

In one of my previous posts, Introduction to Docker for Embedded Software Developers, we started to discuss Docker’s role in embedded software development. Docker provides a mechanism to set up our build environments in a container, making it easier to get new developers up and running. More importantly, Docker allows us to create a portable environment for use in Embedded DevOps like CI/CD. Today’s post will explore setting up the Arm GCC compiler to compile a makefile project for STM32 microcontrollers.
Installing GCC-arm-none-eabi in a Docker Container
The first thing we need to do if we want to set up an Arm build environment in Docker is to create a Dockerfile that sets up our build environment. For this example, I’m just going to use the October 2021 release of the GCC-arm-none-eabi compiler.
Our dockerfile will have four sections:
- The base image we will use
- Installation of support tools
- Installing the GCC-arm-none-eabi compiler and configuring our path
- Setting up our working directory
We will use the latest version of Ubuntu for our base image using the following Docker command:
FROM ubuntu: latest
Next, there are several support tools in Linux that we need to download, unzip, install and configure the Arm compiler. We will install these tools in one RUN command as shown below:
# Download Linux support tools
RUN apt-get update && \
         apt-get clean && \
         apt-get install -y \
             build-essential \
             wget \
             curl
Before we install GCC-arm-none-eabi, we want to specify where to install it. It is common to install it in a directory such as /home/dev. We can do this in our Dockerfile using the following command:
# Set up a development tools directory
WORKDIR /home/dev
ADD . /home/dev
Now, we are ready to install the compiler using the following command:
RUN wget -qO- https://developer.arm.com/-/media/Files/downloads/gnu-rm/10.3-2021.10/gcc-arm-none-eabi-10.3-2021.10-x86_64-linux.tar.bz2 | tar -xj
Note that I am requesting a specific compiler version. When you read this, you may want to update to another version. With the compiler now installed, we want to set up the PATH variable to include the path to the compiler using the following command:
ENV PATH $PATH:/home/dev/gcc-arm-none-eabi-10.3-2021.10/bin
Finally, we can set our working directory for our application code to the /home/app directory as follows:
WORKDIR /home/app
We now have a Dockerfile that is ready to create our Docker image.
Creating and Running the Docker Arm GCC Docker Image
The Docker image is generated using the following command on the terminal command line:
docker build -t beningo/GCC-arm .
The result should look something like the following:
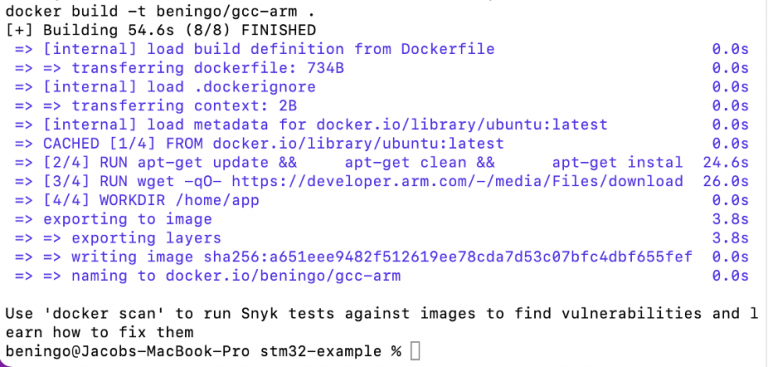
The image can now be started using the following command:
docker run --rm -it --privileged -v "$(PWD):/home/app" beningo/gcc-arm:latest bash
Creating a Test Project
The makefile-based microcontroller project is in the root of the git repository with the dockerfile. You could also create just a few c modules and write your makefile. You could also say forget to make and instead set up cmake or some other build tool. I did something straightforward; I leveraged the STM32 project generator tool STM32CubeMx. I created Blinky and used an STM32L475 IoT Discovery board as my target. (I won’t go into the details since they are beyond the scope and easy to do).
STM32CubeMx allows developers to configure development boards and STM32 microcontroller projects easily. A developer can create a project for various development environments such as make, CubeIDE, Keil, and IAR Embedded Workbench. Then, a developer can just create an STM32 project to test out this environment. The base configuration would be just exemplary. The trick, though, is to set up the project to be makefile-based. The makefile project setting can be found under the Project Manager in the Code Generation section as shown below:
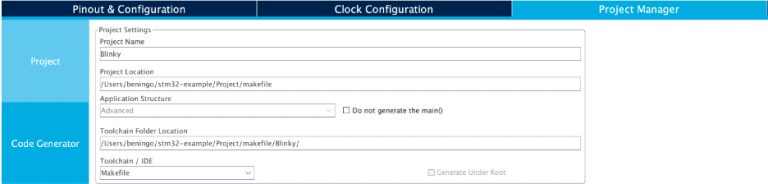
The Toolchain / IDE setting is configured for Makefile. From this point, an example project can be created by just clicking the generate code button. Once done, my repository and project directory looks something like the following:
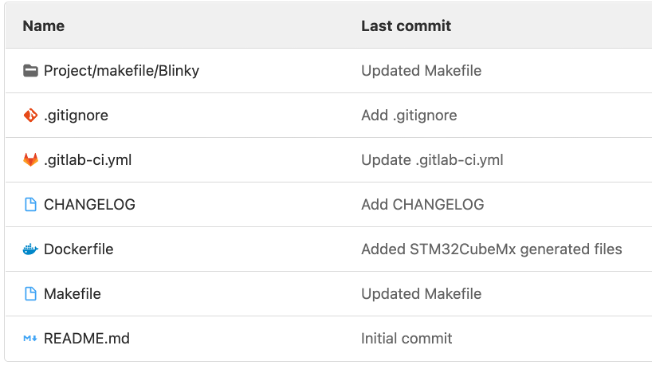
Note, I have a Makefile and a .gitlab-ci.yml file in my directory that you would not have by default. My git repository was set up this way for several reasons, which I’ll discuss in a future blog.
Compiling an STM32 Makefile Project
We now have a Docker container with GCC-arm-none-eabi compiler installed and an example baseline STM32 project. Within the Docker image, we want to navigate to the root directory of our STM32 project. For me, this is done using:
cd Project/makefile/Blinky/
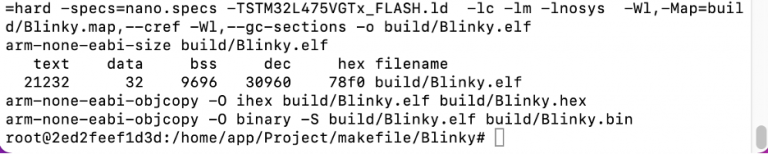
Once I’m in the directory, I can use the STM32 generated make file to compile the project using:
make all
The resultant output should look something like this:
To exit Docker, just type EXIT.
Conclusion
That’s it! We just put together a Docker container with the minimal tools necessary to compile a project for an Arm microcontroller! We saw that we could leverage a microcontroller vendors generator tool to get a makefile-based project up and to run quickly. The reader should easily duplicate what we’ve discussed and start their build environment.


