From AI-Assisted to Agentic Zephyr Development: Build, Flash, Fix
Whether we like it or not, AI-assisted development is here, and it’s only going to become more common. That brings up the question nearly every embedded developer I’ve talked to is asking:
How do I leverage AI-assisted and agentic Zephyr development in embedded systems?
It’s an interesting problem given the wide variety of workflows embedded developers follow. Some work in IDEs. Others work from the command line. We have hardware tools, build systems, debuggers, programmers, and a nearly limitless number of software packages and solutions that make up our development environments.
Embedded development also doesn’t stop when the code compiles. We have to build the application, flash it to a target, interact with real hardware, and figure out what went wrong when something doesn’t work.
In today’s post, we’re going to look at how embedded software developers can use AI-assisted and agentic Zephyr development on the Zephyr real-time operating system with the NXP FRDM-MCXA156 and MCUXpresso for VS Code. I’ll introduce you to the concepts and walk you through how you can leverage your favorite AI tool to build, flash, and fix Zephyr applications running on real hardware.
Let’s dig in!
The AI-Assisted Zephyr Development Stack
When you start working with AI, you quickly discover that there are techniques that get you real results versus generic ones. Yes, you can open an AI application such as Claude Code (Anthropic), Codex (OpenAI), GitHub Copilot in VS Code (Microsoft), or Cursor and just start asking for things, and it will respond. However, the results you get may not fit your project, hardware, or development process.
Before we go further, let’s agree on some terminology. Each of these applications is what’s often called an AI harness. The harness is the application you interact with. It manages the conversation, your project files, and the tools the AI is allowed to use. The harness, in turn, connects to a large language model (LLM) such as Claude Opus, Claude Sonnet, or GPT. The model is the brain; it does the reasoning, planning, and writing. Without a capable model, nothing else in the stack matters. Without a well-configured harness, even the best model is just guessing about your project.
If you want AI to help you set up and write Zephyr applications, you need to understand the AI development stack you build inside your harness. There are four key tools to be aware of: skills, agents, RAG, and MCP.
Skills give your agent specialized instructions and processes to follow. I like to think of them as portable knowledge packages that describe how you want work done. For example, a skill might describe your coding style, naming conventions, how to configure Kconfig, or the steps you follow to diagnose a failed Zephyr build.
Agents use the model to interpret those instructions and act on them. They can plan, iterate, use tools, and take action within a limited scope, such as a single project, or across an entire workspace. I like to think of agents as colleagues or fellow engineers with a short memory. You give them a specification or desired result, and they attempt to make it happen.
Retrieval-Augmented Generation (RAG) grounds the AI in the data that matters to your project. If you are working with an NXP MCX device, you want the AI working from the datasheet, reference manual, errata, example code, and your project documentation. You don’t want it guessing from whatever it picked up from the open web during training.
Model Context Protocol (MCP) connects your AI to external tools and data sources through MCP servers. In other words, MCP servers give your agents hands to interact with the real world! MCP is an open standard that allows AI harnesses to discover and use tools exposed by those servers. That might include file systems, databases, documentation, Git, CI/CD pipelines, draw.io, JIRA, or even development hardware like a logic analyzer.
For embedded developers, this is where things get really interesting. An agent no longer has to tell you how to build, flash, or test your application. Give it access to the right tools, and it can potentially perform those steps itself. The way I view these AI building blocks is like this:
- Skills tell the agent what to do
- Agents use the model to plan the work and carry it out
- RAG gives the agent data to work from
- MCP servers give the agent hands to interact with software, hardware, and data
As you start leveraging AI to develop Zephyr applications, you’ll find that using these pieces properly can dramatically improve the results you get. The question then becomes how much of the development process you want AI to control.
That brings us to two different approaches: an AI-assisted workflow where the developer remains in the loop, and an agentic workflow where AI can build, flash, test, and fix the application with much less human intervention. Both workflows use the same AI tools, including agents. The difference is how much of the development loop you let the agent own.
Two AI Development Workflows
The AI development building blocks we just discussed can be combined to create two fundamentally different workflows for AI-assisted and agentic Zephyr development. Let’s look at each one in more detail before we set up our development environment and put them into practice.
Workflow 1: AI-Assisted Development
The first workflow is one that many developers experimenting with AI are already using today: AI-assisted development. In this workflow, the developer remains in control of the development process and uses AI to accelerate individual tasks.
Most AI harnesses support this style of work directly. GitHub Copilot in VS Code, Claude Code, and similar tools offer modes, such as Ask, Plan, and Agent (the names vary by tool). In Ask or Plan mode, the AI can answer questions, research your project, or propose a step-by-step plan without changing anything. When you’re ready, you let the agent act. In an AI-assisted workflow, you’re still using an agent; you’re just keeping it on a short leash and deciding when it gets to act.
For example, you might ask your AI tool to add the Zephyr shell to USART1 on the FRDM-MCXA156. The agent can use your skills, project documentation, and other available context to propose and generate the application. If you’re using the Zephyr AI Skills, your AI would call those skills to analyze the Zephyr devicetree, add and verify the correct entries. You would then review the result and use MCUXpresso for VS Code to build and flash the application to the board.
At that point, you are still responsible for determining whether the application works, so pull out your favorite debugger and get to work!
If the build fails, you might copy the compiler output into your AI tool and ask it to diagnose the problem. If the application builds but doesn’t work correctly on the hardware, you might provide the serial output, debugger results, or other observations and ask AI to help determine what went wrong. You then decide whether to accept the suggested changes, make the changes yourself, or take a completely different approach.
The workflow looks something like this:
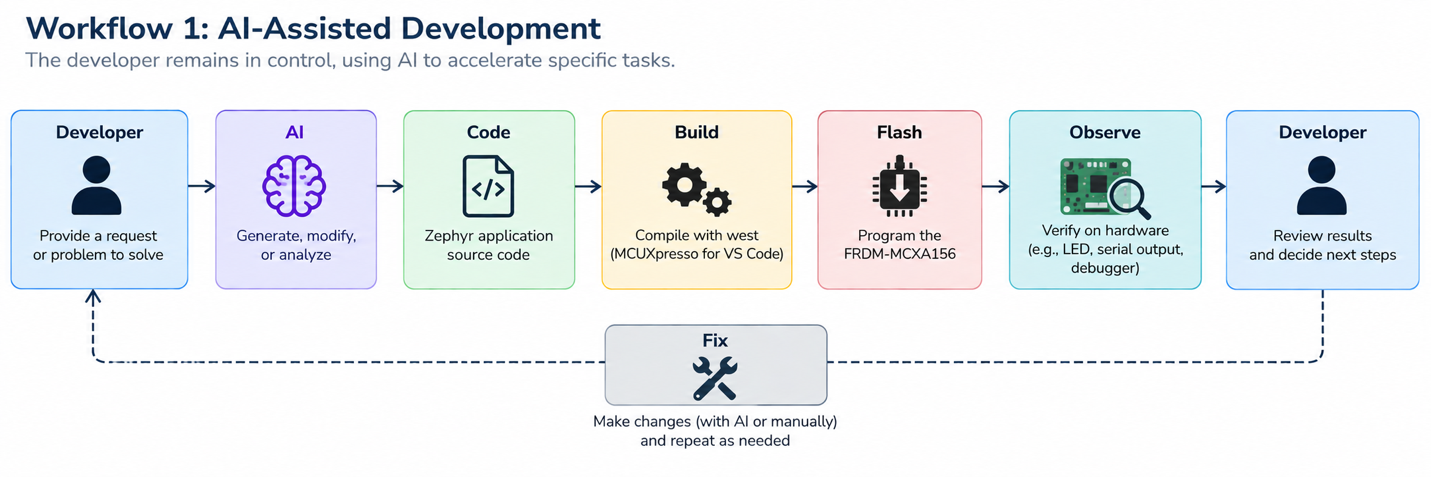
The key point is that the developer controls each step and decides when and how to use AI. The agent might write code, analyze an error, tune Kconfig, or help diagnose a devicetree problem, but the developer remains responsible for moving the application through the build, flash, and test cycle.
This approach gives developers an easy way to start incorporating AI into an existing Zephyr workflow without handing the entire development process over to an agent. However, handing that control over to AI is where things might be the most interesting!
Workflow 2: Agentic Development
The second workflow uses the same development cycle but starts removing manual handoffs. This is the shape agentic Zephyr development takes in practice.
Instead of asking AI to generate code, reviewing it, building it yourself, flashing the board, and then bringing the results back to the AI, you give an agent a desired outcome and let it work through the development loop.
For example, you might ask:
Build me a Zephyr application for the FRDM-MCXA156 that samples a temperature sensor on I2C1 at 1 Hz and turns on a red LED if the temperature exceeds a preconfigured threshold. Build the application, flash it to the board, verify that it works, and fix any problems you encounter.
The agent can then use its available tools to generate or modify the code, run the build, flash the target, observe the results, diagnose failures, and iterate until the application works.
The workflow looks something like this:
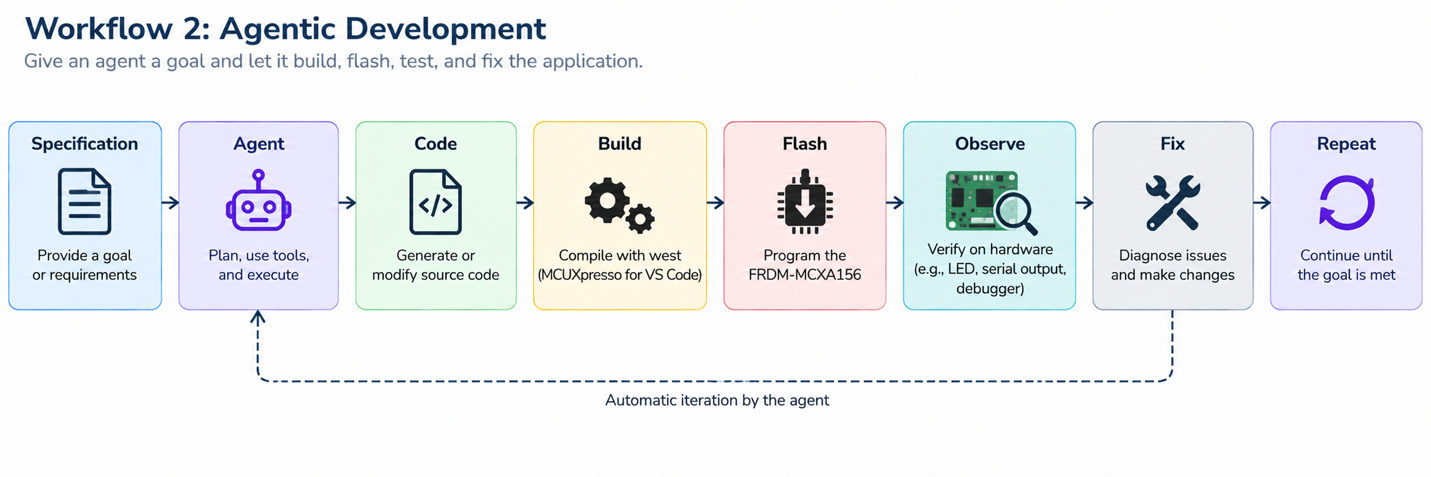
This is where the AI development stack we discussed earlier starts to come together. Skills can provide the engineering processes the agent should follow. RAG can give it access to the correct Zephyr, board, and processor documentation. MCP servers and other tools can provide access to the build system, debugger, serial port, test equipment, and potentially the hardware itself.
The developer is still responsible for defining the requirements and deciding how much authority the agent should have. You might allow the agent to build and analyze errors automatically but require approval before flashing hardware. Or you might allow the entire build, flash, test, and fix cycle to run autonomously.
The important point is that agentic Zephyr development is not necessarily a completely different development process. It is often the same development loop, with more of the handoffs automated.
Setting Up the Development Environment
Before we let AI start writing code, running builds, or flashing hardware, we need to make sure our development environment works without it. If you can’t manually build, flash, and verify an application, adding AI to the mix will just give you another variable to debug.
For this post, I’m using the NXP FRDM-MCXA156 development board with Zephyr and MCUXpresso for VS Code. The exact tools you use aren’t that important. You can apply the same techniques to other development boards, IDEs, and AI tools. (To be honest though, I’ve found this toolchain has worked really well for me!)
The first thing I want is a known-good development loop:
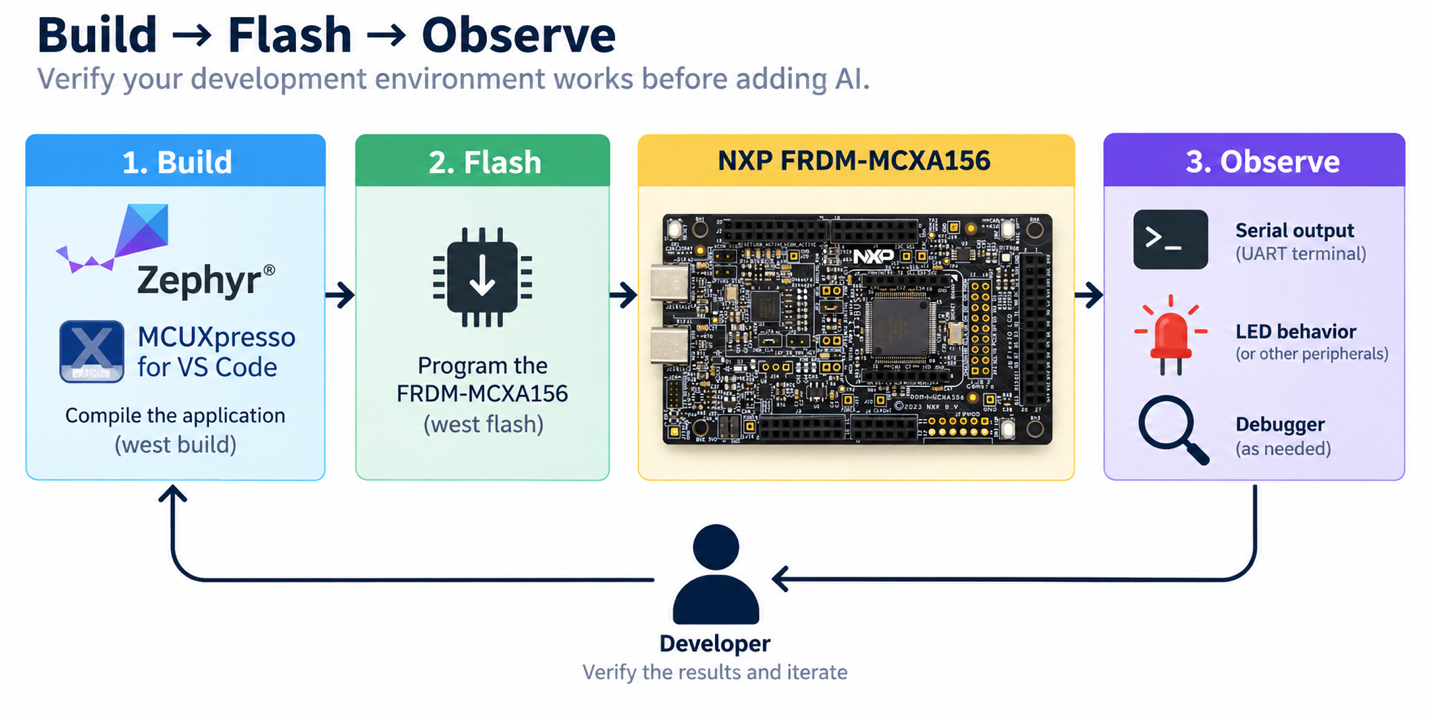
I should be able to build a Zephyr application, flash it to the FRDM-MCXA156, and observe its behavior through an LED, serial terminal, debugger, or other hardware interface. Once that works manually, we have a baseline that AI can start helping us automate.
Adding AI to the Development Environment
The next step is to give our AI harness access to the Zephyr project. I’m using Claude Code for the examples in this article, but you could use GitHub Copilot in VS Code, Codex, or another harness that can work directly with your project files. (I’m also a big fan of the open source models, but you need to have a pretty good GPU to run the more advanced models).
Since this post already uses MCUXpresso for VS Code, it’s worth noting that you don’t have to leave VS Code to work this way. Claude Code runs inside VS Code through its extension, so the agent, the project, and the MCUXpresso build and debug tools can live in the same window. If you prefer GitHub Copilot, the same skills and MCP servers work in VS Code’s Agent mode, and Copilot lets you bring your own API key to use models such as Claude. The concepts in this post apply either way. (I’ll dig into the differences between these harnesses in a future post.)
At the simplest level, the harness needs access to a model, and the agent needs to be able to read and modify the project. You can test this with a simple prompt such as:
Examine this Zephyr project. What board does it target, and what does the application do?
At this point, we haven’t given AI control of anything. We’ve simply given it access to the project and verified that it understands what we’re working with.
Adding Zephyr Skills and Project Knowledge
This is also where the AI development stack we discussed earlier starts to become useful. Rather than relying entirely on the AI’s general knowledge, I can give it skills that describe how I want specific Zephyr development tasks performed.
For example, I’ve developed several Zephyr skills that I’ve discussed in previous articles:
- build-doctor helps diagnose Zephyr build failures.
- kconfig-tuner helps analyze and modify Kconfig settings.
- devicetree-author helps create and modify Zephyr devicetree configurations.
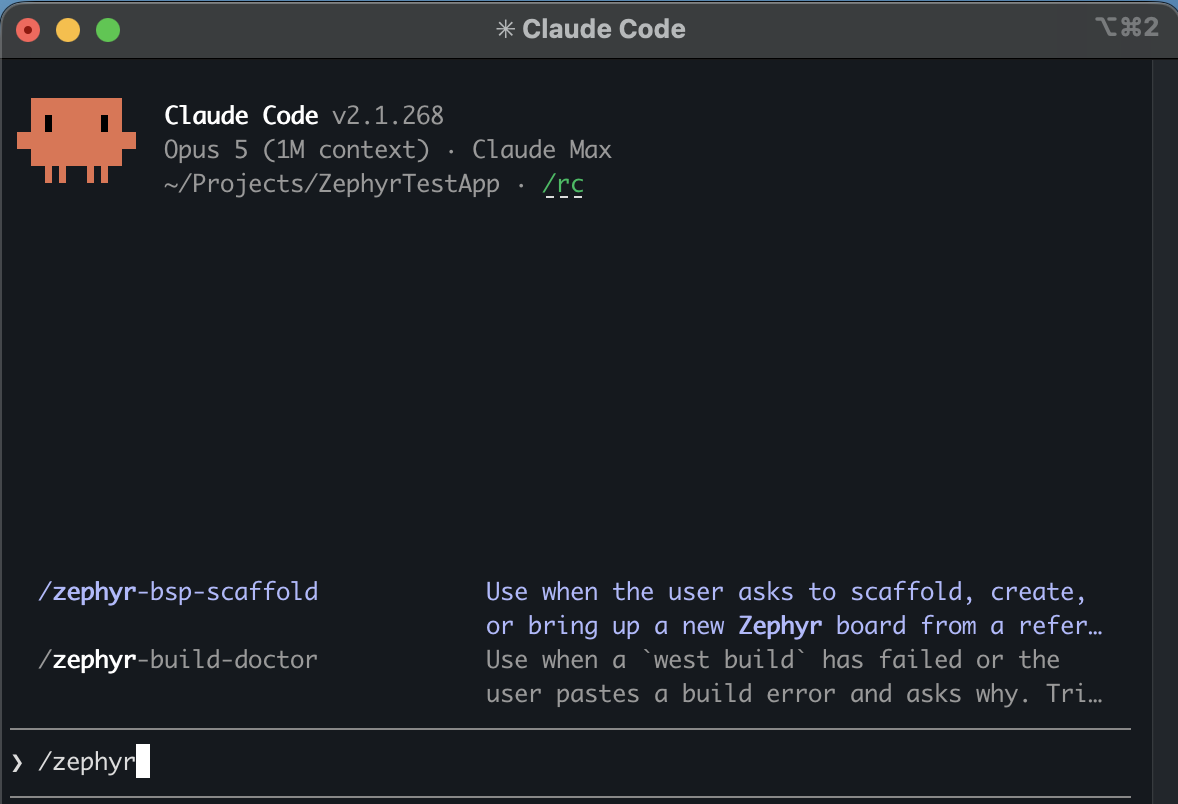
Installing a skill is straightforward. A skill is typically a folder containing a SKILL.md file that you place in your project (for example, .claude/skills for Claude Code or .github/skills for GitHub Copilot) or in your user-level configuration so it’s available across projects. Once a skill is installed, verify that the agent can actually see it. In Claude Code, you can simply ask it which skills it has available. In VS Code, the Chat view’s Configure Tools menu shows which tools and MCP servers are enabled for the session. Before relying on a skill, make sure it’s actually in play for the prompt you’re about to run.
We can also give the AI access to project requirements, processor documentation, board documentation, and other reference material through RAG or other context mechanisms.
NXP has also started building this part of the stack for you. It recently released agentic AI support for its development tools as an experimental beta. For Zephyr developers working with MCX devices, two pieces stand out:
- MCUXpresso for VS Code AI support. Adds Zephyr project skills and MCUXpresso SDK project skills to the extension, along with VS Code Agent and Copilot views, so the agent works directly with the same project and build tools used in this post. It’s enabled through the extension settings and requires MCUXpresso Installer 26.09 or later. (Getting started guide)
- MCP Server for Documentation. A hosted MCP server that brings up-to-date NXP documentation into your agent, with answers grounded in the source material. It works with MCP-capable harnesses, and NXP has tested it with GitHub Copilot, Claude Code, and Kiro. You’ll need an NXP account to connect. In other words, it gives you the RAG piece of the stack without having to build it yourself. (Getting started guide)
NXP’s skills don’t replace your own. NXP’s skills capture how its tools and SDK expect projects to be built, while your skills capture how your team develops software. You’ll get the best results using both. NXP is also rolling out similar support for S32 Design Studio, FreeMASTER, and its Model-Based Design Toolbox. You can find all of it on NXP’s Agentic AI Development page.
The result is an AI that isn’t starting from scratch every time we ask it to do something. We’ve given it our development processes and access to the information it needs to make better decisions.
Deciding What AI Can Control
The final setup step is deciding which parts of the development environment we want AI to control. This is where our two workflows begin to diverge.
In an AI-assisted workflow, I might allow AI to read the project, modify source code, and analyze build errors. I remain responsible for building the application, flashing the board, observing its behavior, and deciding what happens next.
In an agentic workflow, I can give the agent access to more of the toolchain. It might be allowed to modify the project, invoke west to build it, flash the FRDM-MCXA156, read the serial output, diagnose failures, make corrections, and repeat the process.
The underlying development environment hasn’t changed. What has changed is how much of that environment we’ve made available to the AI.
With our development environment working and our AI tools in place, we’re ready to put these workflows to the test. Let’s start with the AI-assisted approach and see what it takes to build, flash, and fix a Zephyr application.
Building, Flashing, and Fixing with AI
Now that our development environment is configured, let’s put the AI-assisted workflow into practice. For this first example, I’m going to keep control of the development loop. AI can help me write and fix the application, but I’ll decide when to build, flash, and test the software.
For the application, I’m going to use the MIKROE Temp&Hum 24 Click (MIKROE-5651) connected to the FRDM-MCXA156. The Click board contains a temperature and humidity sensor that we’ll communicate with over I2C.
I’ll start by giving the AI the following prompt:
Create a Zephyr application for the FRDM-MCXA156 that interfaces with the MIKROE Temp&Hum 24 Click (MIKROE-5651). Read the temperature and relative humidity once per second and print the measurements to the console. Use the available Zephyr development skills where appropriate.
This is intentionally a fairly high-level request. I’m telling the AI what I want the application to do, but I’m not telling it which I2C peripheral to use, how to configure the devicetree, which Kconfig options are required, or how to communicate with the sensor.
Because I’ve already added my Zephyr skills to the development environment, I also don’t need to tell the AI exactly how to handle every Zephyr-specific task. It can use skills such as devicetree-author, kconfig-tuner, and build-doctor when appropriate.
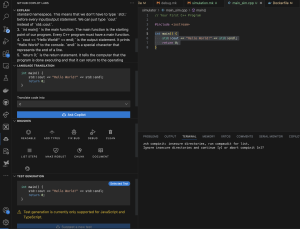
AI has become quite resourceful. Check out some of the output that I received from Claude Code:
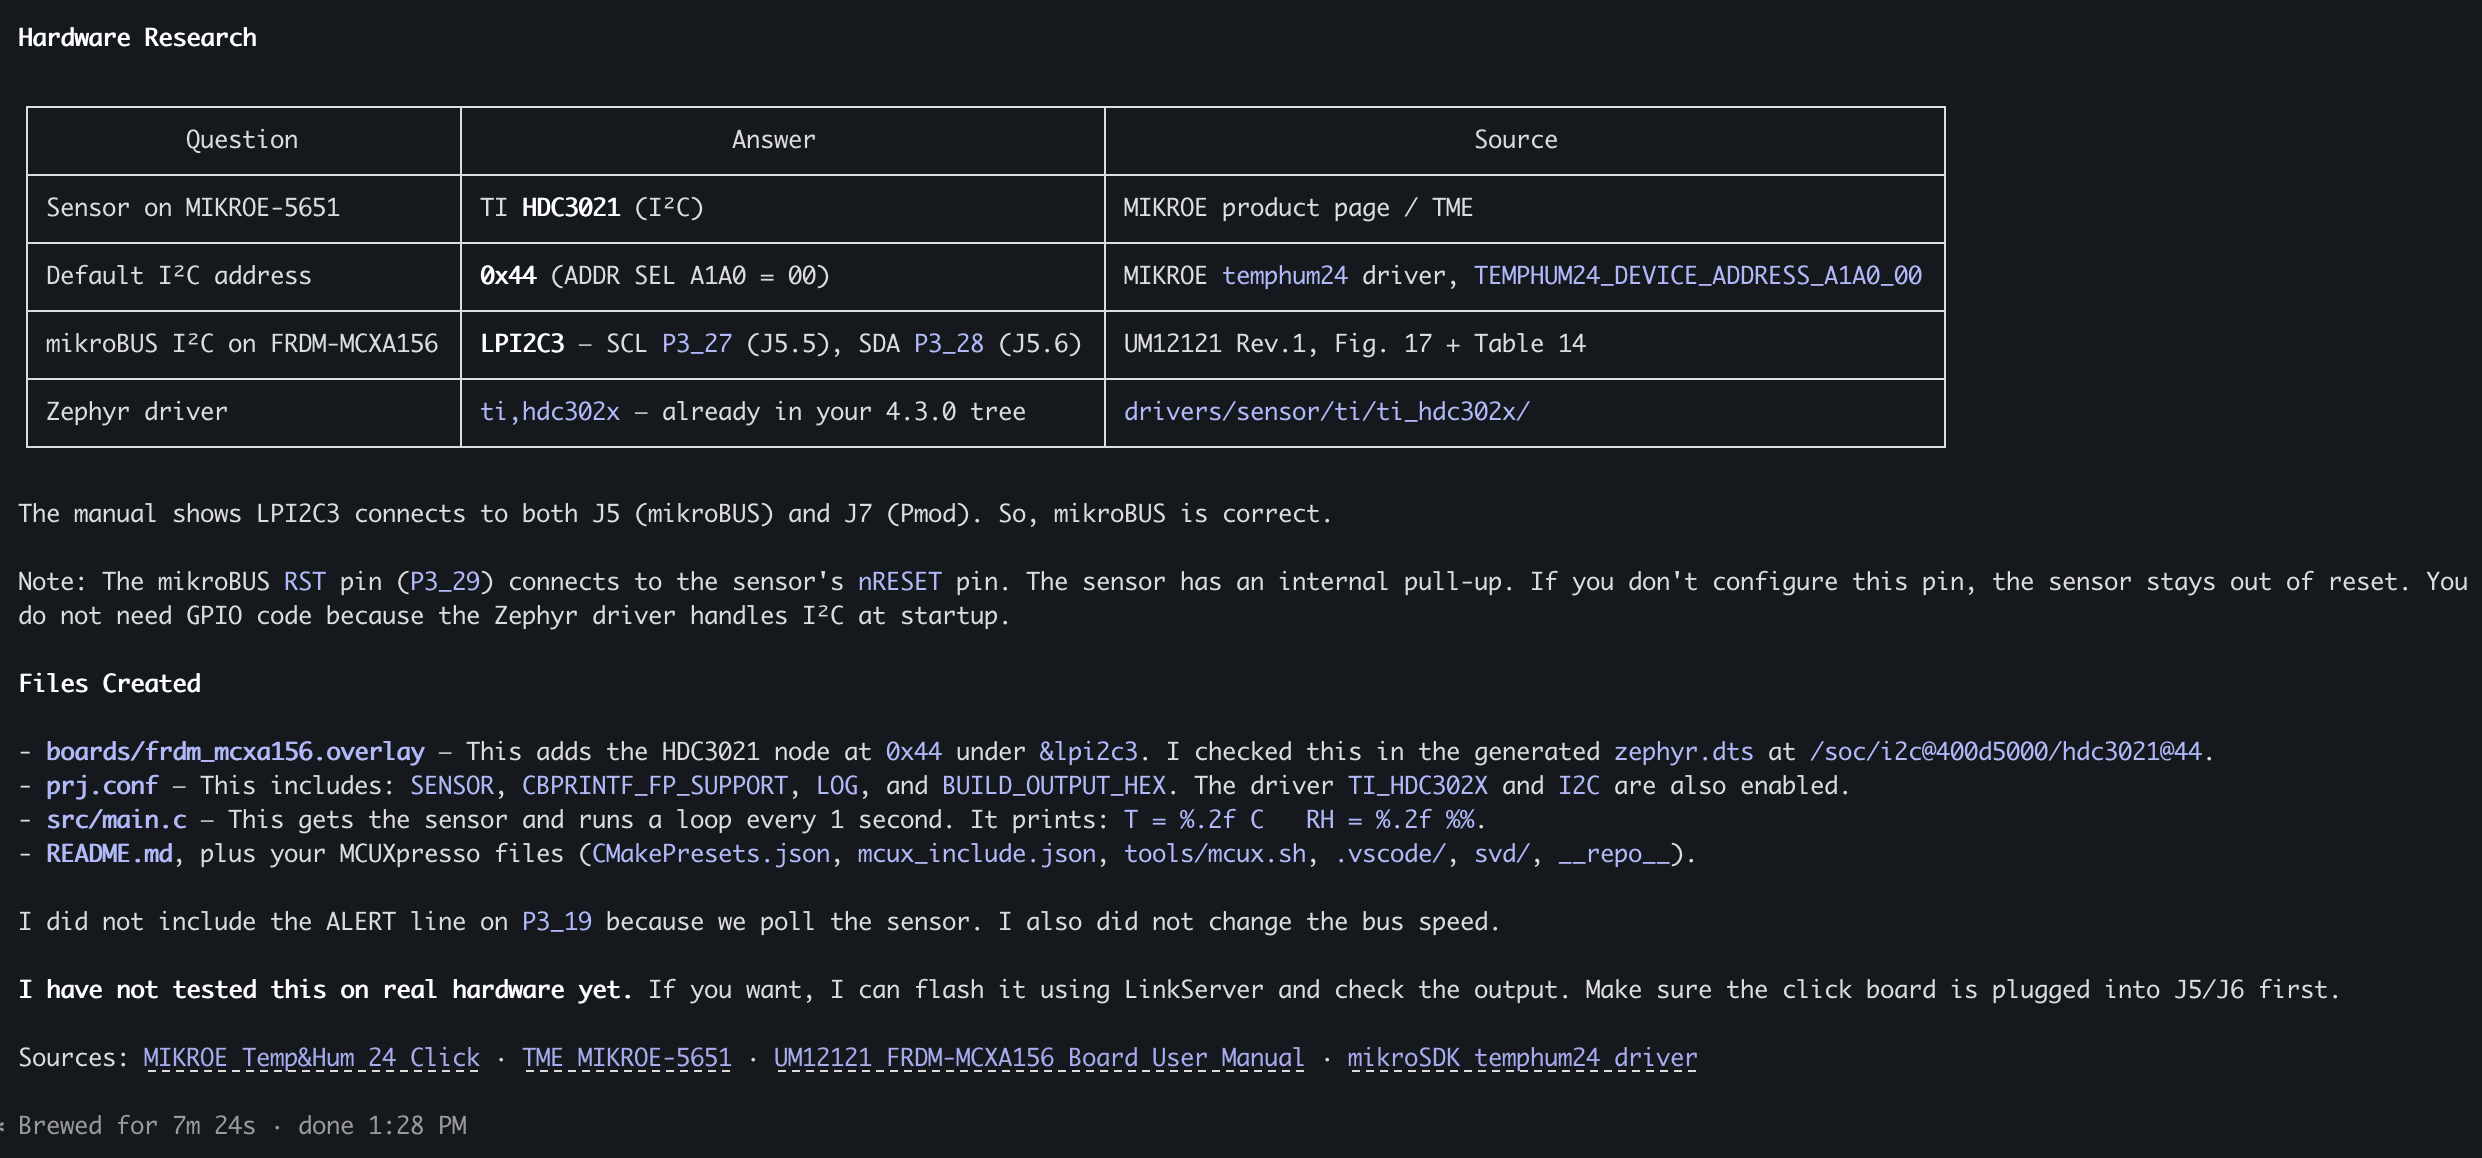
There are a few important things worth pointing out here:
- AI did the background research. It investigated the sensor, the buses, pins, and other information it needed rather than requiring me to provide everything in the prompt.
- It cited its sources. That doesn’t guarantee the implementation is correct, but it gives us a way to verify where the information came from and whether the AI interpreted it correctly.
- It told us what it created. Rather than simply dumping code into the project, it summarized the changes it made and how the application was configured.
Now, I intentionally kept the requirements loose. Since this is a Zephyr application, we probably should have specified that the application be event-driven, along with several other architectural and coding requirements.
For this experiment, though, that’s not the point. I want to see how far AI can get from a relatively simple requirement, where it struggles, and what happens when we put its code on real hardware.
Build
Once the AI finishes creating the application, I’ll review the changes before doing anything with the hardware. This is an important part of the AI-assisted workflow. AI can write the code, but I’m still responsible for deciding whether I’m comfortable building and running it.
Below is a snippet of the main application the AI came up with. If I wasn’t happy with the results, I could provide feedback or use my own brain to make adjustments, then build the application.
/*
 * MIKROE Temp&Hum 24 Click (MIKROE-5651) on the NXP FRDM-MCXA156.
 *
 * The click carries a TI HDC3021 temperature/relative-humidity sensor, driven
 * here through Zephyr's ti,hdc302x driver over LPI2C3, the FRDM-MCXA156
 * mikroBUS socket bus (J5.5 = P3_27 SCL, J5.6 = P3_28 SDA).
 *
 * Samples both channels once per second and prints them on the console
 * (LPUART0 / MCU-Link VCOM, 115200 8N1).
 *
 * SPDX-License-Identifier: Apache-2.0
 */

#include <zephyr/kernel.h>
#include <zephyr/device.h>
#include <zephyr/drivers/sensor.h>
#include <zephyr/sys/printk.h>

#define SAMPLE_PERIOD_MS 1000U

/*
 * Resolves to the single enabled "ti,hdc302x" node, see
 * boards/frdm_mcxa156.overlay. A build error here means the overlay was not
 * picked up (check that the board name in the file name matches BOARD).
 */
static const struct device *const hdc3021 = DEVICE_DT_GET_ONE(ti_hdc302x);

int main(void)
{
    int64_t next_sample;
    uint32_t count = 0U;

    printk("\n*** FRDM-MCXA156 + Temp&Hum 24 Click (HDC3021) ***\n");
    printk("Board: %s\n", CONFIG_BOARD_TARGET);
    printk("Sensor: %s on %s @ 0x%02x\n", hdc3021->name,
           DEVICE_DT_NAME(DT_BUS(DT_NODELABEL(hdc3021))),
           DT_REG_ADDR(DT_NODELABEL(hdc3021)));

    if (!device_is_ready(hdc3021)) {
        printk("Error: %s is not ready. Is the click board seated in the "
               "mikroBUS socket, and are the ADDR SEL jumpers set to 0?\n",
               hdc3021->name);
        return -ENODEV;
    }

    /*
     * Schedule against an absolute deadline rather than sleeping a fixed
     * 1000 ms after each read, so the I2C transaction time does not make
     * the sample period drift.
     */
    next_sample = k_uptime_get();

    while (1) {
        struct sensor_value temp;
        struct sensor_value humidity;
        int ret;

        next_sample += SAMPLE_PERIOD_MS;

        /*
         * The driver triggers a one-shot conversion of both channels;
         * it requires SENSOR_CHAN_ALL, which sensor_sample_fetch() passes.
         */
        ret = sensor_sample_fetch(hdc3021);
        if (ret < 0) {
            printk("Error %d: sample fetch failed\n", ret);
            goto wait;
        }

        ret = sensor_channel_get(hdc3021, SENSOR_CHAN_AMBIENT_TEMP, &temp);
        if (ret < 0) {
            printk("Error %d: temperature read failed\n", ret);
            goto wait;
        }

        ret = sensor_channel_get(hdc3021, SENSOR_CHAN_HUMIDITY, &humidity);
        if (ret < 0) {
            printk("Error %d: humidity read failed\n", ret);
            goto wait;
        }

        printk("[%u] T = %.2f C   RH = %.2f %%\n", count++,
               sensor_value_to_double(&temp),
               sensor_value_to_double(&humidity));

wait:
        k_sleep(K_TIMEOUT_ABS_MS(next_sample));
    }

    return 0;
}There’s quite a bit I could review here. The AI chose Zephyr’s existing HDC302x sensor driver rather than writing its own driver. It also used the devicetree to obtain the sensor device, checked that the device was ready, handled errors from the sensor API, and used an absolute deadline to keep the one-second sampling period from drifting. Most harnesses make this review easy. Both Claude Code and GitHub Copilot in VS Code show you a diff of every file the agent changed, so you can see exactly what was modified before accepting it.
But compiling code is a much faster test than staring at it.
Next, I’ll build the application using MCUXpresso for VS Code. You can see in the image below the button I clicked to build the application along with the build results.
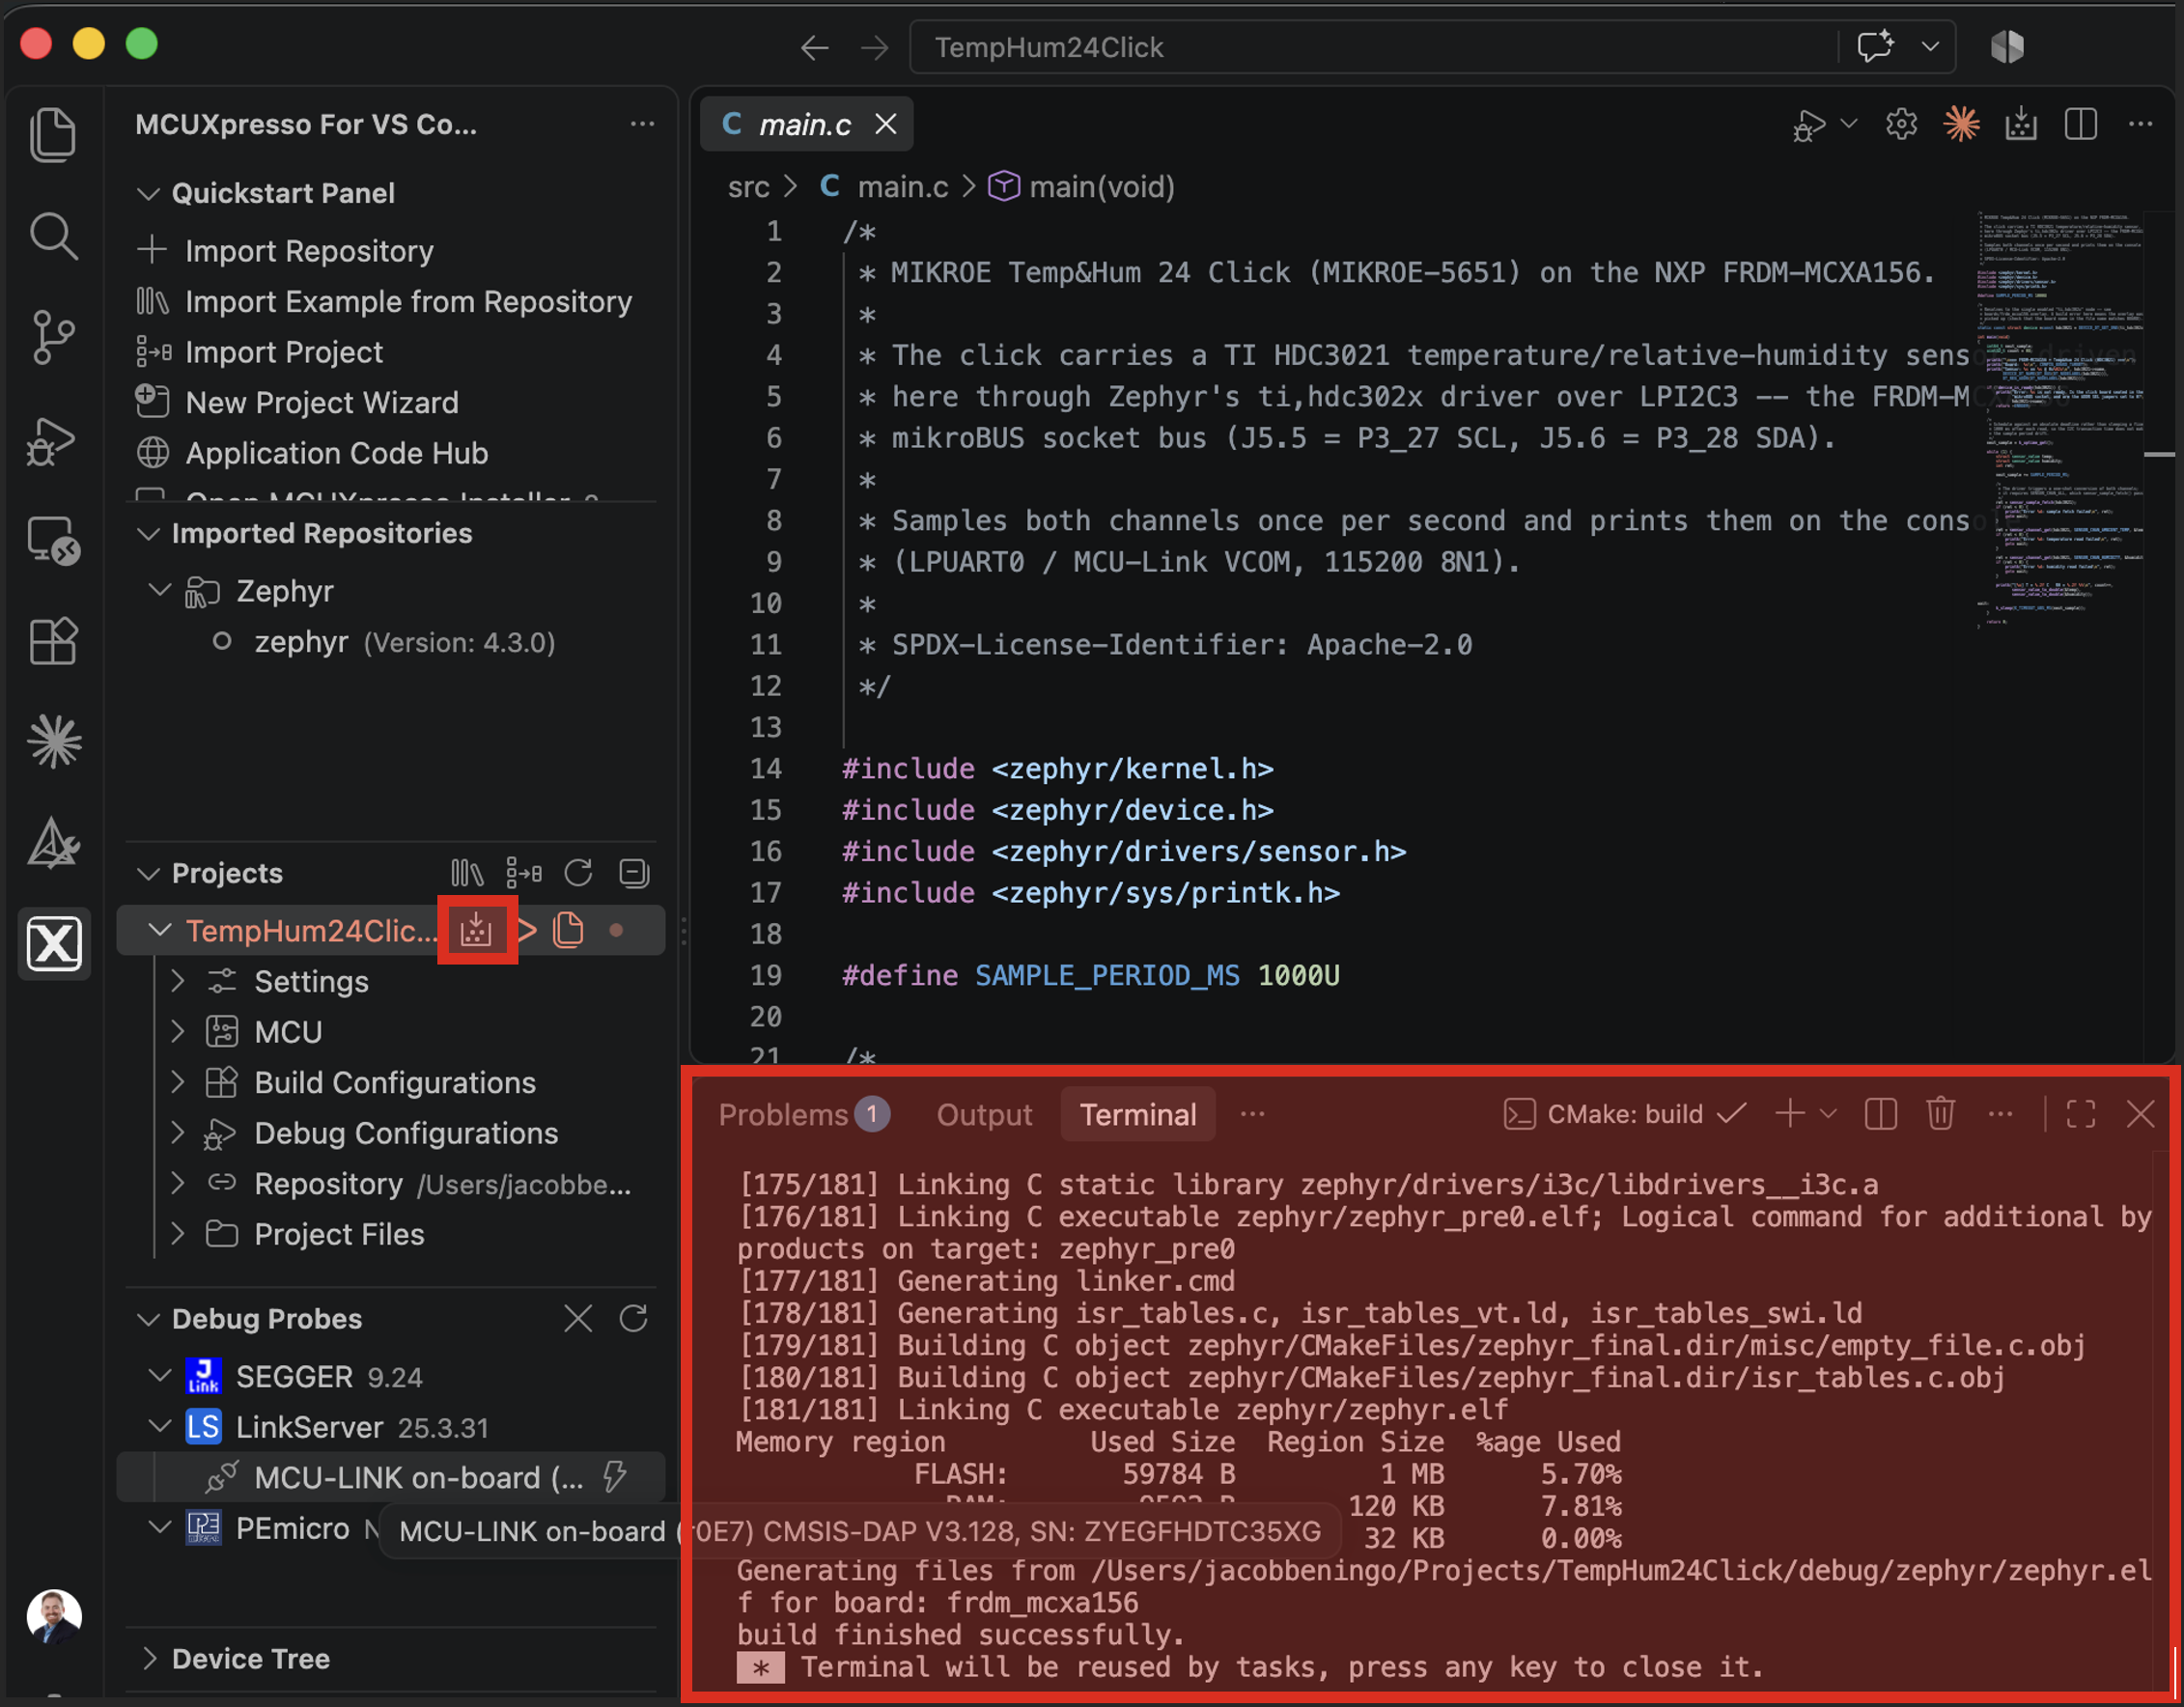
It compiles just fine. I can also build the same application from the command line using west.
That’s a good first result, but all we’ve proven so far is that the application builds. We haven’t proven that the devicetree configuration matches the hardware, that we’re communicating with the sensor, or that the application actually works.
If the build had failed, this would also be our first opportunity to bring AI back into the loop. Instead of manually digging through the build output, I could ask the AI to diagnose the failure. Since it has access to the project and our Zephyr skills, it can inspect the source code, devicetree, Kconfig configuration, and build output to determine what went wrong.
The AI could then propose or make a correction. I would review the changes and build again.
In this case, though, we don’t need to fix anything yet.
It’s time to put the code on the hardware.
Flash
Now that the application built successfully, I can program it to the FRDM-MCXA156 by clicking the play button in MCUXpresso for VS Code under the Projects menu. You just need to place your cursor over the project and the option to debug will be displayed.
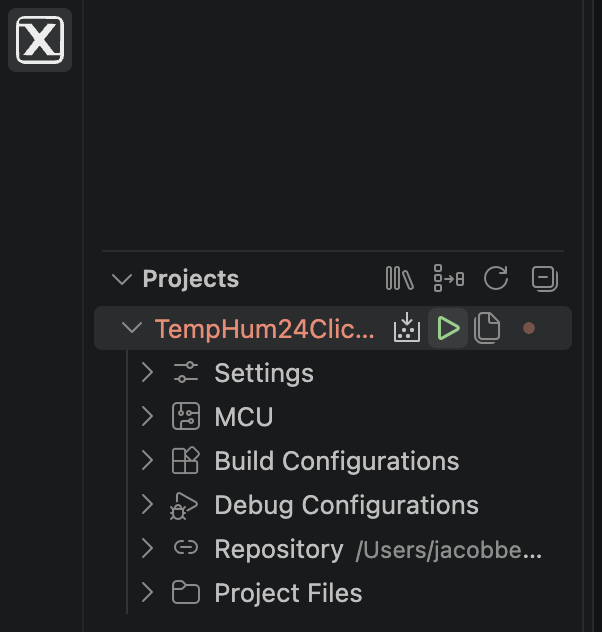
Again, notice that the AI isn’t controlling this step. I decide when the application is ready to be programmed onto the hardware.
A successful build and flash, however, doesn’t mean the application actually works.
Observe and Fix
Now we need to look at the serial output from the board. If everything is working correctly, we should see temperature and relative humidity measurements appearing approximately once per second:
Temperature: 22.8 C
Humidity: 43.6 %
That’s not what happened.
The application built and flashed successfully, but when I opened the serial console, this is what I saw:
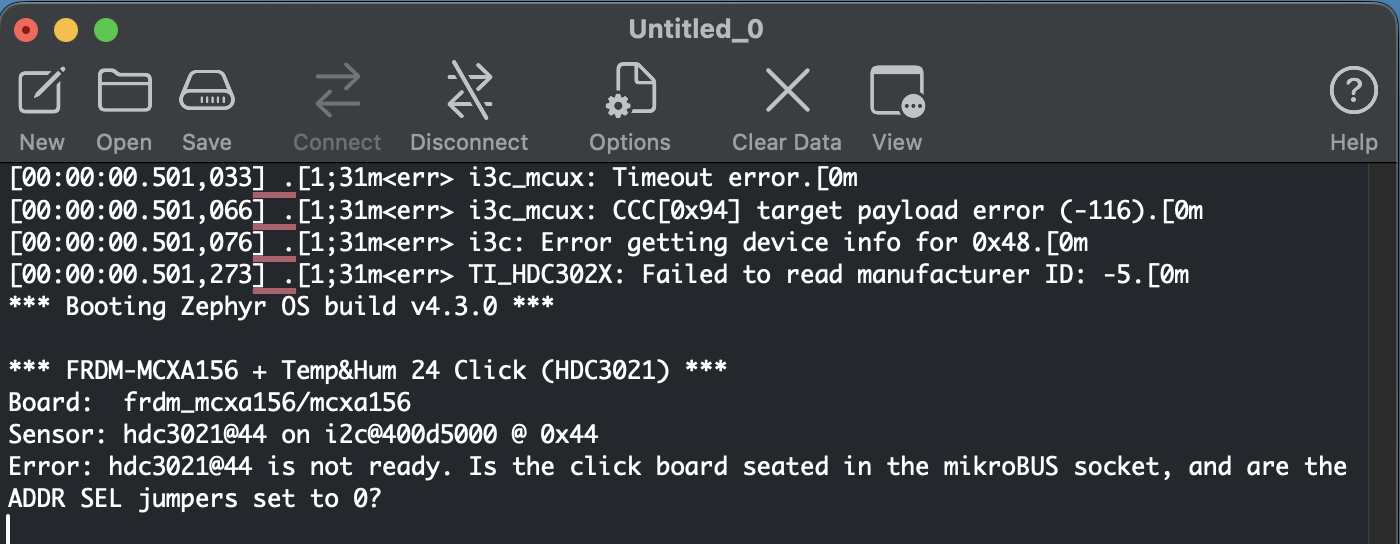
This is where AI-assisted development gets interesting. The compiler was happy, but something is clearly wrong when the application runs on the actual hardware.
I can take that observation back to the AI and ask it to investigate. The AI can inspect the project again, use the available Zephyr skills, and determine what should change. I can then review its fix, rebuild the application, flash it again, and observe the results.
Our development loop has now become:
At every step, I’m still moving the application through that loop. The AI is helping me write code and diagnose problems, but I’m deciding when to build, when to flash the hardware, whether the observed behavior is correct, and whether to accept its changes.
That’s AI-assisted development.
But there’s something interesting about this particular example. Our application reports its results over the serial console. If an AI agent could build the application, flash the board, and read that console itself, there isn’t much stopping it from moving through this loop without me.
That’s what we’ll try next. We’ll give an agent access to our development environment and see whether it can diagnose and fix the problem without me moving it through each step.
Closing the Loop with an Agent
So far, AI has helped us create the application, but I’ve been responsible for moving it through the development loop. I built the application, flashed the board, opened the serial terminal, observed the failure, and decided what to do next.
Now let’s remove me from that loop. This is where agentic Zephyr development earns the name.
I’m going to give the agent access to the same project that just failed on the hardware. This time, though, I’ll allow it to use the development tools available in our environment, including a serial port MCP server. That gives the agent something it didn’t have in our first workflow: the ability to observe the application running on the hardware itself.
I’ll give it the following prompt:
The Zephyr application in this project builds and flashes successfully, but it does not work correctly on the FRDM-MCXA156 hardware.
Diagnose and fix the problem. Use the available Zephyr skills where appropriate. You may build the application, flash the FRDM-MCXA156, and use the serial port MCP server to observe the application’s output.
Iterate through the build → flash → observe → fix loop until the application correctly reads temperature and relative humidity from the MIKROE Temp&Hum 24 Click once per second.
Do not assume that a successful build or flash means the problem is fixed. Verify the final result using the serial output from the running hardware.
When you are finished, report:
1. What failed.
2. The root cause of the failure.
3. What changes you made to fix it.
4. How you verified the fix on the hardware.
5. How this type of failure can be prevented in the future.
Finally, create a ROOT_CAUSE_ANALYSIS.md file in the project containing the root cause analysis, corrective action, verification results, and recommended preventive actions.
That’s a very different assignment from the one we gave AI earlier.
I’m no longer asking it to write some code and hand control back to me. I’m giving it a desired outcome and access to the tools necessary to determine whether that outcome has actually been achieved.
The agent can inspect the serial output, investigate the failure, modify the project, rebuild the application, flash the board, and check the serial output again. If the application still doesn’t work, it can repeat the process.
In other words, we’ve closed the loop:
The serial port MCP server is especially important here. Without it, the agent could determine that the application compiled and that the board was successfully programmed, but it would still need me to tell it what happened next. By giving the agent access to the application’s serial output, it gets feedback directly from the running system.
That doesn’t mean we’re giving AI unlimited control. The agent is operating within a development environment and with the tools we’ve explicitly made available to it. We’re deciding the boundaries; the agent is handling the iterations within them.
What Did the Agent Find?
After letting the agent work through the problem, it came to an interesting conclusion: there’s something wrong with the hardware!
Now, this is a familiar blame game that often occurs between firmware and hardware engineers. So, I laughed, until I looked at my Click board and found I installed it backward. Apparently, when it’s installed correctly, a green LED lights up.
Once I had the board installed properly, it turned out that there were still software errors. The first samples returned were:
Temperature: -45.00 C
Humidity: 0.0 %
Basically, the sensor was just returning 0x0000.
Because the AI had been put into its own feedback loop, it went to work diagnosing the problem. It eventually identified a timing issue in the driver. The driver requested a measurement and then immediately tried to read the result without waiting for the sensor to finish the conversion. The sensor returned stale data that looked valid to the driver.
The agent then worked through several attempts to fix the timing:
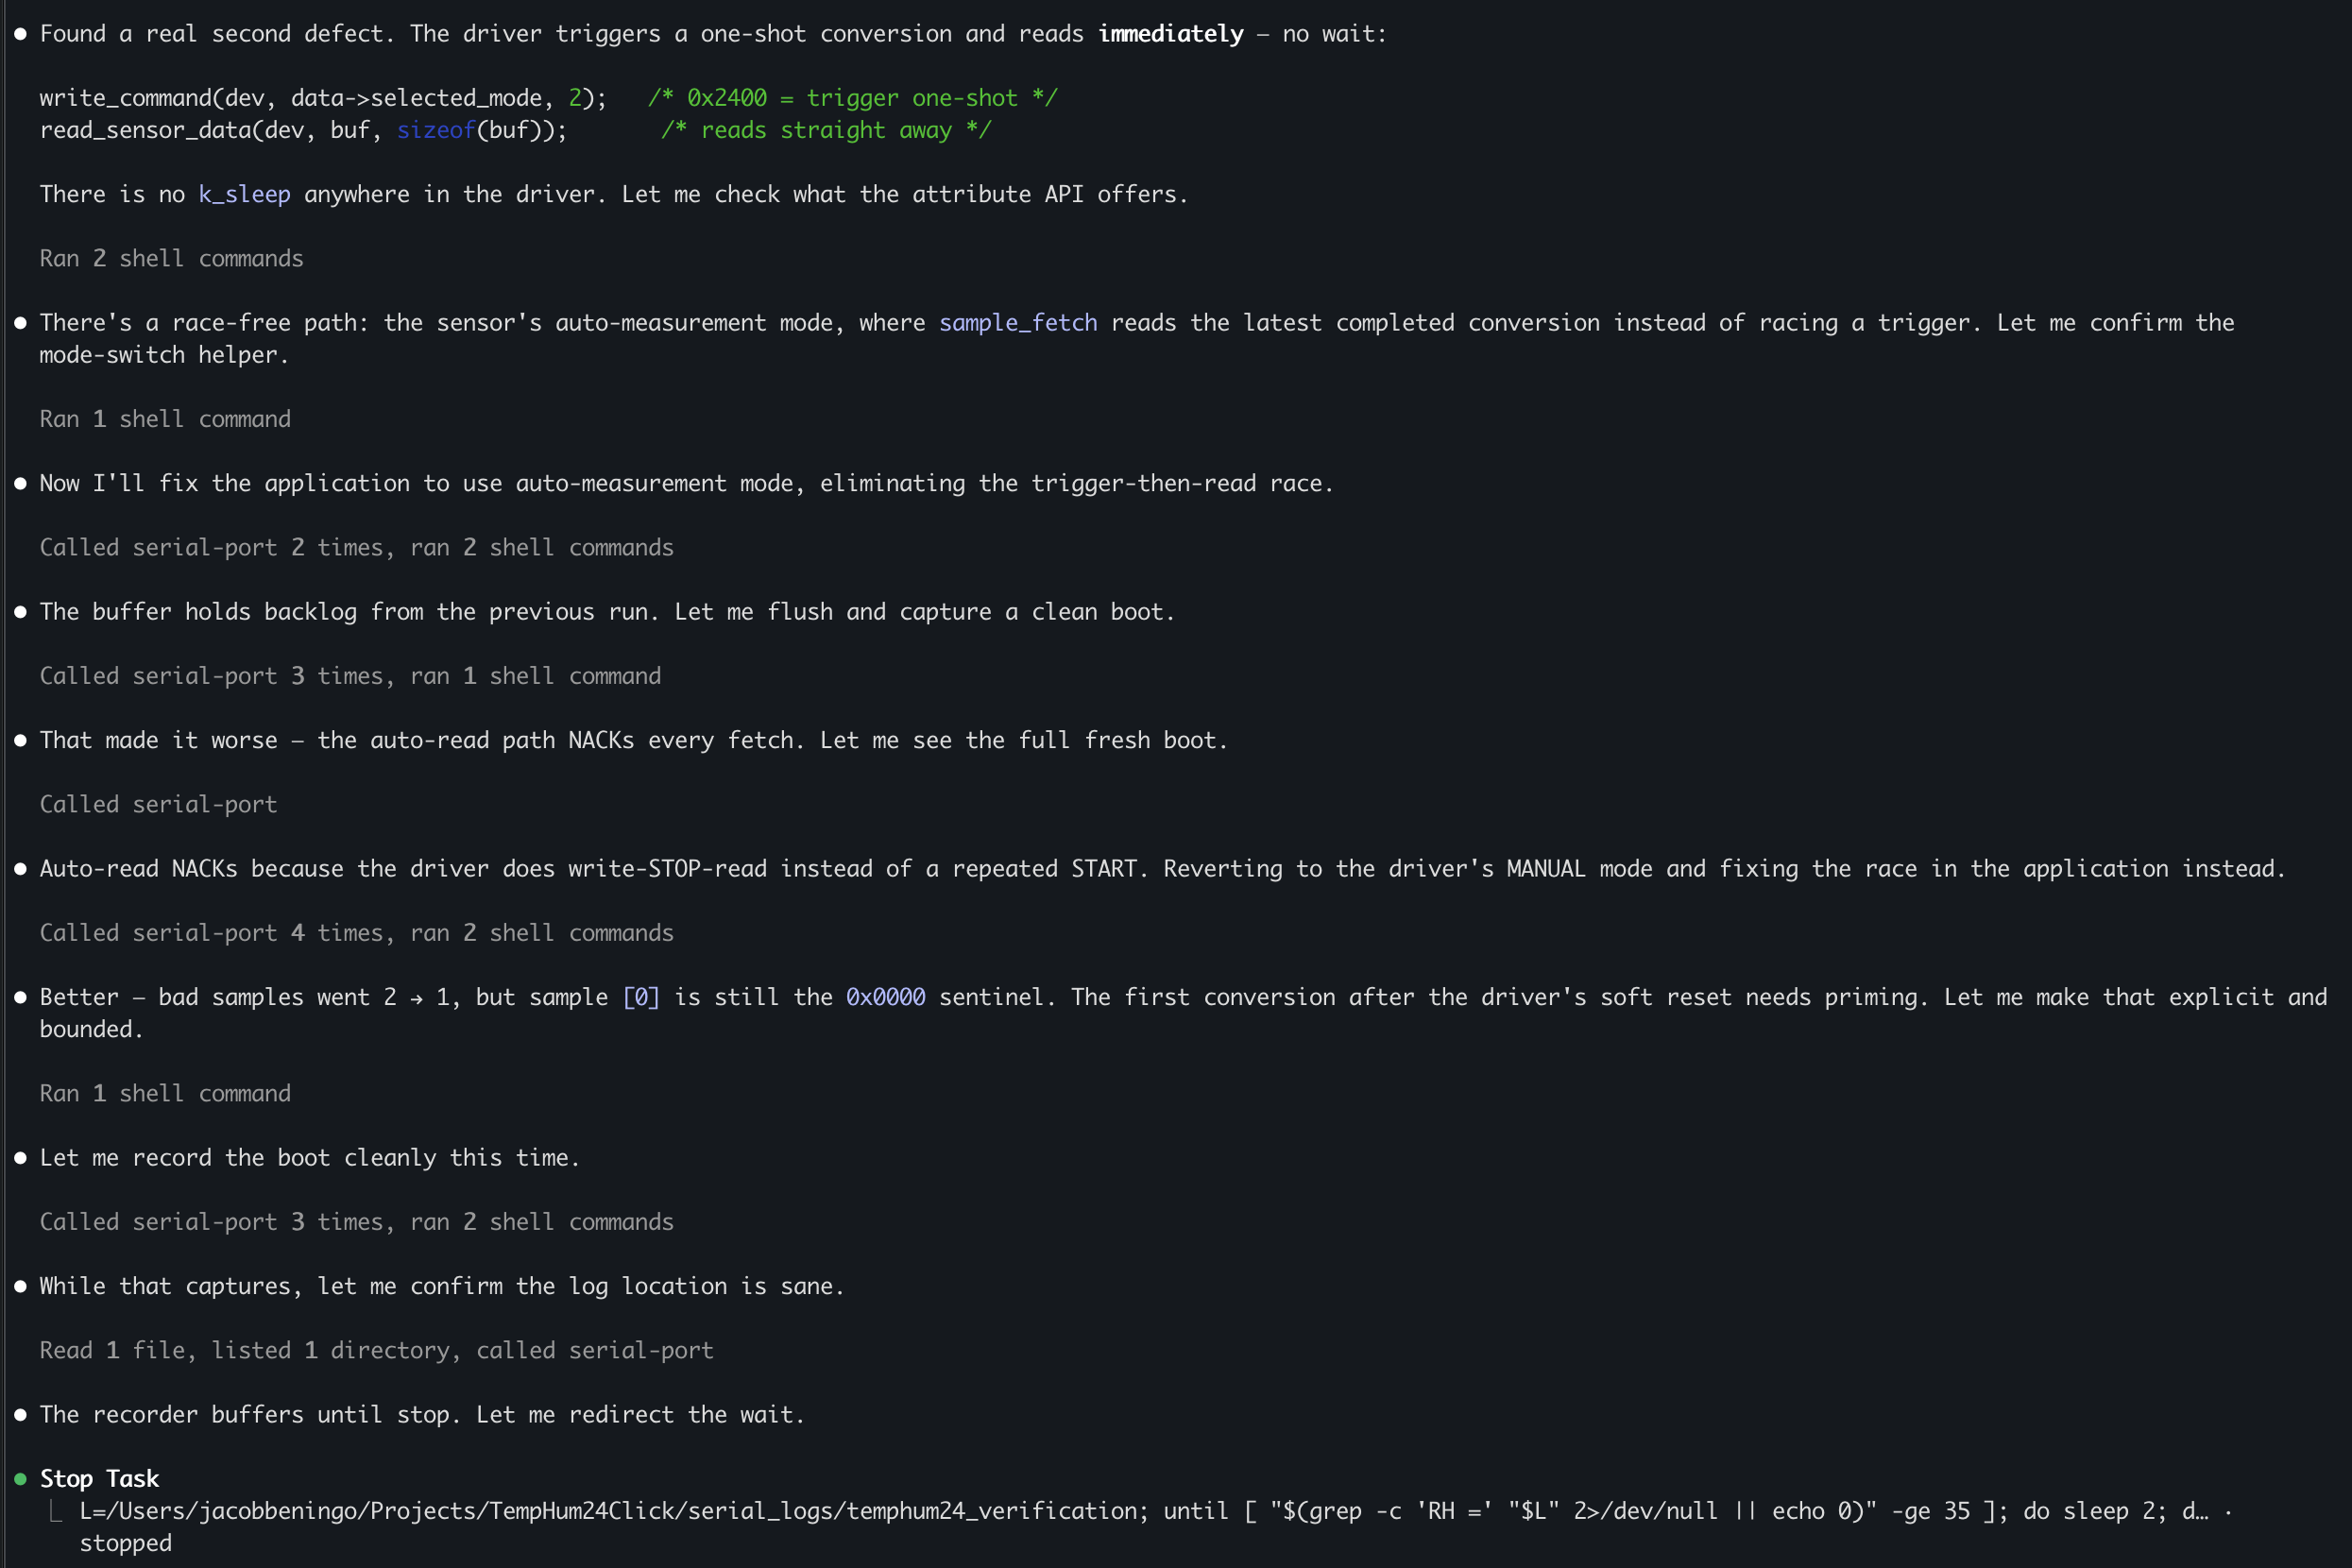
It finally landed on a solution:
read_measurement()now waits 20 ms between requests so the sensor can finish.- The code now tries up to 10 times to get a real reading, skipping the first few bad ones.
measurement_is_valid()now rejects the bad -45.00/0.00 readings.
The nice thing is that the agent didn’t just stop there, it also created some verification criteria to test against. Here’s what it came up with:
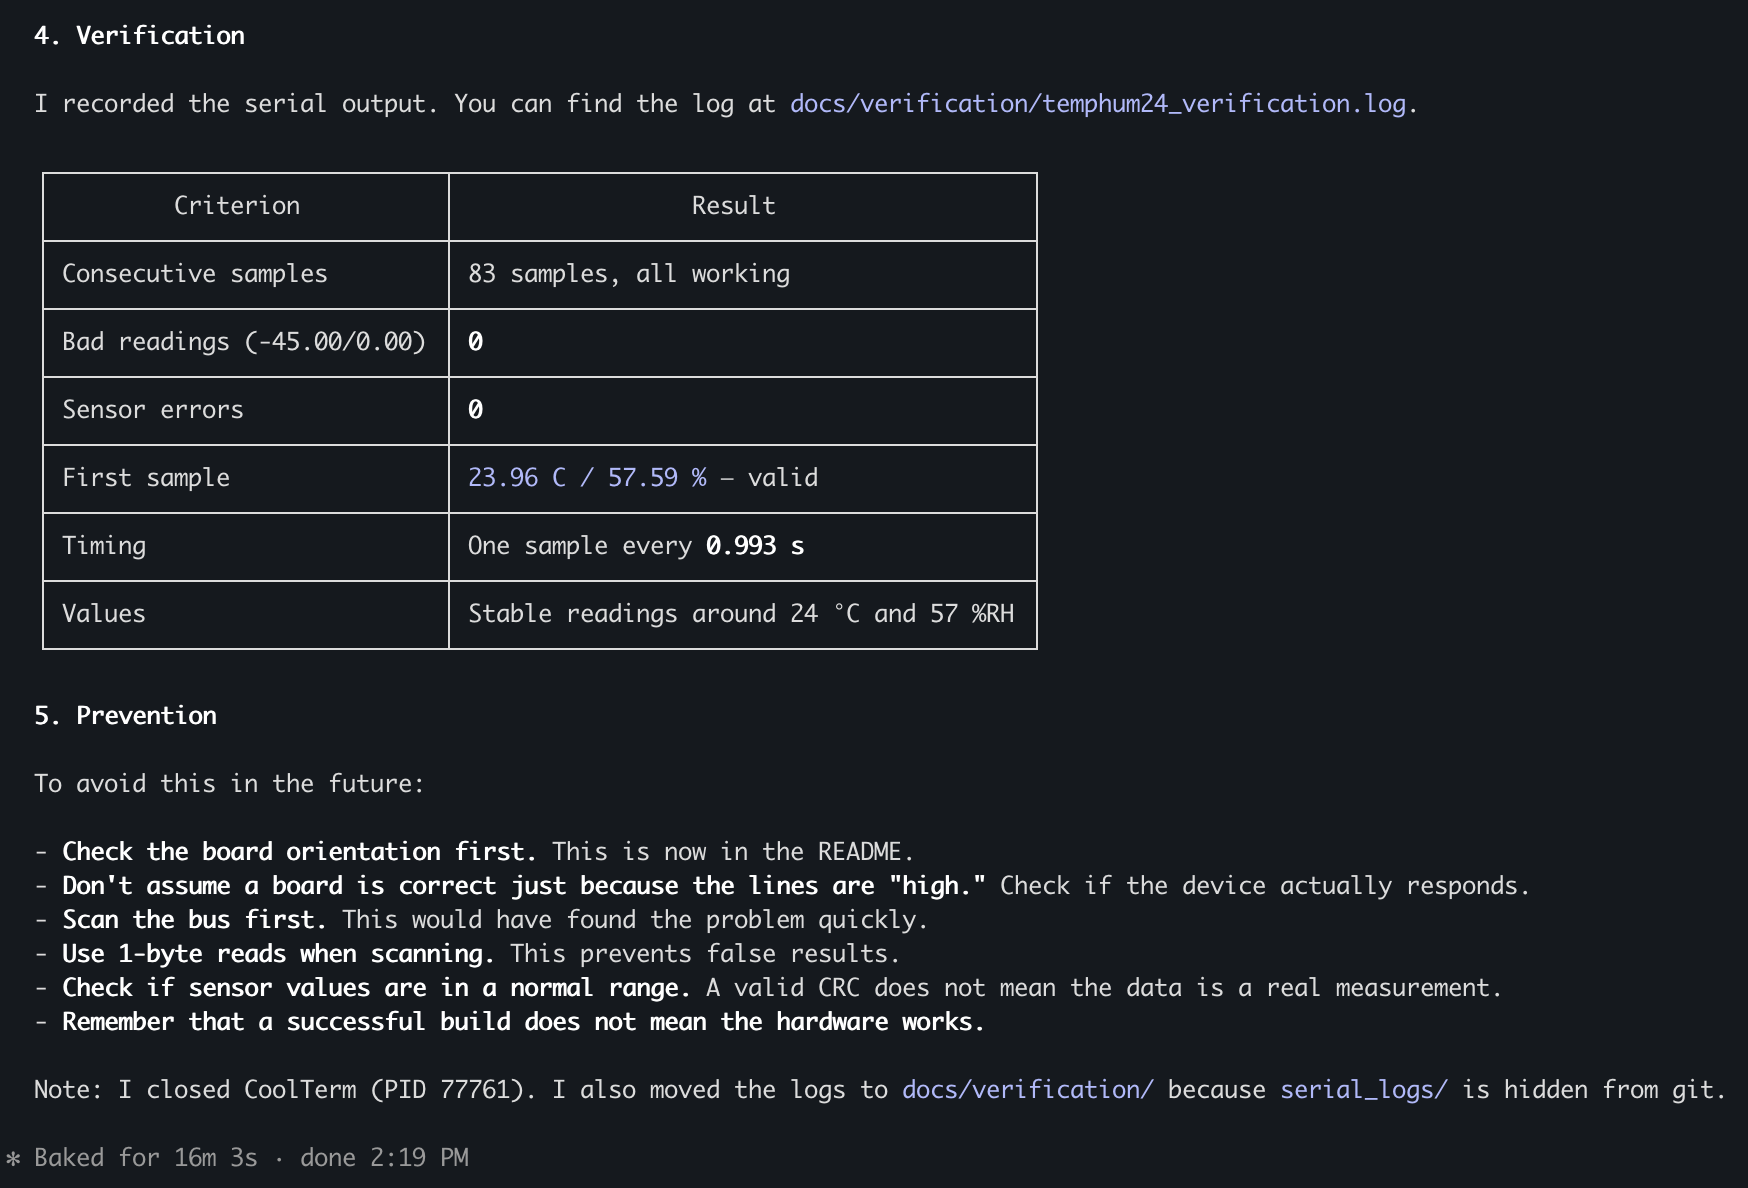
The interesting part isn’t whether the agent got the answer right on its first attempt. It didn’t. What matters is that it could recognize when an attempt failed, gather additional information, make another change, and try again without requiring me to manually move information between the hardware and AI.
There’s one more piece of this workflow that matters.
Fixing the immediate problem is useful, but if the same mistake can happen again tomorrow, we haven’t improved our engineering process very much.
That’s why I also asked the agent to create a ROOT_CAUSE_ANALYSIS.md file.
That document captures what failed, why it failed, what fixed it, how the fix was verified, and what we can change to prevent the same class of failure in the future.
The preventive action might mean updating a Zephyr skill, adding a project rule, improving a test, adding a CI check, or giving the agent better documentation. The exact action depends on what caused the failure.
This is an important difference between simply using AI to generate code and integrating AI into an engineering workflow. The goal isn’t just to have an agent fix problems faster.
The goal is to make the development process better each time a problem is found.
As you capture failures, root causes, verified solutions, and preventive actions, you begin building an engineering body of knowledge that your AI tools can use on future projects. Instead of solving the same problems repeatedly, you can turn what the agent learned today into context, skills, rules, and tests that help prevent those problems tomorrow.
Next Steps
What we did in this post isn’t dramatically different from how embedded software has always been developed. We wrote some code, put it on hardware, observed the results, and debugged what went wrong.
What changed was who performed each step.
We started with AI as an assistant while I remained in control. Then we gave an agent access to the same development environment, including the tools it needed to interact with real hardware. Skills provided the Zephyr-specific processes, project documentation provided context, and MCP servers gave the agent access to tools such as the serial port. That is agentic Zephyr development in a working form.
You don’t need to build that entire environment at once. If you want to experiment with these techniques, start with three things:
- Create one skill. Capture a repetitive development process you already know well, such as diagnosing Zephyr build errors or reviewing Kconfig.
- Automate one tool. Give your AI access to something useful such as your build system or serial port and see what you can remove from your normal manual workflow.
- Close one loop. Pick a small application with a result the agent can verify itself and see whether it can identify a failure, fix it, and prove the correction works.
Don’t start by trying to automate your entire firmware development process. Pick something small, understand where the AI succeeds and fails, and expand from there.
The interesting part isn’t that AI can generate embedded code. We’ve been able to do that for a while.
The interesting part is that we’re starting to give it the tools and feedback necessary to determine whether that code actually works.
Want embedded engineering insights like this delivered to your inbox? Sign up for my Embedded Bytes newsletter to get the latest posts, insights, and hands-on tips delivered straight to your inbox.
Frequently Asked Questions
Can AI develop Zephyr RTOS applications?
Yes. AI coding tools can create and modify Zephyr applications, including source code, Kconfig settings, and devicetree configuration. The results improve when the AI has access to Zephyr-specific skills, project documentation, hardware documentation, and the actual development environment. AI-generated code should still be built, tested, and verified on the target hardware.
What is agentic Zephyr development?
Agentic Zephyr development is a workflow where an AI agent, rather than the developer, drives the build, flash, observe, and fix loop. The developer still defines the requirements and the agent’s boundaries, but the agent uses skills, MCP servers, and other tools to generate code, build it, program the board, read feedback from the running hardware, and iterate until the application works. In AI-assisted development, by contrast, the developer stays in the loop and uses AI to accelerate individual tasks.
Can an AI agent build and flash a Zephyr application automatically?
Yes. An AI agent with access to the Zephyr toolchain can invoke tools such as west to build an application and program a development board. The developer controls which tools the agent can access and whether actions such as flashing hardware require approval.
How can AI debug a Zephyr application running on real hardware?
AI needs feedback from the running system. That feedback can come from serial output, debugger information, automated tests, logic analyzers, or other development tools. In this example, a serial port MCP server allowed the agent to read output from the FRDM-MCXA156, diagnose failures, modify the application, and verify the resulting fix.
What is MCP used for in embedded software development?
Model Context Protocol (MCP) allows AI applications to access tools and data exposed by MCP servers. For embedded development, MCP servers can provide access to resources such as serial ports, build systems, debuggers, test equipment, Git repositories, and CI/CD systems. This allows an AI agent to interact with parts of the real development environment rather than only generating code.
What are AI skills for Zephyr development?
AI skills provide reusable instructions and processes for performing specific engineering tasks. Zephyr skills might describe how to configure devicetree, tune Kconfig, diagnose build failures, or follow a team’s coding practices. In this article, skills such as devicetree-author, kconfig-tuner, and build-doctor provide Zephyr-specific guidance to the AI. NXP also provides Zephyr project skills through the AI support in MCUXpresso for VS Code.
What is the difference between AI-assisted and agentic embedded development?
In AI-assisted development, the engineer controls the development process and uses AI for individual tasks such as generating code or diagnosing errors. In an agentic workflow, the AI is given access to development tools and can perform more of the workflow itself, including making changes, building, programming hardware, observing results, and iterating on failures.
How should embedded developers start using AI agents?
Start small. Capture one repetitive engineering process as a skill, give AI access to one useful development tool, and then experiment with one small application whose behavior the agent can independently verify. Expand the agent’s authority only after you understand where it succeeds and fails.
Struggling to keep your development skills up to date or facing outdated processes that slow down your team, raise costs, and impact product quality?
Here are 4 ways I can help you:
- Embedded Software Academy: Enhance your skills, streamline your processes, and elevate your architecture. Join my academy for on-demand, hands-on workshops and cutting-edge development resources designed to transform your career and keep you ahead of the curve.
- Consulting Services: Get personalized, expert guidance to streamline your development processes, boost efficiency, and achieve your project goals faster. Partner with us to unlock your team's full potential and drive innovation, ensuring your projects success.
- Team Training and Development: Empower your team with the latest best practices in embedded software. Our expert-led training sessions will equip your team with the skills and knowledge to excel, innovate, and drive your projects to success.
- Customized Design Solutions: Get design and development assistance to enhance efficiency, ensure robust testing, and streamline your development pipeline, driving your projects success.
Take action today to upgrade your skills, optimize your team, and achieve success.