5 Tips for Developing an RTOS Application Software Architecture
Real-time operating systems (RTOS) are finding their way into nearly every IoT device. An RTOSes ability to manage low-level resources and complex timing requirements make them well suited for these applications. It is not uncommon though to struggle with how to design a software architecture that includes an RTOS. In today’s post, we will examine several tips for developing a robust and flexible RTOS based software architecture.
Tip #1 – Break the application dependency on the RTOS
One problem that I often see in RTOS based software architectures is that developers select their RTOS and then build their entire software architecture around it. While at first glance this doesn’t seem like a bad idea, it can become quite a headache to maintain or port that code to other applications where a different RTOS may be used. Think about it, there is no RTOS interface standard that RTOS developers follow (even though Arm does have CMSIS-RTOSv2). Instead there are about 100 different RTOSes each with their own API. Switching RTOSes requires every RTOS API call to be found and changed which is probably time consuming.
A better way to design the architecture is to make the application agnostic to the RTOS. Most RTOSes provide similar functionality anyways, so the putting the RTOS behind an Operating System Abstraction Layer (OSAL) allows the specific RTOS selected to be deferred until much later, decreases application RTOS dependence and improves the architectures flexibility.
Tip #2 – Use the outside-in technique to define initial tasks
The outside in approach to defining tasks is a method that allows a developer to look at the system and then break it down starting with the physical features that the user interacts with and then working inwards towards application related tasks. For example, you can picture an internet connected thermostat that has features such as:
- LCD
- Touch screen
- LED backlight
- Wi-Fi
- Memory Storage
- Sensor interfaces such as temperature, humidity and current
- Fan
- Bluetooth
As you can see these are mostly the outward, user facing and hardware-based devices. Completely describing the outside-in technique is beyond today’s blog, but the resulting tasks might be organized into the following tasks:
- Input Processing
- Network Management
- Printing
- Controller
- Memory Management
Remember, this a technique to help you decide what tasks you need, there are often more than one way to build out your tasks which will work equally well. (And there are some that will just result in more trouble than they are worth).
Tip #3 – Use rate monotonic scheduling (RMS) to define task priorities
Once the tasks are defined in the architecture, it is useful to use rate monotonic scheduling to determine if the task design is going in the right direction. Let’s say you have a dozen tasks and the question really becomes: “Can I really schedule all these tasks successfully and ensure that no deadlines are missed?”. RMS is designed to help use answer that question.
I will often create a task table that includes all the parameters that I want to track about a task. For example, I will include data such as:
- Task priority (even though I may not have assigned it yet)
- Task stack size (or depth depending on the RTOS)
- Task estimated execution time (in milliseconds)
- Task period (in milliseconds)
- Task CPU utilization (execution time / period)
Once the table is created, we sum the utilization for each task and then make sure that the CPU utilization is less than the value in the following list based on the number of tasks in the system:
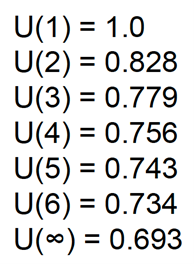
If our system had five tasks, we would want the sum of our CPU utilization to be less than 0.743 in order to ensure that our tasks can be scheduled. (Keep in mind that RMS comes with a lot of assumptions but it’s a good sanity check).
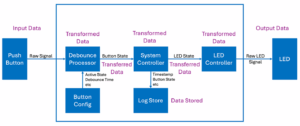
Tip #4 – Create a data flow diagram
A dataflow diagram typically provides a single high-level application picture on how data flows through the application. When using an RTOS, the diagram shows:
- Where data is generated
- How data moves from where it is generated to where it is consumed
- Where data is stored
- How data is accessed
The diagram typically helps a developer get a feel for the major RTOS components in the system as well. For example, the diagram will often show:
- Tasks
- Queues
- Semaphores
- Shared data protected by mutexes
- Interrupt service routines
- Event flags
The diagram can dramatically help when laying out skeleton code to test the architecture.
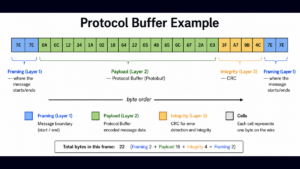
Tip #5 – Define the task and message interface upfront
It is very tempting once a data flow diagram is created to just dive in and start coding the application. This will undoubtedly go well for a while, but I’ve found that it can result in rework if the developer doesn’t take the time to carefully define the task and message interfaces upfront. While the data flow diagram often shows how data is propagating through the application, it doesn’t necessarily require that the data structures be defined.
The goal then is to examine each message queue up front and then build out the structure for those messages. This is important because it will define what the messages look like but also will contribute to how the interfaces for any underlying modules will look. For example, a task that manages a series of valves may expect a message that contains:
- A valve ID
- The valve state
- The valve desired on-time
Then again, it could be expecting:
- A mask defining valve states
- A list of on-times
At the end of the day, there is always more than one way to do things and one is not necessarily better than the other. However, understanding what messages are being passed around will help when building out the interface for other modules that support task execution.
Conclusions
Developing an RTOS software architecture is a great way to understand the application that will be built and its major component. We’ve explored several tips in today’s post that will help the reader not just create a clearer, more flexible application based on an RTOS but will also help them to communicate the design intent for their application. These tips should help the reader get a jump start on their application development while minimizing its dependence on the RTOS.
Struggling to keep your development skills up to date or facing outdated processes that slow down your team, raise costs, and impact product quality?
Here are 4 ways I can help you:
- Embedded Software Academy: Enhance your skills, streamline your processes, and elevate your architecture. Join my academy for on-demand, hands-on workshops and cutting-edge development resources designed to transform your career and keep you ahead of the curve.
- Consulting Services: Get personalized, expert guidance to streamline your development processes, boost efficiency, and achieve your project goals faster. Partner with us to unlock your team's full potential and drive innovation, ensuring your projects success.
- Team Training and Development: Empower your team with the latest best practices in embedded software. Our expert-led training sessions will equip your team with the skills and knowledge to excel, innovate, and drive your projects to success.
- Customized Design Solutions: Get design and development assistance to enhance efficiency, ensure robust testing, and streamline your development pipeline, driving your projects success.
Take action today to upgrade your skills, optimize your team, and achieve success.