Programming the STM32 Option Bytes using SEGGER J-Flash
Nearly every microcontroller contains option bytes, fuses, or some method to control general settings on the processor. These settings often control features such as whether debugging is enabled or disabled, flash can be written or read, and even how the processor will boot. In this post, we will explore how to program the STM32 option bytes.
An Introduction to the STM32 Option Bytes
The STM32 option bytes often vary in capabilities and memory location depending on the exact microcontroller family used. For example, the option bytes for the STM32F4 are not in the same memory location as the option bytes for the STM32F0. For our purposes, we will look at the STM32F0 as an example. The STM32F0 has 16 option bytes that are mapped to flash memory at 0x1FFFF800.
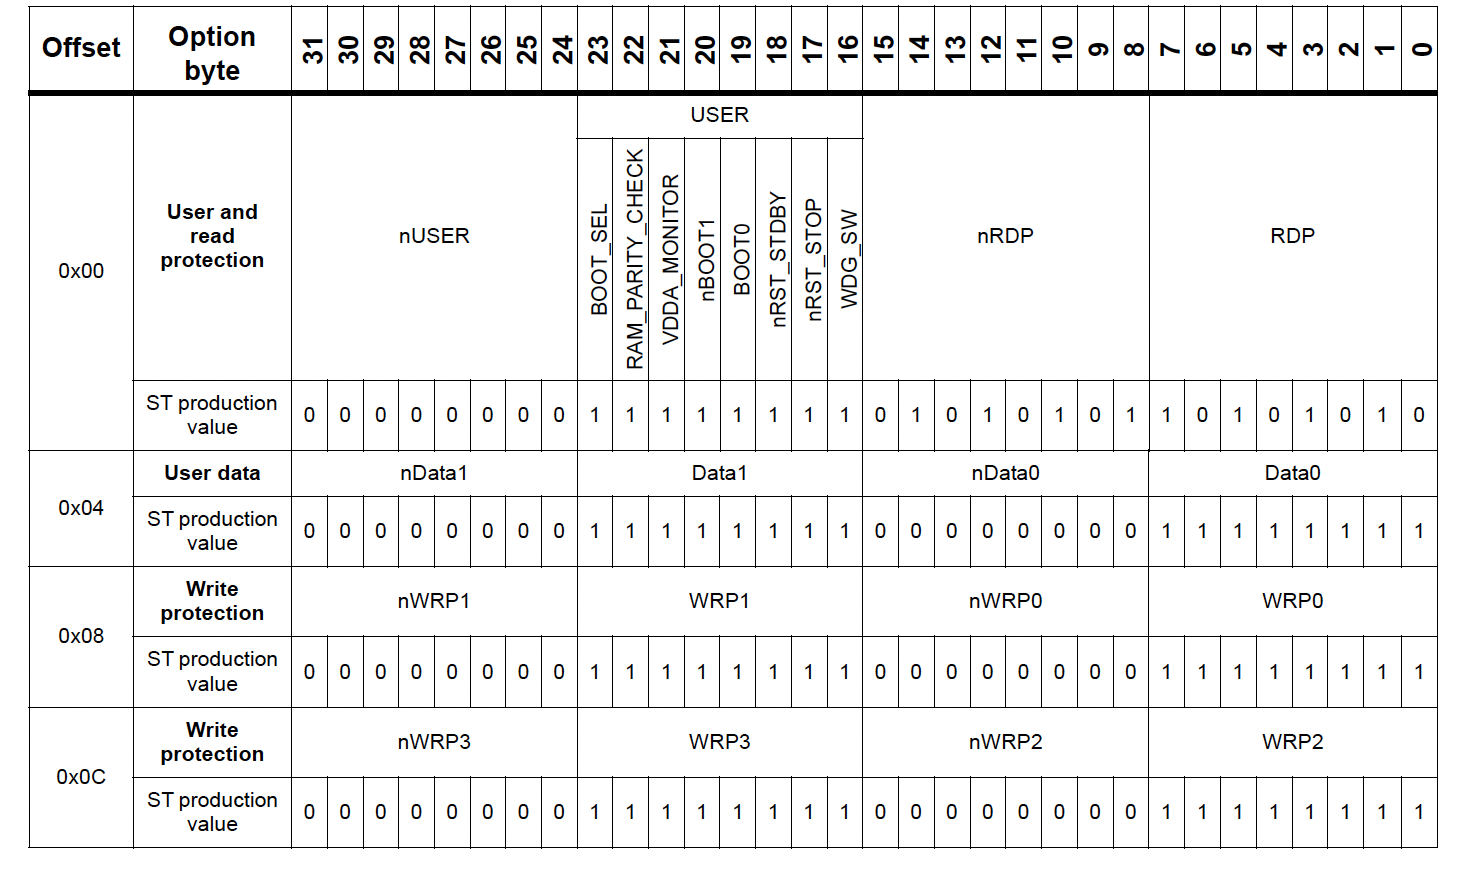
An example from the STM32F091xxxRefManual Section 4 can be seen below:
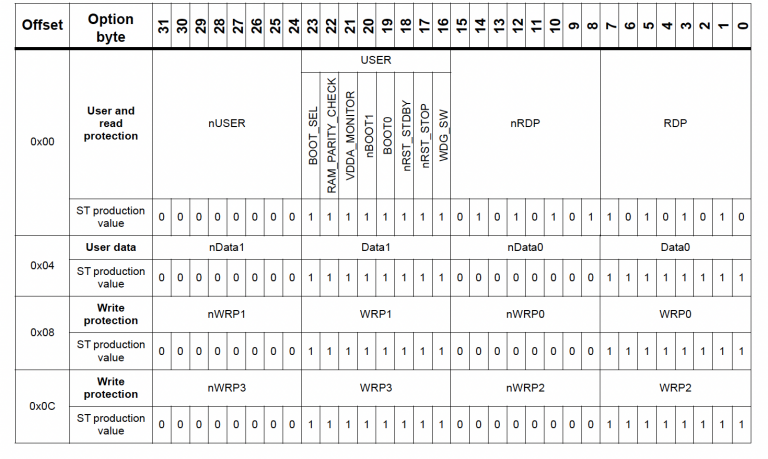
As can be seen above, these option bytes control write protection, boot, reset, user, and data options. It’s worth noting that each option byte has a complement byte associated with it. So if I have settings for RDP of 0xFF, then nRDP has to be set to 0x00. If the byte pairs don’t contain a compliment, then an error will be thrown.
Methods for Programming the Option Bytes
There are several different methods that developers can use to modify the option bytes on the STM32. These methods include:
- Writing application code
- Building a production firmware image
- Using a programming tool
Let’s briefly examine each of these options.
First, developers can write application code to program the option bytes. A good example of source code that can do this on the STM32 can be found here. At first glance, this seems like a good idea. The first time an application boots, it can set the option bytes. But, unfortunately, if the ability to program the option bytes is included in the firmware, it opens up the opportunity for an attacker to leverage that code. Thus, programming the option bytes in the application is probably not a great idea. (Even though it may be convenient).
Second, building an image that includes the byte values is a great thing to do for production. With the bytes already configured, the manufacturer can program the production image into the system with the desired bytes already set. An image is the preferred option, but most developers don’t want to fight with creating an image during development. Creating an image isn’t complex, but it often requires specialized software and tools.
Finally, the easiest way to set the STM32 option bytes is to use a programming tool. Sure, a production tool could be used. However, you can also use a free tool with a debugger like the SEGGER J-Flash software. In addition, a programming tool will often provide the capability to edit the option bytes directly! A tool is far more convenient than creating an image or trying to write application code.
Let’s examine how we can use SEGGER’s J-Flash software to modify the STM32 option bytes.
Programming Option Bytes on the STM32 using SEGGER J-Flash
J-Flash is a free development tool for use with the SEGGER J-Link series of flash programmers and debuggers. The software can be downloaded with the J-Link Software and Document Package. Once the software package has been installed, the following procedure can be used to program the option bytes:
J-Flash Project Setup
- Open J-Flash and create a project for the desired target microcontroller. Note that there is an option for the target with option bytes and one without when selecting the microcontroller. Select the one that includes option bytes.
2. From the top menu, click project settings.
3. In the left menu, select the MCU option.
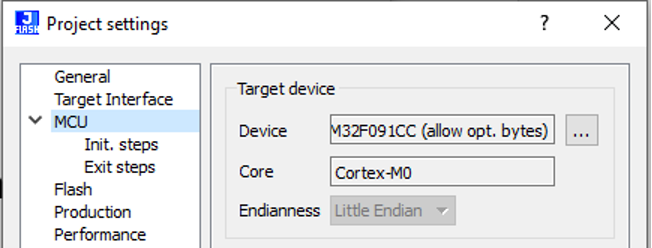
4. Verify that the selected target profile includes the option bytes as shown below:
5. Click the Flash option on the left.
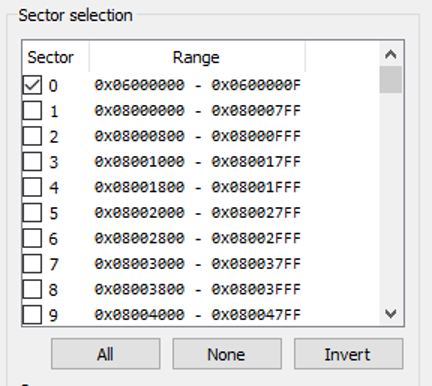
6. Under the selector selection, make sure that only Sector 0 is selected as shown below:
7. Exit the project settings by clicking okay.
Reading and Editing the STM32 Option Bytes
- In the Target menu, click connect.
- Click the Target menu then Manual Programming -> Readback -> Selected Sectors.
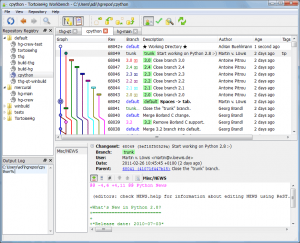
- A pop-up should say that everything was successful. Click okay. You should now see the option bytes in a format similar to the following:

We can directly edit the bytes by clicking on them and then changing their values! So, for example, if we can disable the boot pin so that it cannot control which area of memory is executed during start-up, we would do the following:
4. Click on the option byte(s) and edit them until the readout looks like the following:

Note: Click the desired byte to change and then type to get edit permission.
Note: The option bytes have complimentary bytes. That means that changing F7 requires the next byte 00 to be 08. However, the tool will automatically calculate the complement, so manually adjust it manually.
Programming the STM32 Option Bytes
- Click the Target menu and select Manual Programming -> Erase Sectors
- Click the Target menu and choose Manual Programming -> Program
- The target memory screen will now update to show the calculated and corrected option byte values:

4. If you want to verify that it is correct, click the Target Menu and select Manual Programming -> Readback -> Selected sectors.
Everything should match! The STM32 option bytes have now been programmed successfully! The total time to follow this procedure is maybe 5 minutes!
Troubleshooting:
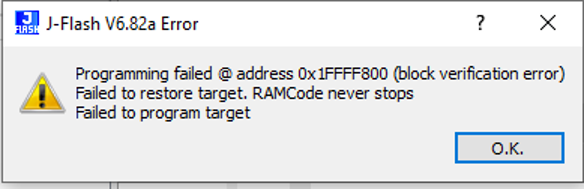
If the option bytes are not erased before programming them, then the following error will be presented:
The target will disconnect as well. To resolve the error, perform the following steps:
- Target -> Connect
- Click the Target menu and select Manual Programming -> Erase Sectors
- Click the Target menu and choose Manual Programming -> Program
The option bytes should now be programmed successfully.
Conclusions
The option bytes included on many microcontrollers are critical to the program. The option bytes often dictate how the microcontroller will behave. The bytes also can be used to control whether flash can be read and written and whether the debug port is enabled or disabled.
This blog has quickly walked through how to program the option bytes on the STM32 without the need to understand the flash and options peripheral. There was also no need to build out a custom firmware image. Instead, we used SEGGER J-Flash and the features built into the application to modify the option bytes.
Struggling to keep your development skills up to date or facing outdated processes that slow down your team, raise costs, and impact product quality?
Here are 4 ways I can help you:
- Embedded Software Academy: Enhance your skills, streamline your processes, and elevate your architecture. Join my academy for on-demand, hands-on workshops and cutting-edge development resources designed to transform your career and keep you ahead of the curve.
- Consulting Services: Get personalized, expert guidance to streamline your development processes, boost efficiency, and achieve your project goals faster. Partner with us to unlock your team's full potential and drive innovation, ensuring your projects success.
- Team Training and Development: Empower your team with the latest best practices in embedded software. Our expert-led training sessions will equip your team with the skills and knowledge to excel, innovate, and drive your projects to success.
- Customized Design Solutions: Get design and development assistance to enhance efficiency, ensure robust testing, and streamline your development pipeline, driving your projects success.
Take action today to upgrade your skills, optimize your team, and achieve success.