How to Organize a Firmware Project
There are many benefits to having a software project that is organized. First, it makes it easy to find modules and files when you them rather than wasting time hunting around things. Second, an organized project can help with project scalability by not requiring constant adjustments to a project make file or project properties. Third, if meticulously organized, developers should be able to easily integrate tools, rebuild their development environment and even port the code easier. There are lots of ways to organize a code base but in today’s post, I’ll share how I typically organize my own projects.
When starting a new project, typically you want to have some sort of top-level organization to the project to make it easy to find things. Over the years, I’ve adopted a simple but effective structure that I immediately commit at the start of every project and that usually evolves slightly based on the project needs. The structure that I typically start with is the following:
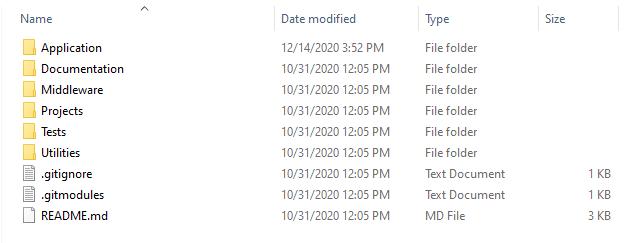
While it may seem self-explanatory from a quick glance, let me explain what each of these does and how I typically handle them.
The Application directory is used to store all the application specific code. This is custom code that is written specifically for the product. A developer can consider this the secret sauce or the code that differentiates the embedded system from every other one out there. This folder contains application modules along with any configuration modules that go with them that help make the code portable and scalable. One might want to create subdirectories for include source and configuration code, but I’ve often found that isn’t helpful and just requires adding more include paths to the project configuration. If I want to organize these further, I just do it in the actual IDE environment.
The documentation directory is used for several types of documentation. First, Doxygen generated manuals and files are all stored under this directory. Second, any additional documentation that is useful such as write-ups about user guides, CRC’s, input file formats, development specific data and so forth.
The middleware directory stores all the relevant middleware and third-party libraries that are used in the project. Now, one thing that I do here that is special is that I often linking in git submodules in this directory. There was once a best practice where teams would pull in a copy of everything they used, and they would keep it static so that it would never change, and they would always have a backup. This is a great practice, but I’ve found that today it’s more practical to include the git submodule and then just check-out the tagged revisions. With each official build for the project, the versions of each library used are documented. I like this approach because if I want to stay current, I can just pull from the submodule the latest revision versus exporting it, importing into my repository, adding, committing and so forth.
The Project directory just stores the toolchain specific project information. It’s possible for several things to be in this directory. First, it’s possible to have multiple versions of the same project in different toolchains. One might want to have or test their project in GCC, Keil, IAR, Visual Studio Code or many other environments based on preference. Second, there may be different product sku’s that use a common code base and there are different projects defined for each product’s specific settings. In any event, keeping these things all together in one place keeps the project(s) structure from getting too messy.
The Tests folder is one that would not have existed in my organizational flow just a few years ago. I’ve been rapidly pushing myself to adopt a more Test-Driven Development (TDD) development process for firmware. All my test case code is stored under this directory. The exact structure I use varies a little bit, but a good place to start is James Grenning’s cpputest-start-project on github. Automated testing has become so important that every project should include this (and actively manage and maintain the tests).
Finally, there is the Utilities folder. Just like with the middleware folder, this is often a folder of git submodules that provide access to various open source tools. For example, I often link cpputest into this folder. That way, a new developer can check-out the project and initialize the submodules and be most of the way to being up and running. (I’ve also used Docker for this but that is a story for another time). I will also include sometimes the installer for various tools if they are not open source. Sometimes I’ll even place custom interface code written in Python in this folder as well.
Conclusions
Having a well-organized project can help developers easily find their way around the code but also help them to easily maintain that code over time. Including folders like a test folder also implicitly implies that developers should be writing test cases. There are certainly other directories that could be added. For example, a driver’s folder. I’ve just found that more and more these fall under the Middleware / libraries category in most toolchains today. In any event, I hope this helps give you an idea on how you can easily organize your firmware projects along with some processes you can follow that I’m hinting at are good modern day software practices.
Struggling to keep your development skills up to date or facing outdated processes that slow down your team, raise costs, and impact product quality?
Here are 4 ways I can help you:
- Embedded Software Academy: Enhance your skills, streamline your processes, and elevate your architecture. Join my academy for on-demand, hands-on workshops and cutting-edge development resources designed to transform your career and keep you ahead of the curve.
- Consulting Services: Get personalized, expert guidance to streamline your development processes, boost efficiency, and achieve your project goals faster. Partner with us to unlock your team's full potential and drive innovation, ensuring your projects success.
- Team Training and Development: Empower your team with the latest best practices in embedded software. Our expert-led training sessions will equip your team with the skills and knowledge to excel, innovate, and drive your projects to success.
- Customized Design Solutions: Get design and development assistance to enhance efficiency, ensure robust testing, and streamline your development pipeline, driving your projects success.
Take action today to upgrade your skills, optimize your team, and achieve success.