

Visual Studio Code: A Guide to the MCUXpresso for VS Code extension
Modern embedded software development often requires customizing your build and development environments. You’ve probably found that your typical Eclipse-based environment just doesn’t quite do what you need as you try to use techniques such as CI/CD pipelines, simulation, and Test-Driven Development. Visual Studio Code has become the most popular code editor because it provides extensibility that allows you to customize your development environment to meet your team’s needs and each developer’s individual needs.
While Visual Studio Code makes a lot of sense, you may think that developing embedded software for microcontrollers is a different story. Thankfully, it’s not. The blog Visual Studio Code Extensions for Embedded Software details the many extensions useful to develop embedded software using Visual Studio Code. In today’s post, we will focus on the NXP Microcontrollers extension, which allows you to develop embedded software for NXP’s microcontrollers. We will cover:
- Setting up MCUXpresso for Visual Studio Code
- Importing software repositories
- Importing an example
- Debugging with the NXP Extension in Visual Studio Code
Let’s dive in!
Note: If you don’t have Visual Studio Code, you can download and install it using the instructions here.
Setting up MCUXpresso for VS Code
Installing the MCUXpresso for Visual Studio Code Extension
When you first open Visual Studio Code, you’ll find yourself on the Welcome screen. Along the left-hand side, you’ll see a series of icons. The fifth icon down, which shows an extension being added to the whole, is the extension menu. Clicking on this icon will open your extensions and show you what you currently have installed, what is recommended, and provide you with a search box to find other extensions.
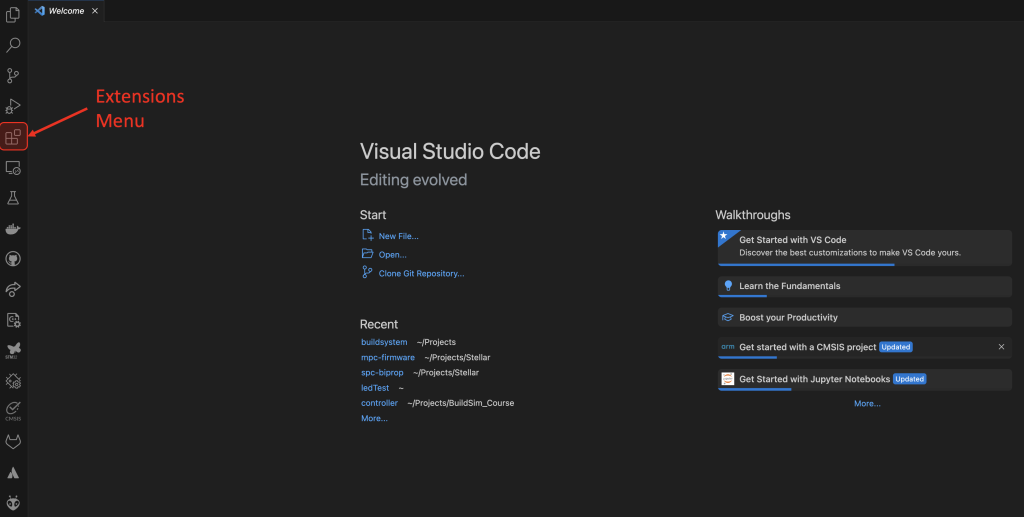
Figure 1 – Screenshot showing how to access the Extensions Menu in Visual Studio Code
The search box at the top of the extensions menu allows you to search for specific terms. For example, enter NXP into the search and find the NXP MCUXpresso for VS Code extension. Clicking the extension will provide additional details, such as the number of downloads, the extension rating, and a description of what the extension will do for you. If you are following along, click the install button.

Figure 2 – Screenshot demonstrating how to search and install the NXP MCUXpresso Extension from the Extensions Marketplace in Visual Studio Code
Once the extension is installed, you’ll be on an updated welcome screen. What I like about this welcome screen is that it provides the steps you need to follow to get started. For example, as shown in Figure 3, we must check our tool dependencies and set up code repositories. Once we’ve completed all these steps, we’ll be ready to import an example and debug a project.
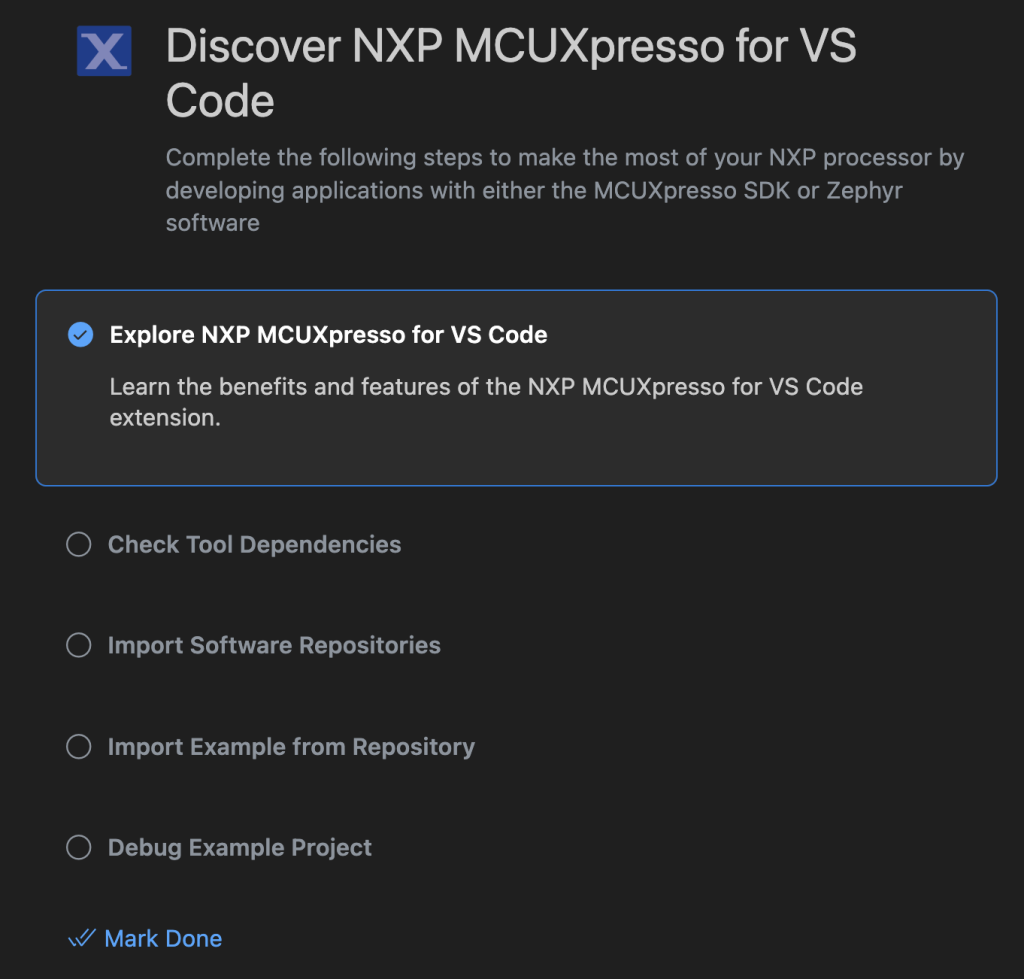
Figure 3 – Screenshot detailing the steps to get started with the NXP MCUXpresso for VS Code extension
The NXP MCUXpresso for VS Code Tool Dependency Checks
You’ve successfully installed the NXP MCUXpresso for VS Code extension, but the extension does use external tools. To ensure you can load projects, compile and debug them, we need to ensure you have all the required dependencies installed. Thankfully, the extension makes this a super easy process.
On the welcome screen, click the “Check Tool Dependencies” checkbox. When you do this, you’ll see two things happen. First, the Check Tool Dependencies checkbox will be checked. Second, the box will expand, and you’ll see an option for “Open Installer”. Click the open installer button.
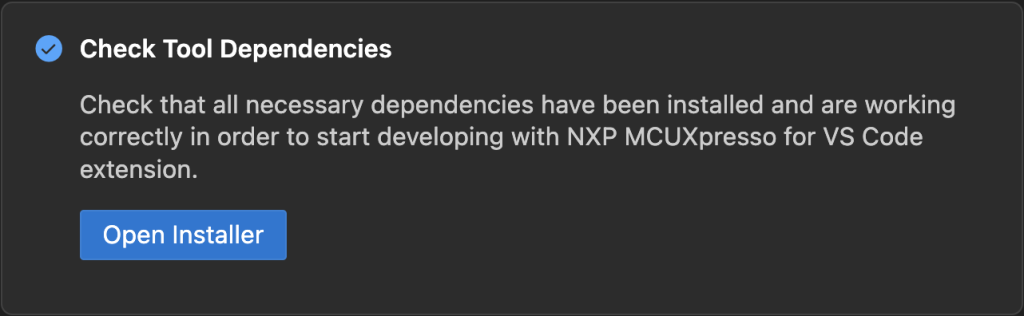
Figure 4 – Screenshot detailing installing the dependencies for the NXP MCUXpresso for VS Code extension
When you click the button, there are two potential outcomes. First, you’ll already have the dependencies installed. This may be the case if you already have MCUXpresso installed on your machine. The second option is that you won’t have the dependencies and will be prompted to download and install them.
If you have to download and install them, Visual Studio Code will ask permission for you to access an external website. The link goes directly to the download for MCUXpresso Installer. Running the downloaded file will show you the various dependencies and tools it wants to install. You can see in Figure 5 that it is a mix of SDKs, Debug Software, and Arm support tools. Click on each component that you want to install. (I recommend just installing all of them). Once you have selected each component, you can then click install. The installer will go through and install everything. It may take several minutes to complete the installation, depending on the options chosen and your computer.
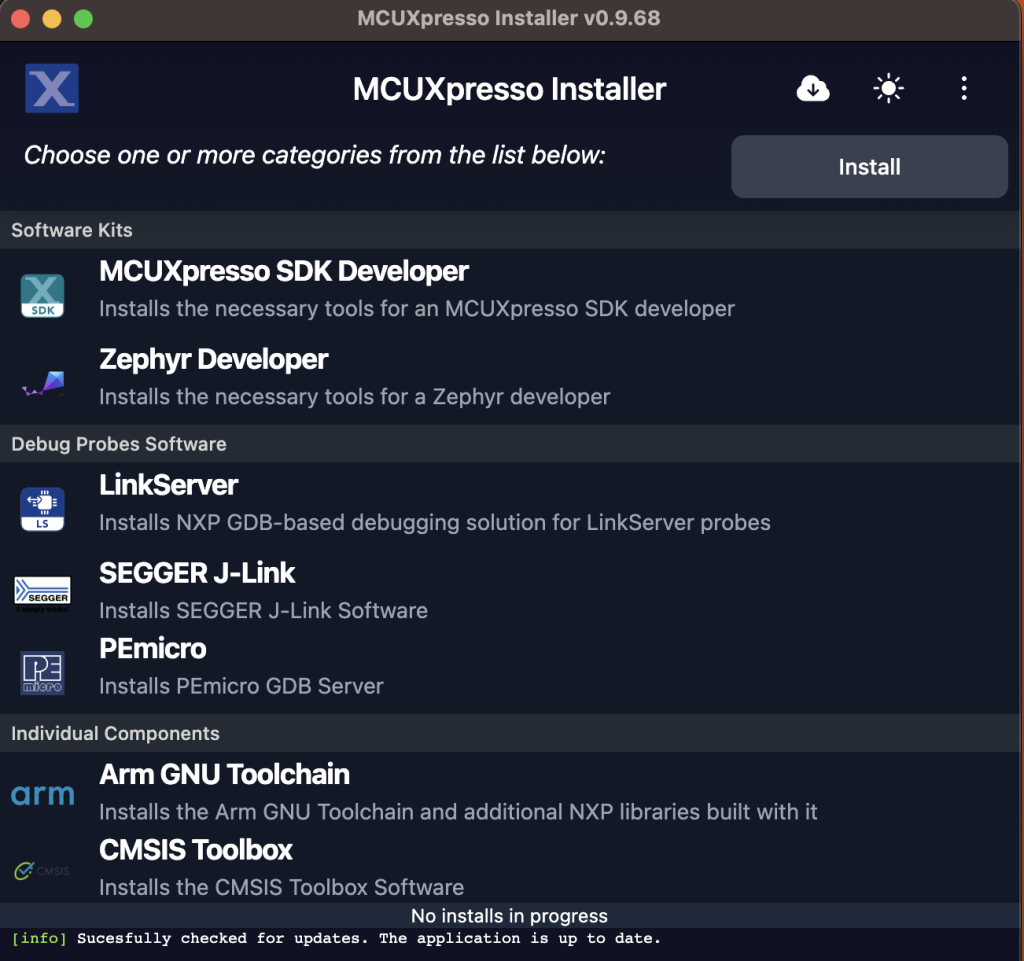
Figure 5 – Screenshot demonstrating the options for installing the NXP MCUXpresso for VS Code extension dependencies
When completed, you should see the installer tell you that the installation was successful, as shown below:
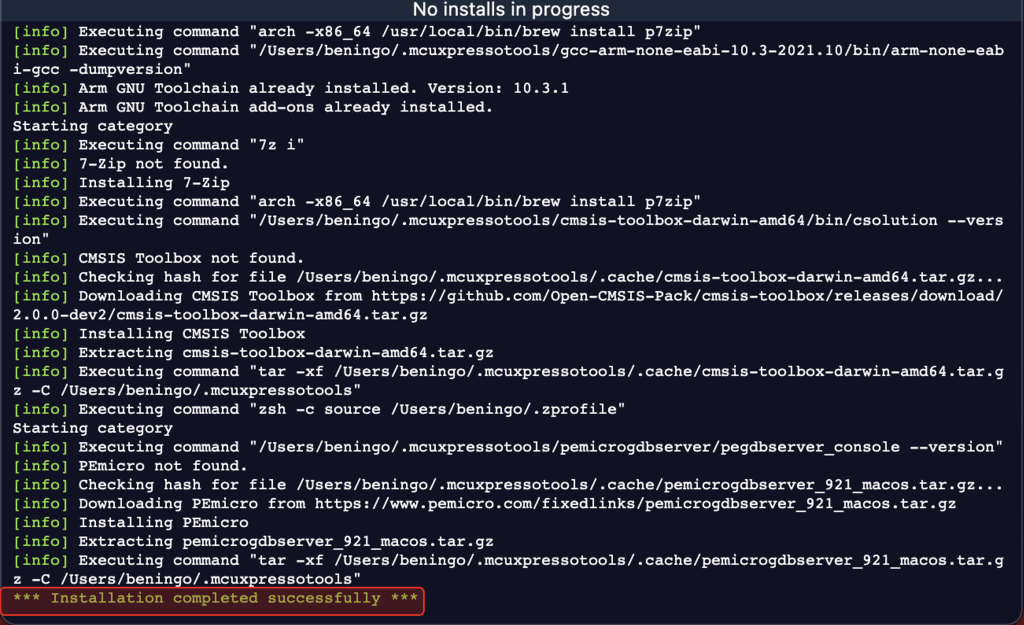
Figure 6 – Successful installation of the MCUXpresso for VS Code extension dependencies
Importing Software Repositories
Congratulations! If you’ve made it this far, you’ve installed the extension and all its dependencies. The next step is to gain access to the NXP repositories so that you can explore example code. The process is pretty straightforward.
First, return to Visual Studio Code and click on the “Import Software Repositories” box. It will expand, like before, and reveal an option to “Import Repository”. Click that button. You’ll be brought to an import screen that allows you to select from several existing repositories, such as:
- MCUXpresso SDK
- Zephyr
- Open-CMSIS-Packs
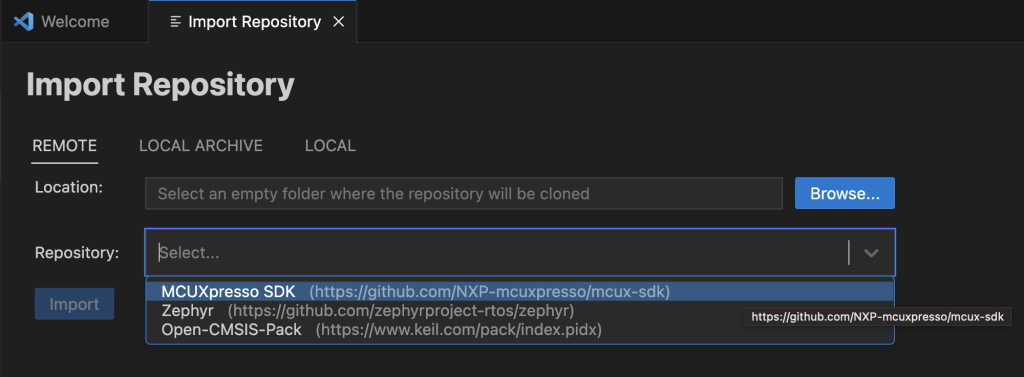
Figure 7 – Selecting an NXP MCUXpresso Repository
When you are first getting started, I would recommend that you start with just the MCUXpresso SDK. Select it and then select where the repository will live on your computer. I put it in a directory like beningo/Projects/NXP/MCUXpressoSDK. I would also recommend checking the “download all examples” checkbox. This will bring all the board examples in from the repository. It will take a bit longer to clone and use more hard drive space, but you’ll have everything you need. Once your import looks like Figure 7, click import. It will take several minutes to clone the repository.
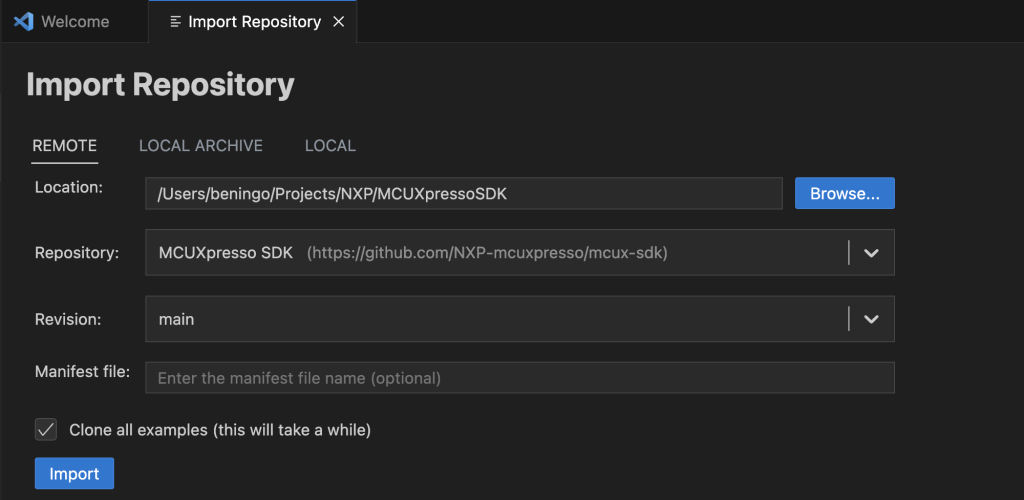
Figure 8 – Importing the MCUXpresso SDK repository into Visual Studio Code
Importing a “Hello World” Application into Visual Studio Code
Now that you have cloned the NXP SDK repository, there are a lot of examples at your fingertips that you can use! Let’s look at how we can use the SDK repository we just cloned to pull an example into Visual Studio Code, compile it, and debug it on a target.
Returning to the Visual Studio Code welcome screen, you’ll notice a checkbox for “Importing Example from Repository”. Go ahead and click it. When it expands, click the “Import Example from Repository” button. A new tab will open with a bunch of options that you can use to configure your project import. You can see an example of my import options below in Figure 9.
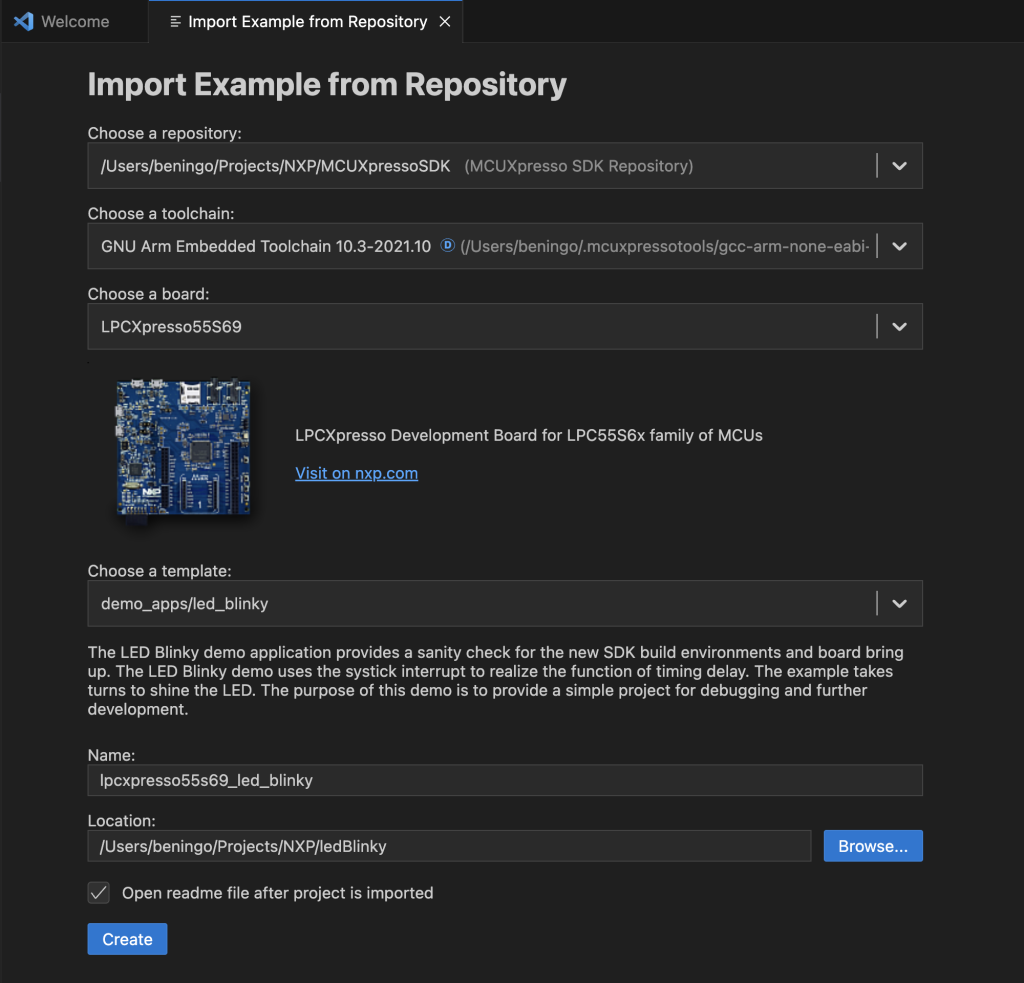
Figure 9 – Importing an LED blinky example into Visual Studio Code
As you can see in Figure 9, we can select which repository to choose an example from, along with the toolchain we want to use for the project. We also have an option of choosing any board that is supported by the NXP toolchain! I am using an LPCXpresso55S69, a multicore Arm Cortex-M33 microcontroller. It’s a super cool part with a lot of functionality. If you select that board as an example, you’ll also notice that if you look through the “Choose a template” dropdown, we can use dozens of examples. I selected the led blinky example.
Once the options are set, creating the project is easy. Just click Create and wait while the project is imported into the specified location and then into Visual Studio Code.
Exploring and Compiling the LED Blinky Application
Once you’ve imported the project, if you click on the explorer icon, you’ll find that you have an organized baseline LED blinky project, as shown in Figure 10. Let’s take a moment to examine what is in the project.
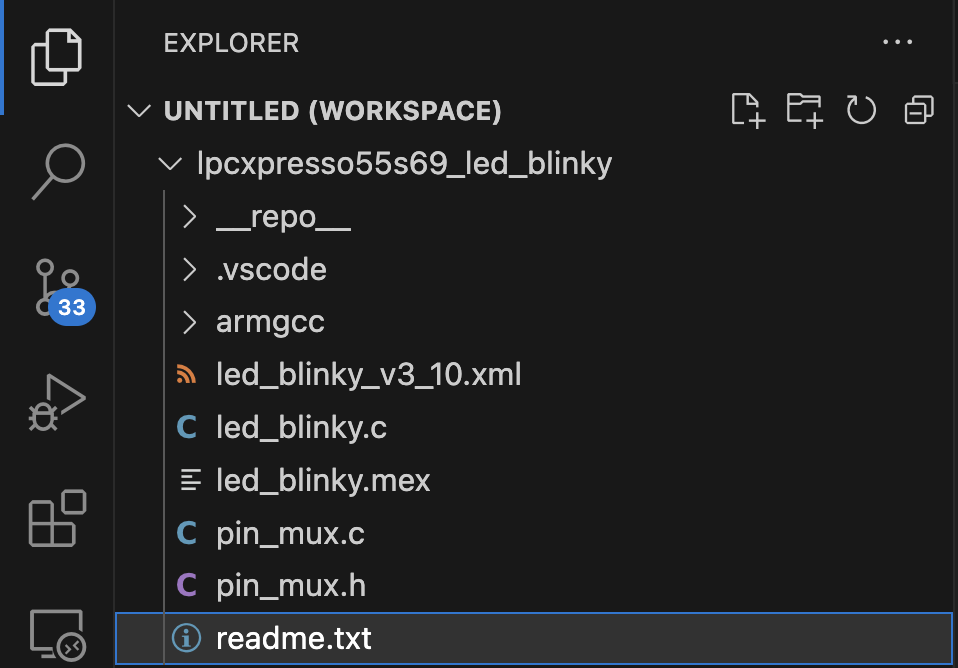
Figure 9 – Organization of the LED blinky example for the LPCXpresso55S69
Below is an explanation of what each of these is:
__repo__ : folder that contains the SDK repo content of instances of core, RTOS, and middleware components.
.vscode : contains the configuration files for vscode, such as the debug launch configuration.
armgcc : build scripts
*.xml : project manifest file
*.h : example application header file(s)
*.c. : example application source file(s)
*.mex : MCUXpresso Configuration Tool file
Now, if you look at the icons along the left-hand side of Visual Studio Code, you’ll notice an icon for NXP’s MCUXpresso for Visual Studio Code extension, as seen in Figure 10. You’ll want to click that icon.
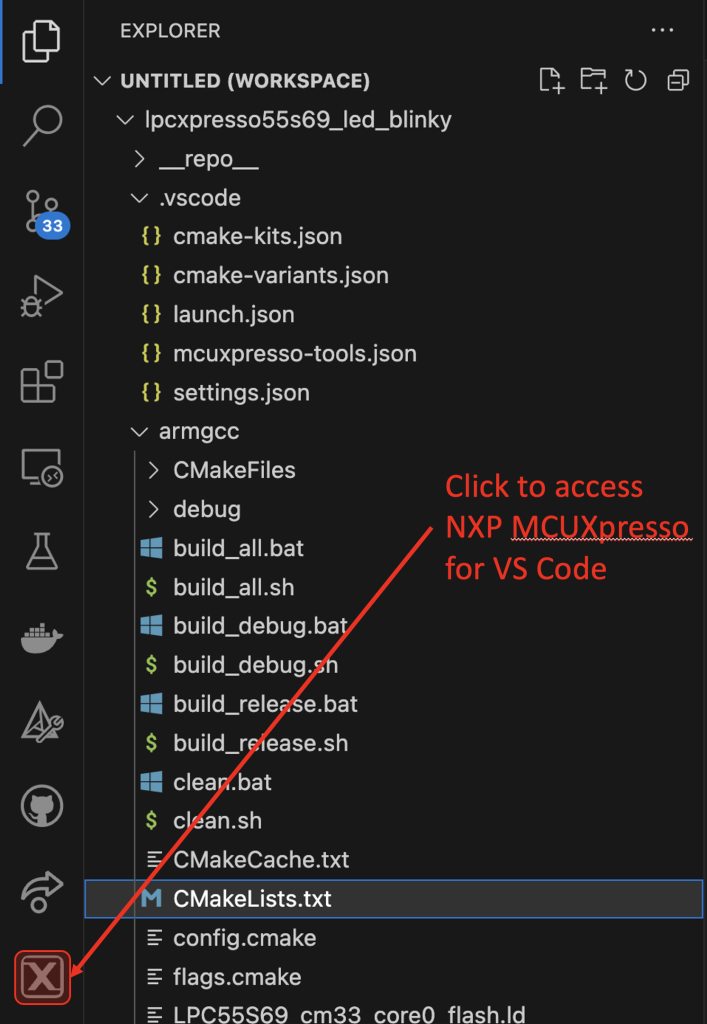
Figure 11 – Accessing NXP’s MCUXpresso for VS Code extension.
Features of NXP Microcontrollers Extension
The MCUXpresso for VS Code extension provides many features for developers to interact with NXP microcontrollers in Visual Studio Code. Take a moment to look at Figure 12. You’ll notice that there are several different areas for you to interact with:
- Quickstart Panel provides various options for importing projects, flashing devices, and accessing documentation.
- Installed Repositories list, which shows you what repositories you currently have cloned.
- Projects which show you the projects you currently have in your workspace.
- Debug Probes lets you see what probes are currently available for programming and debugging your target.
- Device tree is a feature that lets you interact with the device tree files used by the Zephyr project.
- Image Info will provide you with information about the callgraph and memory information of your image once you build it.
- Baremetal heap and stack usage provide information about your heap and stack usage.
- Analysis provides a way to import energy measurement archives.
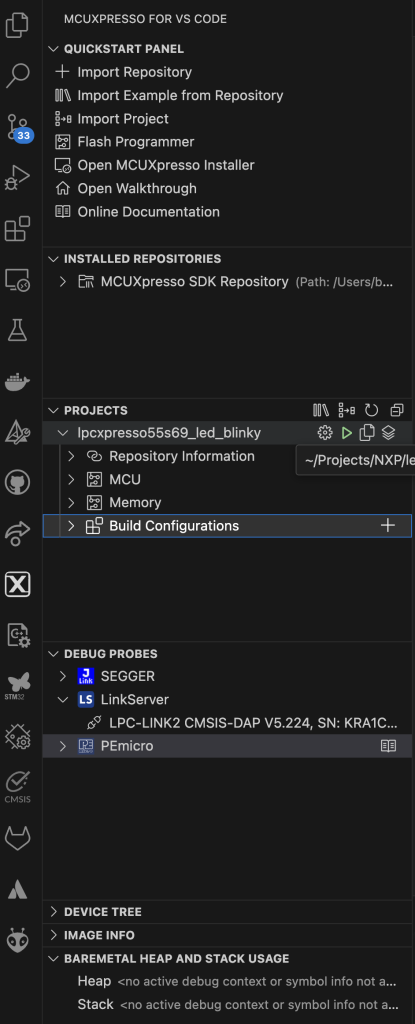
Figure 12 – The NXP MCUXpresso for VS Code extension components and capabilities.
These are just the features the extension offers in the “code view”. When we debug our application, we’ll see that additional features will be available. Before we can do that, though, we need to compile our LED Blinky project.
Compiling the LED Blinky Project
Compiling the project might not be very obvious at first. The build system uses CMake, so you could open a terminal and invoke Cmake to build the project. However, there is a much better way to compile your project. If you look closely at the Projects section, you can place your cursor over the lpcxpresso55s69_led_blinky project. When you do this, you’ll notice four additional icons will appear; a build gear, a debug play symbol, an explorer, and a manage components icon. Clicking on the gear will build the project based on the currently selected build settings.
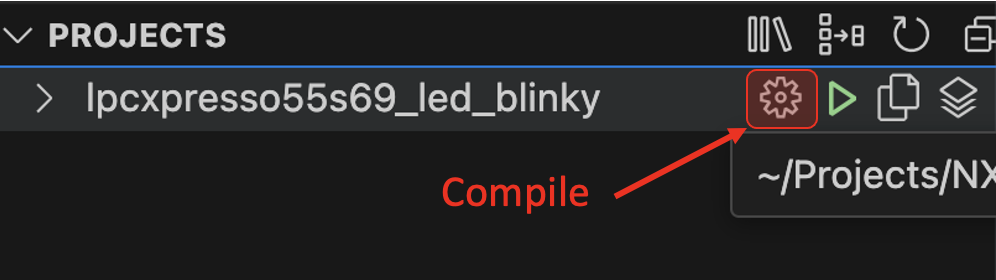
Figure 13 – Placing your cursor over the lpcxpresso55s69_led_blinky project will reveal a gear that can be used to compile the program.
When you click build, the project will invoke Cmake and build the project. The output that I got from the project was the following:
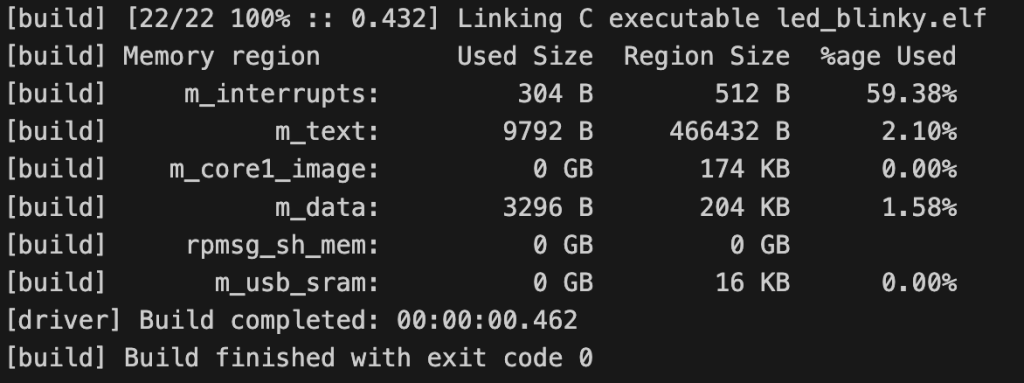
Figure 14 – The blinky led project build output
With these results, we are now ready to debug the project!
Debugging a Project with NXP MCUXpresso for VS Code Extension
Before starting a debug session, it is a good idea to connect your development board to your computer. Once that is done, there are two different ways that you can initiate a debug session. First, you can go to the “Run” and then “Start Debugging” menu. Alternatively, in the Project view, you can click the debug Play symbol when you place your cursor over the lpcxpresso55s69 project.
When you start your debug session, you should see your Visual Studio Code terminal spit out some text as it initializes the debug session, programs the board, and executes the program. If everything goes as expected, you should see an LED blinking on the development board! In the upper left-hand corner of VS Code, you’ll notice some controls for pausing, starting, and restarting the debug session. If you press pause, you’ll likely find yourself in the SysTicks_Delay function.
There are a few important points to note in this paused debug state. First, you have access to a watch view and a variable view. Looking closely, you’ll notice that the variables view has a variable n defined with some current value. In addition, you can see a register view that lets you peek in on the CPU registers! If you want to look at the microcontroller’s peripheral registers, an xperipherals view enables you to dig in. You’ll also find a call stack that tells you your call tree. Depending on the extensions that you have installed, there may also be other views that you can see.
Go ahead and click play, and you should see that your LED is blinking again!
Conclusions
The NXP MCUXpresso for VS Code extension enables you to customize your development environment while still easily interacting with your hardware in a way that is already natural to you. With Visual Studio Code, you can create a development environment to write code, perform static analysis, integrate it into a CI/CD pipeline , easily run unit tests, and much more. We’ve seen how easy it is to install the extension and clone example repositories. We successfully built and debugged the example application on the target.
You should now be up and running with MCUXpresso for VS Code! How you customize your development environment is now entirely up to you! To help you go a little further, you’ll find some additional resources at the end of this post.
Happy Coding!
Going Further Resources
There is a public forum on the NXP Community for MCUXpresso for VS Code which can be found here.
MCUXpresso for VS Code Training Videos can be found here
Struggling to keep your development skills up to date or facing outdated processes that slow down your team, raise costs, and impact product quality?
Here are 4 ways I can help you:
- Embedded Software Academy: Enhance your skills, streamline your processes, and elevate your architecture. Join my academy for on-demand, hands-on workshops and cutting-edge development resources designed to transform your career and keep you ahead of the curve.
- Consulting Services: Get personalized, expert guidance to streamline your development processes, boost efficiency, and achieve your project goals faster. Partner with us to unlock your team's full potential and drive innovation, ensuring your projects success.
- Team Training and Development: Empower your team with the latest best practices in embedded software. Our expert-led training sessions will equip your team with the skills and knowledge to excel, innovate, and drive your projects to success.
- Customized Design Solutions: Get design and development assistance to enhance efficiency, ensure robust testing, and streamline your development pipeline, driving your projects success.
Take action today to upgrade your skills, optimize your team, and achieve success.


Overall, I thoroughly enjoyed your article and found it highly informative, thanks for sharing.
Thanks!
Excellent article! On a similar topic, one thing I recently discovered when looking into the RP2040 on Pico, is that doing the sdk install per the instructions will give you headaches with setting up vscode as your IDE. What worked for me was to start with a clean git pull of the pico_sdk & pico_examples tree, do not run the cmake stuff directly as instructed. Install all the required tools for cross-compile, then just let vscode “build all” from the top of the pico_examples directory. That Ninja no likey native Linux cmake builds!
Excellent! Thanks for sharing!
Brilliant thank you so much. Setup for people who don’t speak jargonese.
I did trip up once though: it’s hard to believe we’re approaching the 30th birthday of Windows 95’s introduction of spaces in filenames, and it still causes issues. Don’t pick a project directory with a space in the path!
I’m here because I’m considering migrating some LPCOpen projects to the new “SDK paradigm” way of working. Wish me luck!
Thanks for the comment. I’m glad to hear that the post was helpful!
Spaces in Windows filenames and paths has been a longtime issue. Glad you got it resolved though!
Good luck! I think you’ll like the SDK paradigm once you get used to it!