How to Add an RTOS to a Bare-Metal Embedded Application in 45 Minutes
Learning how to add an RTOS to bare-metal firmware is often treated as the point at which a project must be rebuilt from the ground up. Search for tutorials, and you’ll usually find yourself installing a new framework, learning a new build system, adopting a new project structure, and rewriting code around a vendor-specific API. It’s no surprise that many teams postpone the transition until the pain becomes unbearable.
In reality, learning how to add an RTOS to bare-metal firmware is a much smaller problem than most developers imagine. In fact, for many projects, it can be done in a few hours rather than a few months.
Unlike many RTOS tutorials that begin by installing an entirely new framework, we’ll keep our existing STM32 project intact and add only the scheduler. If you already have a working application, you do not need to abandon it to gain access to multithreading, semaphores, message queues, etc. All you need is a scheduler, a periodic tick, a context switch mechanism, and a few integration hooks. Everything else is optional.
The challenge is that most RTOS integration guides blur the line between introducing an RTOS (Real-Time Operating System) and adopting an entire embedded software framework. They make you believe that they are one and the same! They are not.
In this post, I’ll show you how to add an RTOS to bare-metal firmware without restarting your project from scratch. We’ll start with a working STM32 application, integrate the PX5 RTOS using its POSIX pthreads interface, and walk through the handful of changes needed to run multiple threads. Along the way, we’ll separate what is genuinely required from what frameworks simply make convenient and discuss why choosing a standards-based API today can save you from rewriting application code tomorrow.
Let’s dig in!
The Starting Point: A Working Bare-Metal STM32 Project
To demonstrate how easy it is to add an RTOS to bare-metal, we’ll use a simple Hello Blinky application that already compiles successfully on the IAR Embedded Workbench for an STM32 NUCLEO-C562RE development board.
The project was easy to create. I generated a bare-metal project using STM32CubeMX and wrote some basic control logic to read a button, change a state, and blink an LED. The project contains little more than the standard startup code, clock configuration, and a basic while loop in main().
The application itself isn’t important. Whether your project blinks an LED, samples an ADC, or communicates over UART, the integration process is the same. The only requirement is that the application already builds, programs, and runs correctly. With the application in hand, all we need to do is add PX5 RTOS.
PX5 RTOS is a fifth-generation real-time operating system (RTOS) designed specifically for resource-constrained embedded devices. It emphasizes high performance, a minimal memory footprint, and certified safety, making it suitable for various demanding applications, including automotive, industrial automation, medical devices, and IoT.
With a working project established, we’re ready to begin adding PX5 to the application. As you’ll see, the first step is much less invasive than most developers expect, and the overall process is fast.
Step-by-Step: How to Add an RTOS to Bare-Metal
From the RTOS’s perspective, every application only needs to provide four things:
- A mechanism to perform a context switch between threads.
- A periodic system tick so the scheduler can manage delays, timeouts, and timers.
- Stack memory for each thread that will execute.
- An entry point that starts the scheduler and hands it control.
On a Cortex-M microcontroller, the context switch is typically performed using the PendSV exception, while the periodic tick comes from SysTick. Most RTOSes provide the scheduler itself along with the synchronization primitives, such as mutexes, semaphores, and message queues. Your application simply supplies the hooks that allow those services to operate.
At this point, it’s worth emphasizing what we’re not going to change.
We’re not replacing the startup code, rewriting the linker script, reorganizing the project structure, or migrating to a new build system. The application remains exactly where it is. All we’re doing is adding the scheduler and connecting it to a handful of architecture-specific hooks.
The integration consists of five straightforward steps.
Step 1: Add the RTOS Source Files
The first step in learning to add an RTOS to bare-metal is simply adding the PX5 RTOS source to the existing project.
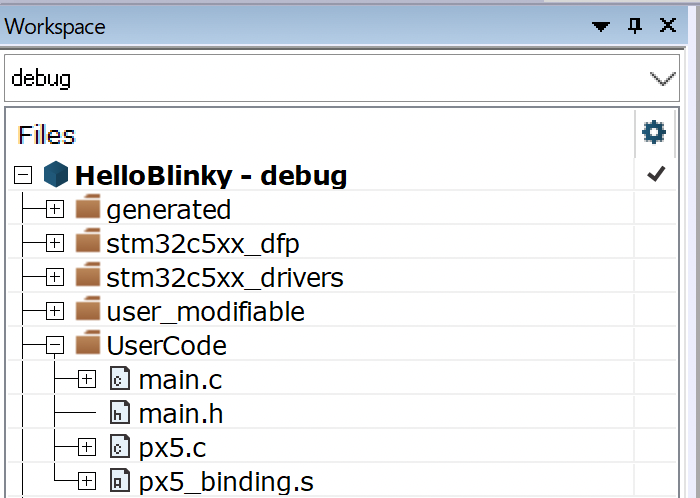
Unlike a framework-based solution, there is no manifest to update, no project conversion, and no build system to replace. Add the PX5 source package to your project. Then, in IAR Embedded Workbench, add the PX5 scheduler implementation (px5.c) and the Cortex-M binding (px5_binding.S) to the project as shown below:
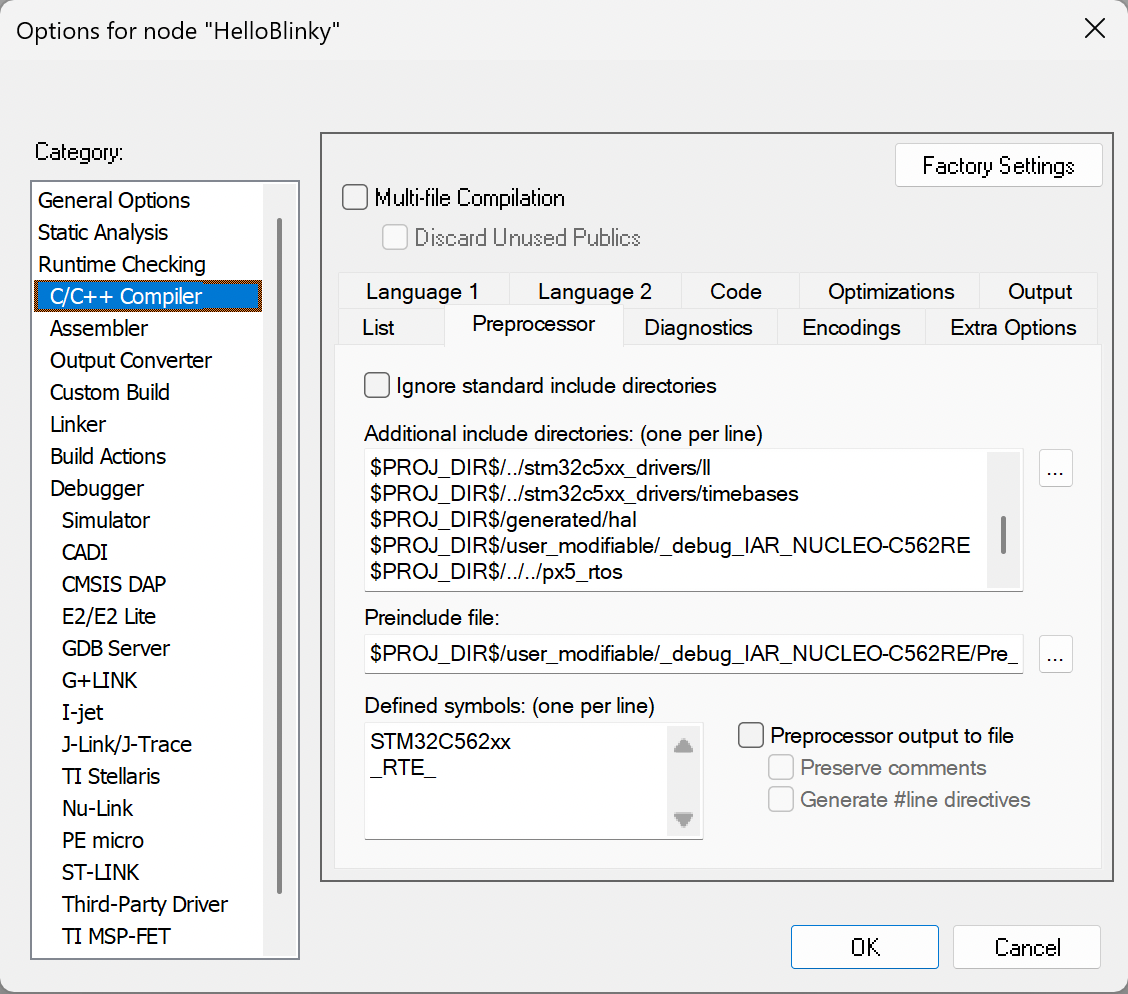
Next, we need to point the compiler at the PX5 header and source directories. I did this by going to Project Options, clicking C/C++ Compiler and then the Preprocessor tab. I then added the PX5 directory to the compiler’s include path as shown below:
That’s it! I’m able to successfully build the project and verify that PX5 RTOS is also compiled:
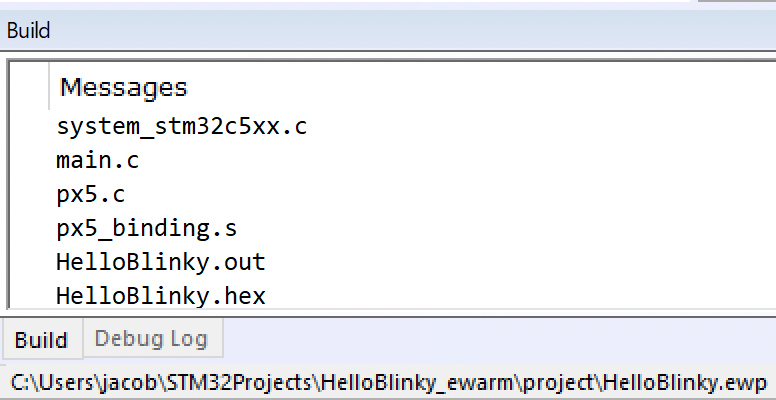
At this point, the RTOS has been added to the build, but it isn’t running yet. We still need to start the scheduler and configure a few more items.
Step 2: Start the Scheduler
Next, we want to start the scheduler. The code is there, but it’s not doing anything. To include it, add the POSIX threads header to main.c:
#include <pthread.h>Then initialize the RTOS by calling px5_pthread_start() as follows:
px5_pthread_start(0, NULL, 0);This is one of the more interesting aspects of the PX5 design. Unlike many RTOS startup sequences that never return from the scheduler start routine, px5_pthread_start() returns after the scheduler has been initialized. From that point forward, main() is simply another POSIX thread managed by the RTOS.
In other words, you don’t rewrite your application around the scheduler. The scheduler is inserted underneath the existing application!
One additional change might be required during this step. Since PX5 implements the context-switch mechanism, the default PendSV_Handler generated by STM32CubeMX should be removed or commented out. Only one handler can own the PendSV exception, and that responsibility belongs to the RTOS.
This is easily done by navigating into your part’s _it.c file. For example, if you are using the STM32C051, the file would be stm32c051xx_it.c. For the STM32C562, this file is not generated, so no additional change is required.
You can verify that PX5 is mapped to PendSV_Handler by checking your map file. After compiling, I can see that PendSV_Handler is in px5_binding.o as shown below:
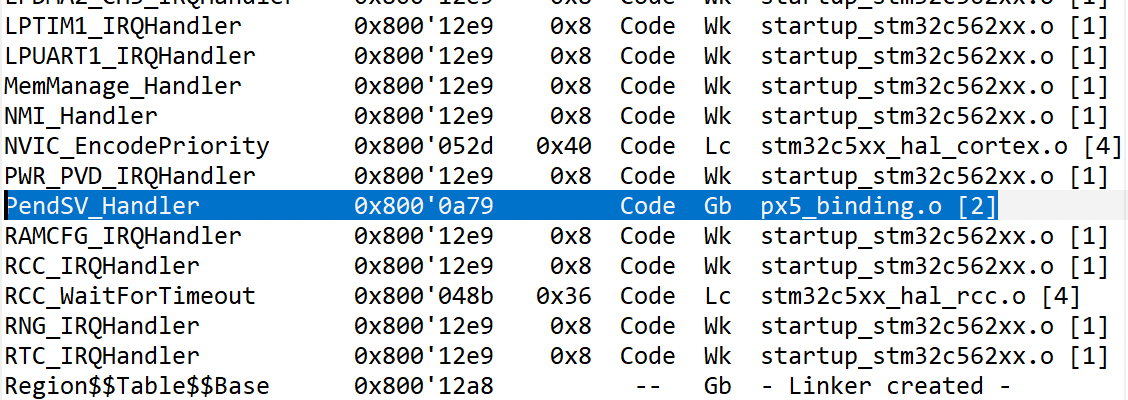
At this point, your application is multithreaded, even though it will still execute exactly as before. When I run the application, I see the exact same behavior as before, except now the bare-metal code is being executed by the PX5 kernel.
All non-timer related functionality is now enabled! However, if you want to leverage the time-related functions, you need to add support for time. Let’s do that next.
Step 3: Add the System Tick
The scheduler is now running, but it doesn’t yet have a source of time.
To enable delays, timers, and timeout services, call px5_timer_interrupt_process() from the SysTick_Handler(). You can do this by searching your project for SysTick_Handler. For the STM32C562, you can find it in generated/hal/mx_system.c. Then, modify it as follows:
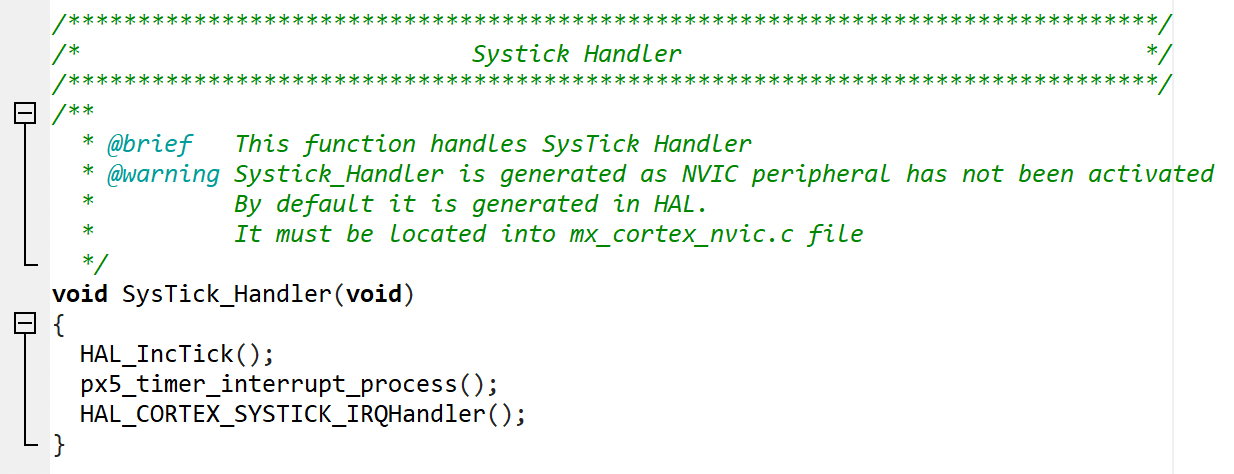
Note that you’ll probably need to add #include <pthread.h> to the top of the file too.
You’ll also need to configure the SysTick interrupt priority appropriately for your application. For our example, I set the priority to high (1). To do that, I went into the generated/hal/stm32c5xx_hal_conf.h file, located USE_HAL_TICK_INT_PRIORITY, and set it to 1 as follows:
#define USE_HAL_TICK_INT_PRIORITY 1U /*!< tick interrupt priority */Without this hook, thread scheduling, mutexes, semaphores, and other synchronization primitives continue to work normally. Only services that depend on the passage of time, such as thread sleeps and software timers, remain unavailable.
This separation is useful because it demonstrates that the scheduler itself is largely independent of the timer infrastructure. Most developers don’t realize that time is just an RTOS feature! You can use the RTOS in a timeless, event-driven application!
Step 4: Verify You Added an RTOS to Bare-Metal Correctly
At this point, the application should build, download, and execute exactly as it did before.
The difference is that it is now running under RTOS control.
A simple way to verify that timer services are operational is to replace a busy wait with a call to:
px5_pthread_tick_sleep(10);If the thread sleeps and resumes as expected, the scheduler and system tick are working together correctly.
Step 5: Enable Optional Features
The previous four steps are all that’s required to add an RTOS to bare-metal.
From there, you can enable additional capabilities as your application requires them.
For example, if you plan to create threads, mutexes, or other objects dynamically, you can provide a memory region to px5_pthread_start() that PX5 will use for allocation. Applications that rely entirely on static allocation can simply omit this step.
Similarly, if you’re using PX5’s Pointer/Data Verification (PDV) capability, you can supply a runtime-generated random seed during startup. This creates unique verification values each time the application executes, strengthening the integrity checks performed by the RTOS.
Neither feature is required to get an existing bare-metal application running under PX5. They’re incremental capabilities that you can enable when your application needs them.
Key Takeaway: At this stage, you’ve successfully added an RTOS to bare-metal. The project is already running under RTOS control. The original startup code is still intact, the project structure hasn’t changed, and the existing build system continues to work exactly as before. Rather than rebuilding the application around a new framework, you’ve simply introduced a scheduler beneath the software that was already working.
From Super Loop to Threads
At this point, the application is running under the PX5 scheduler, but its behavior hasn’t changed. The entire super loop is simply executing inside the main() thread.
That’s exactly where you want to be.
One of the biggest mistakes developers make when introducing an RTOS is trying to redesign the entire application at once. Every loop becomes a thread, every global variable becomes shared state, and suddenly the project has become far more complicated than it needs to be.
Instead, migrate incrementally.
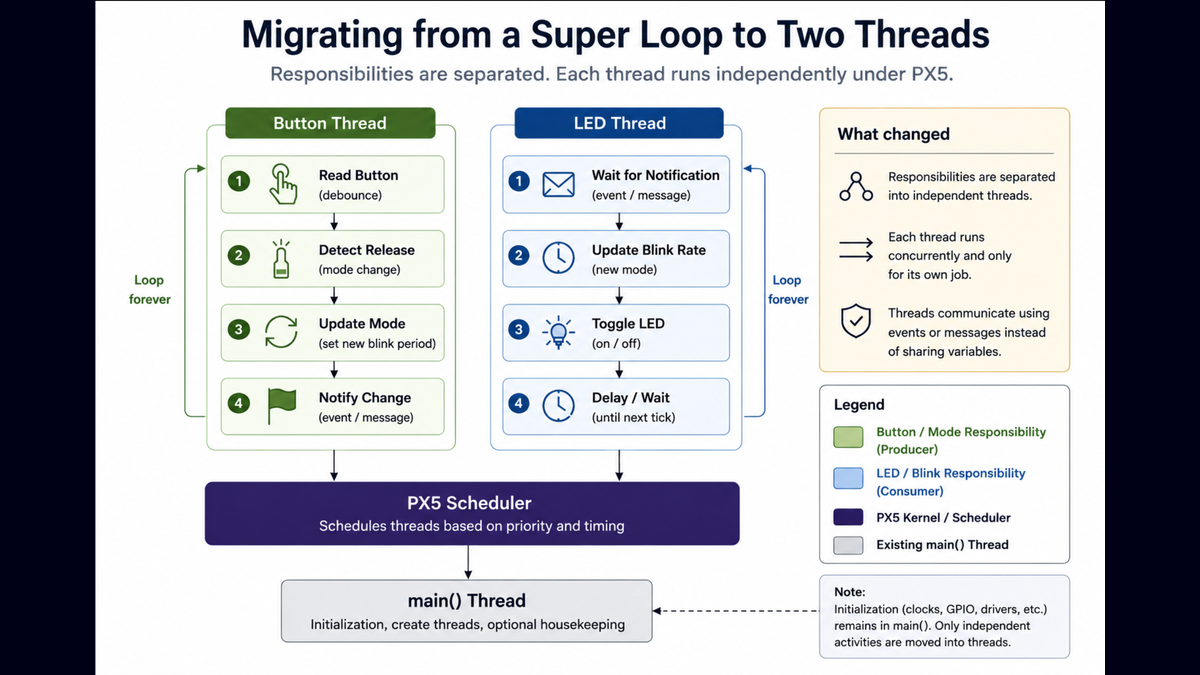
Our example application already contains two independent responsibilities. One portion of the code monitors and debounces the user button, while another is responsible for blinking the LED at the selected rate. Today, both responsibilities execute inside the same while loop, but they don’t have to.
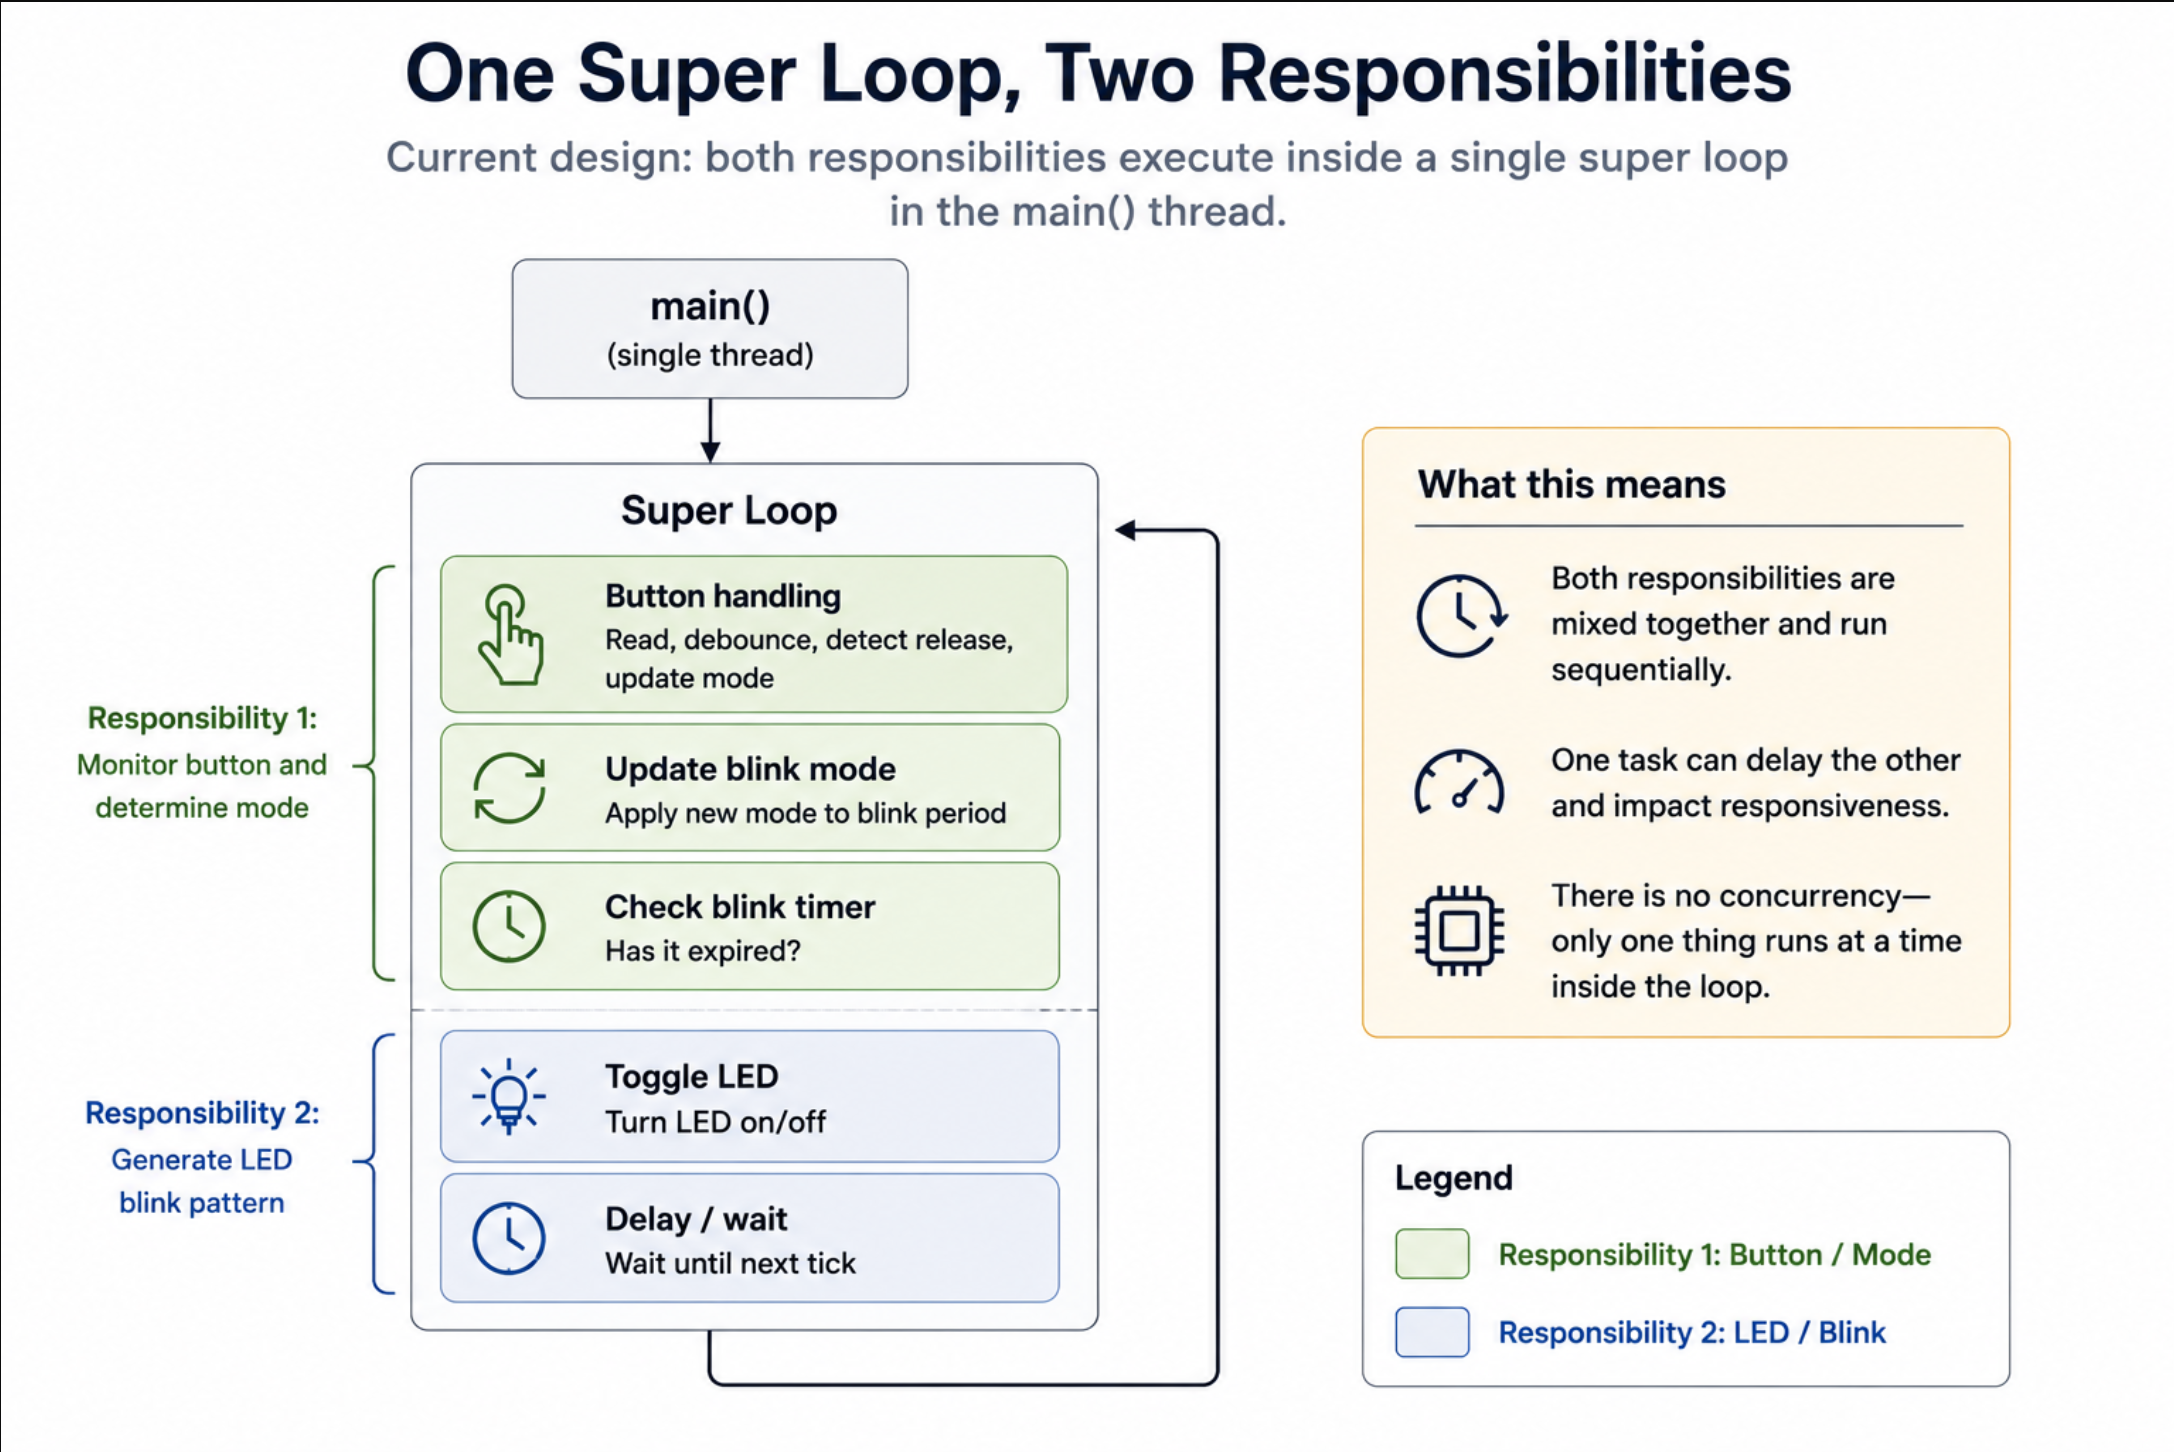
The first step isn’t to rewrite the application. It’s simply to identify activities that can execute independently. Since main() is already running as a POSIX thread, you can begin moving functionality into additional threads one responsibility at a time.
For example, the LED blink logic can be moved into its own thread with very little code:
#include <pthread.h>

static void *led_thread(void *arg)
{
    while (1)
    {
        HAL_GPIO_TogglePin(HAL_GPIOA, LD1_PIN);
        px5_pthread_tick_sleep(BLINK_PERIOD);
    }
    return NULL;
}We then only need to create the thread during start-up for the LED thread to run:
pthread_t led_thread_handle;

pthread_create(&led_thread_handle,
               NULL,
               led_thread,
NULL);Now the LED executes independently of the rest of the application. The button handling can remain exactly where it is until you’re ready to migrate it. Eventually, the application evolves into something that looks like this:
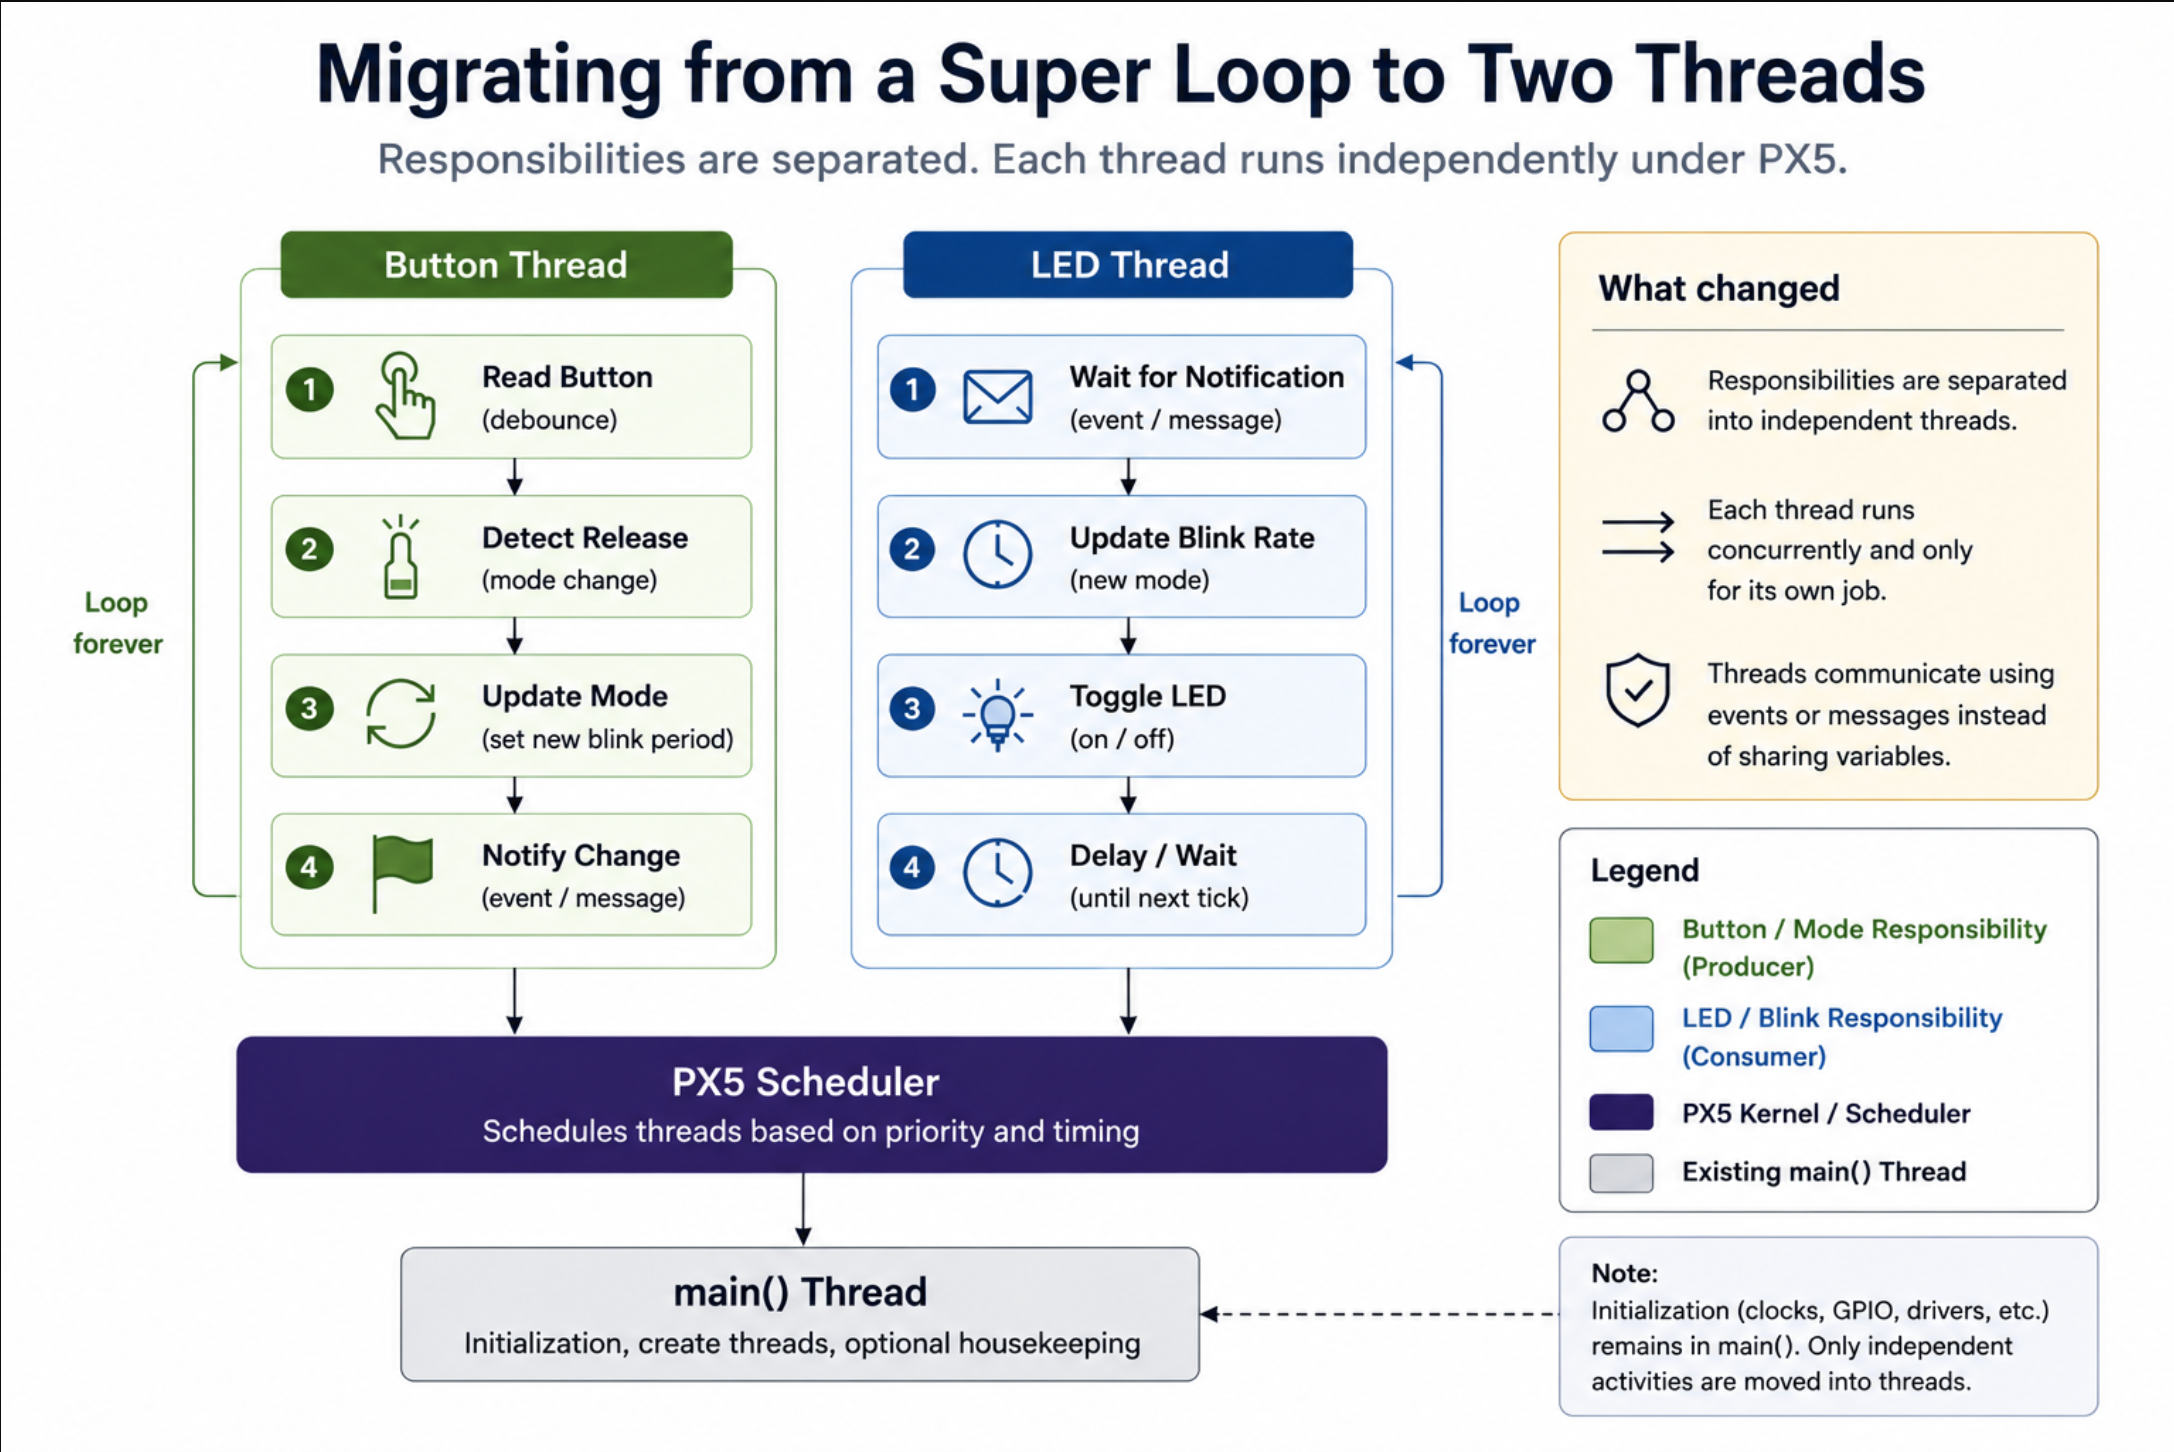
Your application code might end up looking like the following:
int main(void)
{
    if (mx_system_init() != SYSTEM_OK)
    {
        return -1;
    }

    gpio_init();

    /* Start PX5 RTOS */
    px5_pthread_start();

    /* Create application threads */
    pthread_create(&led_thread_handle,    NULL, led_thread,    NULL);
    pthread_create(&button_thread_handle, NULL, button_thread, NULL);

    while (1)
    {
        /* Optional housekeeping */
        px5_pthread_tick_sleep(1000);
    }
}Notice what didn’t change. The hardware initialization remains in main(). The clock configuration is untouched. GPIO initialization is exactly the same. The application wasn’t rewritten; it evolved!
That’s an important distinction.
The goal isn’t to convert every function into a thread overnight. The goal is to identify independent activities, move them into their own execution contexts, verify that everything still works, and then repeat the process. Each migration is small, easy to understand, and easy to test. Yet, slowly improves your architecture, scalability, reuse, etc.
Perhaps more importantly, none of this work is required to get PX5 running. The application was already executing successfully under RTOS control after the previous section. Creating additional threads is simply the next step as your application grows in complexity.
How Does This Compare to Zephyr?
Throughout this blog, we’ve walked through how to add an RTOS to bare-metal by taking an existing STM32 application and adding multithreading without replacing the build system or rewriting the application. If you’ve worked with Zephyr before, you may be wondering how this process compares.
The short answer is that the two technologies solve different problems.
PX5 RTOS and associated middleware products (PX5 MODULES, PX5 FILE, PX5 NET, PX5 SECURE, PX5 USB, and PX5 FLASH) are designed to be platform-agnostic and easily integrate into any environment, allowing developers to choose their development tools and build environment. This component methodology enables developers to use as much or as little as they wish. PX5 does not dictate device management or prescribe a particular device driver format. It does not try to define the entire system. That said, the goal of this walkthrough was simply to add those capabilities to an existing application.
Zephyr, on the other hand, is a complete embedded software platform. In addition to an RTOS, it provides a hardware abstraction layer, driver framework, networking stack, middleware, security services, device management, and a comprehensive build and configuration system. Those capabilities provide tremendous value, but they also introduce additional setup, learning curves, and complexity because you’re adopting an entire ecosystem rather than just a scheduler.
The difference becomes clear when looking at the integration process.
| PX5 RTOS | Zephyr |
|---|---|
| Add the RTOS source | Install the Zephyr SDK and toolchain |
| Add two source files and an include path | Create or import a west workspace |
| Start the scheduler | Configure Kconfig options |
| Connect PendSV and SysTick | Configure devicetree and board support |
| Existing application remains intact | Applications are typically developed inside the Zephyr ecosystem |
Neither approach is inherently better.
If you’re developing a new product and want access to Zephyr’s extensive ecosystem of drivers, middleware, and supported boards, adopting the platform often makes excellent sense.
If, however, you don’t need or want a complete platform definition and would rather only add the components you need, then PX5 is an appealing choice. This is true if you already have a mature bare-metal application and simply need multithreading, or if you have an existing RTOS-based design and are looking for a change. In general, PX5 RTOS integration is considerably easier because that is its fundamental design goal.
That’s an important distinction. Many developers think adding an RTOS automatically means adopting an entirely new development ecosystem. As this walkthrough demonstrates, it doesn’t.
Final Thoughts on Adding an RTOS to Bare-Metal
When many developers think about how to add an RTOS to bare-metal, they imagine weeks of work, a new build system, and a major application rewrite. In reality, learning how to add an RTOS to bare-metal is much more modest.
Starting with a working STM32 bare-metal application, we added PX5 RTOS by introducing the scheduler, connecting a few architecture-specific hooks, and enabling the system tick. The application itself remained largely unchanged, and from there, it could evolve into a multithreaded design one responsibility at a time.
That distinction is important when you add an RTOS to bare-metal.
Adding an RTOS and adopting a software framework are two very different decisions. If your objective is simply to introduce deterministic scheduling and multithreading into an existing application, you don’t necessarily need to replace the project you’ve already built. To add an RTOS to bare-metal successfully, sometimes all you need is a scheduler.
PX5 demonstrates that approach well. The integration is small, the application remains familiar, and the migration can be performed incrementally instead of as a wholesale rewrite.
The next time someone tells you adding an RTOS means starting over, you’ll know better.
Want embedded engineering insights like this delivered to your inbox? Sign up for my Embedded Bytes newsletter to get the latest posts, insights, and hands-on tips delivered straight to your inbox.
Struggling to keep your development skills up to date or facing outdated processes that slow down your team, raise costs, and impact product quality?
Here are 4 ways I can help you:
- Embedded Software Academy: Enhance your skills, streamline your processes, and elevate your architecture. Join my academy for on-demand, hands-on workshops and cutting-edge development resources designed to transform your career and keep you ahead of the curve.
- Consulting Services: Get personalized, expert guidance to streamline your development processes, boost efficiency, and achieve your project goals faster. Partner with us to unlock your team's full potential and drive innovation, ensuring your projects success.
- Team Training and Development: Empower your team with the latest best practices in embedded software. Our expert-led training sessions will equip your team with the skills and knowledge to excel, innovate, and drive your projects to success.
- Customized Design Solutions: Get design and development assistance to enhance efficiency, ensure robust testing, and streamline your development pipeline, driving your projects success.
Take action today to upgrade your skills, optimize your team, and achieve success.