Accelerating Embedded Software Development with NXP’s Application Code Hub
When you’re working on an embedded software project, chances are high—up to 65%—that you’ll face delays and budget overruns. A significant contributor to these setbacks is the scarcity of robust, well-documented examples that effectively showcase how to utilize your microcontroller’s hardware, drivers, middleware, and even target application. The typical developer is left to piece together open-source libraries with minimal guidance, leading to inefficiencies and frustration.
This problem is alleviated for developers using NXP microcontrollers with the Application Code Hub. The Application Code Hub is a comprehensive repository that offers developers a wealth of software examples, snippets of code, application software packs, and demonstration projects crafted by specialists in the field. It allows the user to execute searches for distinct application examples, which can then be seamlessly integrated into their development workspace.
In today’s post, we’ll explore how to use Visual Studio Code to start an Application Code Hub project for the FRDM-MCXN947 development board.
Accessing NXP’s Application Code Hub
Before we get started, it’s important to know that developers can access the Application Code Hub using several mechanisms. Your chosen mechanism will depend on your IDE choice and your preferred development workflow. Let’s quickly explore some options for accessing NXP’s Application Code Hub.
First, they can manually access any project using GitHub through manual links found at Application Code Hub. The manual approach allows developers to filter and search for projects their microcontroller supports and integrate them however they see fit. For example, if we are interested in projects for the FRDM-MCXN947, we can search the Application Code Hub and find something like Figure 1. You can see that there are currently 29 example projects (see the upper right of Figure 1) that can be leveraged to help accelerate development.
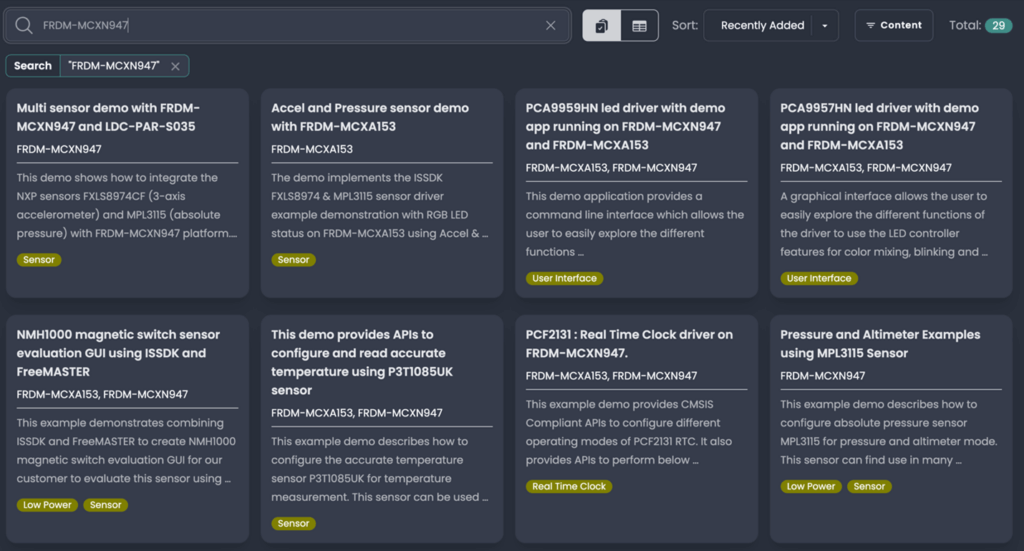
Figure 1 – An example of the projects available on the Application Code Hub for the FRDM-MCXN947 development board.
There are quite a few projects and examples available for the development board, and later in this post, we’ll explore how to get started with the MCX Accelerometer and Pressure Monitor example.
Next, you can import a project into your workspace in Visual Studio Code using NXP’s MCUXpresso for Visual Studio Code extension. In the Quick Start Panel, click on the Application Code Hub and then use the search feature to filter the available projects, as shown in Figure 2.

Figure 2 – An example of the projects available on the Application Code Hub for the FRDM-MCXN947 development board using MCUXpresso for Visual Studio Code extension.
On the right side of Figure 2, you can see that the Application Code Hub results are identical to the first option. We can also see that 29 projects are currently available and listed again, just like on the website.
Finally, the last method for accessing the Application Code Hub is to use the Quick Start Panel within the MCUXpresso IDE. It’s accessed like Visual Studio Code and provides the same experience. We’re going to focus on Visual Studio Code since that is what most developers today are using, especially teams looking to modernize their software development workflows.
Now that you know the different ways you can access the Application Code Hub, let’s look at an example so you can understand how they can help you accelerate development.
Best practices for getting started
Before we dig into the specific example, I have a few best practices to share with you. It’s always a good idea before you start on a project to make sure that your toolchains are up to date.
To do this, open Visual Studio Code and find the MCUXpresso for VS Code extension. In the QUICKSTART PANEL, you’ll find several options. One of them is “Open MCUXpresso Installer” as shown below in Figure 3.
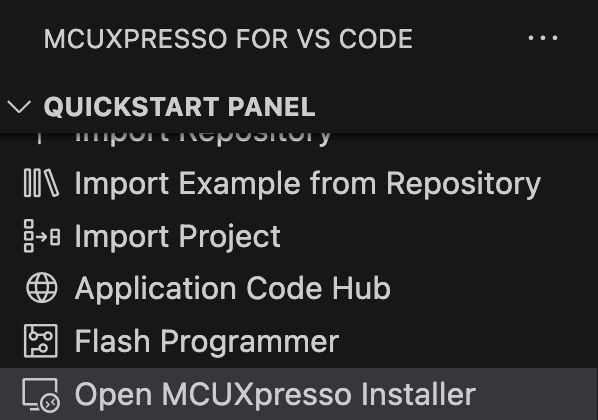
Figure 3 – Before starting, update your software using the MCUXpresso Installer in VS Code.
Click “Open MCUXpresso Installer”. You’ll notice a VS Code pop-up asking if you want to download the MCUXpresso Installer. Click Download. It will take a moment for the download and then automatically install. When it is complete, you’ll see a new screen pop up like that shown in Figure 4. Click OK.

Figure 4 – The MCUXpresso Installer will pop-up and allow you to install the latest tools.
You’ll want to make sure that you review the tools that you have installed and then install the latest. I recommend that you install:
- MCUXpresso SDK Developer
- Arm GNU Toolchain
- Standalone Toolchain Add-ons
- LinkServer
If you are interested in Zephyr, you can also include those. Once you’ve selected those tools, click install to get the latest.
The reason we want to install the updates is to ensure we are working with the latest and greatest tools that also have any bug fixes for the projects and tools we will be working with. Now that are toolchains are updated, let’s look at a project example.
Getting Started with the MCX Accel and Pressure Monitor
The first step to try the MCX Accel and Pressure Monitor example is to open Visual Studio Code and click on the Application Code Hub in the MCUXpresso for Visual Studio Code extension. You’ll notice a few things about the Application Code Hub.
First, there is a filter. You can use the dropdown to select items like
- Device Family
- Toolchains
- Item Type (demo, application, etc)
- Peripheral
- And other categories that might be of interest like AI, sensors, etc
We want to filter for projects that are:
- VS Code
- MCX
If you are following along, add those filters.
The second option, which we’ll be using, is a search bar. Let’s search for the following:
FRDM-MCXN947
You should then see something like the following on your screen:

Figure 5: The Application Code Hub can be accessed in Visual Studio Code through the MCUXpresso extension, then under the QUICKSTART PANEL.
If you click on the MCX Accel and Pressure Monitor tile, you’ll find that a new tab opens with the details for the project. Nearly every Application Code Hub project has the following to help you get started:
- Software
- Hardware
- Setup
- Results
- FAQs
- Support
- Release Notes
There may be variations from one project to the next, but the details are there to help you get the project up and running. Each section provides you with everything you need to run and learn from the example. For example, under the software section, you’ll find the software requirements to run the watchdog example:
- IoT Sensing SDK (ISSDK) v1.8 offered as middleware in MCUXpresso SDK for supported platforms
- MCXUpresso SDK 2.14.0 for FRDM-MCXN947
- MCUXpresso IDE v11.9.0
- Git v2.39.0
Under hardware, you’ll find we need:
Some examples may require additional sensor boards and hardware to run the example entirely.
To get started, all you need to do is look at the bottom of the Application Code Hub, select the location you’d like the project to be saved to, and then click Import Project(s).
The repository for the project will be automatically installed. In fact, once everything is configured, you’ll notice at the top of VS Code at the command palette that you’ll be prompted with something like:

Figure 6: To import the project into your workspace, you must select the project(s) and click ok at the command palette in VS Code.
You’ll want to click OK to bring the project into your workspace. Once you’ve done this, you’ll be prompted again with:

Figure 7: You must associate a toolchain with your project. Select the most recent toolchain available.
You can select the toolchain you want associated with your project. I’d recommend that you use the latest.
In the MCUXpresso for VS Code extension, in the Projects section, you’ll see that your project is imported:

Figure 8: The project has been successfully imported from the Application Code Hub.
If you click the button along the project name that is not green, with the down error, that will compile your application. You should see something like the following when compilation is complete:

Figure 9: The example project successfully compiles and is ready to be flashed to the target.
At this point, the project is imported and it compiles successfully. You can now just follow the directions in the in the Application Code Hub MCX Accel and Pressure Monitor tab to learn about the example and run it.
Taking your Next Steps
As you have seen in this post, getting access to existing, robust examples is absolutely critical to helping you and your development team deliver projects on time. Without existing examples, you’re stuck digging through datasheets and open-source software that may or may not fit your needs.
As you’ve seen, using the Application Code Hub is simple. It easily integrates into your development workflow and can help you get a leg up on getting things done. When you leverage existing examples like this, it can help you focus more on your application code and leverage the common code that other experts have already put together.
For your next steps, I recommend you stop by the Application Code Hub and check out the currently available examples. As you saw, each example has instructions on how to get started and run it. Pick something that interests you or solves a challenge you are currently facing. Try out the example and see how it simplifies your development.
Until next time, happy coding!
Struggling to keep your development skills up to date or facing outdated processes that slow down your team, raise costs, and impact product quality?
Here are 4 ways I can help you:
- Embedded Software Academy: Enhance your skills, streamline your processes, and elevate your architecture. Join my academy for on-demand, hands-on workshops and cutting-edge development resources designed to transform your career and keep you ahead of the curve.
- Consulting Services: Get personalized, expert guidance to streamline your development processes, boost efficiency, and achieve your project goals faster. Partner with us to unlock your team's full potential and drive innovation, ensuring your projects success.
- Team Training and Development: Empower your team with the latest best practices in embedded software. Our expert-led training sessions will equip your team with the skills and knowledge to excel, innovate, and drive your projects to success.
- Customized Design Solutions: Get design and development assistance to enhance efficiency, ensure robust testing, and streamline your development pipeline, driving your projects success.
Take action today to upgrade your skills, optimize your team, and achieve success.