SEGGER Flasher SDK: Build Custom Production Test Apps
Every production line has a bottleneck hiding in plain sight. The board gets programmed at one station, moved to another for functional testing, and maybe a third for calibration. Each station means more fixtures, more equipment, more points of failure, and more time between “flashed” and “shipped.” I’ve seen manufacturing floors where the test station alone adds 30 seconds per board. At volume, that’s not a rounding error. It’s a line item on the BOM.
The SEGGER Flasher SDK answers that question. What if your production programmer could handle all three steps — program, test, and validate — without the board ever leaving the fixture?
That’s exactly what the SEGGER Flasher SDK delivers. It transforms SEGGER’s Flasher programmers from fixed-function flash tools into fully programmable platforms. You write apps in C, compile them for a lightweight virtual CPU, load them onto the Flasher, and run them. Programming, board-level testing, calibration, diagnostics — all from a single station.
In this post, I’ll walk through what the SEGGER Flasher SDK is, show you the development workflow with hands-on examples, explain the built-in sandboxing that keeps production hardware safe, and introduce you to the award-winning emApps platform that brings the same technology to any embedded device.
What the SEGGER Flasher SDK Actually Is
The SEGGER Flasher SDK started life as the Flasher DSK (Device Support Kit). The original purpose was straightforward: if SEGGER didn’t support your target device yet, you could implement the programming algorithm yourself instead of waiting. As a result, silicon vendors and OEMs used it to add device support on their own timeline.
Then SEGGER realized the underlying virtual machine could do more than just run programming algorithms. For instance, you could write any kind of app: test routines, calibration sequences, diagnostic tools, and custom communication protocols. The product was renamed Flasher SDK to reflect this expanded scope.
In practice, you can think of the SEGGER Flasher SDK as a framework for developing device-specific applications for the SEGGER Flasher ecosystem. There are a lot of possible use cases for the SDK that embedded developers should find interesting, such as:
- Programming MCU or SoC internal flash memory
- Programming external rewritable non-volatile memory devices
- Programming an FPGA or CPLD
- Running device tests and board tests during production
- Developing diagnostic applications to support engineers in the field
The Flasher SDK ecosystem is made of several critical pieces:
- S32 C Compiler (
S32CC.exe): Compiles C source code targeting the S32 virtual CPU - Flasher App Builder (
FlasherAppBuilderCL.exe): A command-line tool for building, loading, and executing apps - Speedy Assembler (
SpeedyASM.exe): Assembler for the custom 8-bit cores used in timing-critical operations - Sample projects: HelloWorld, ControlLED, ControlTIF (UART), GetUpTime, Sandbox, and SpeedyPinToggle
- Templates and API docs: Skeleton code for device programming apps and the complete firmware API reference (UM08044)
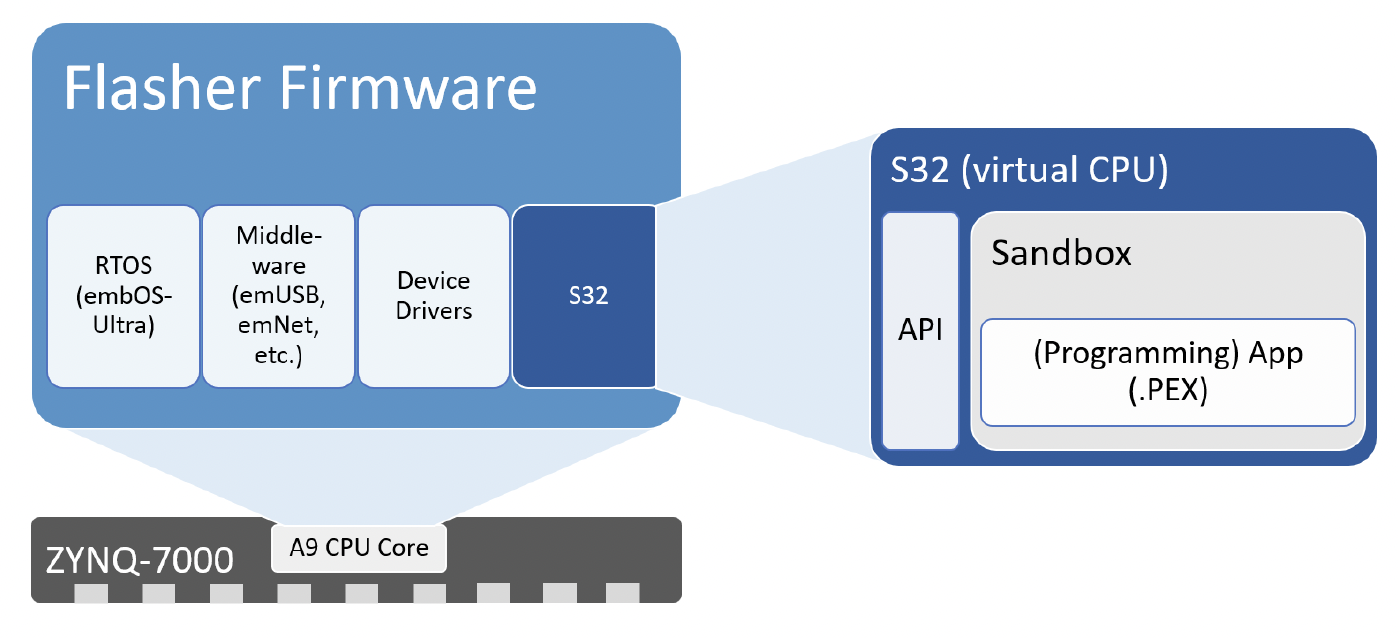
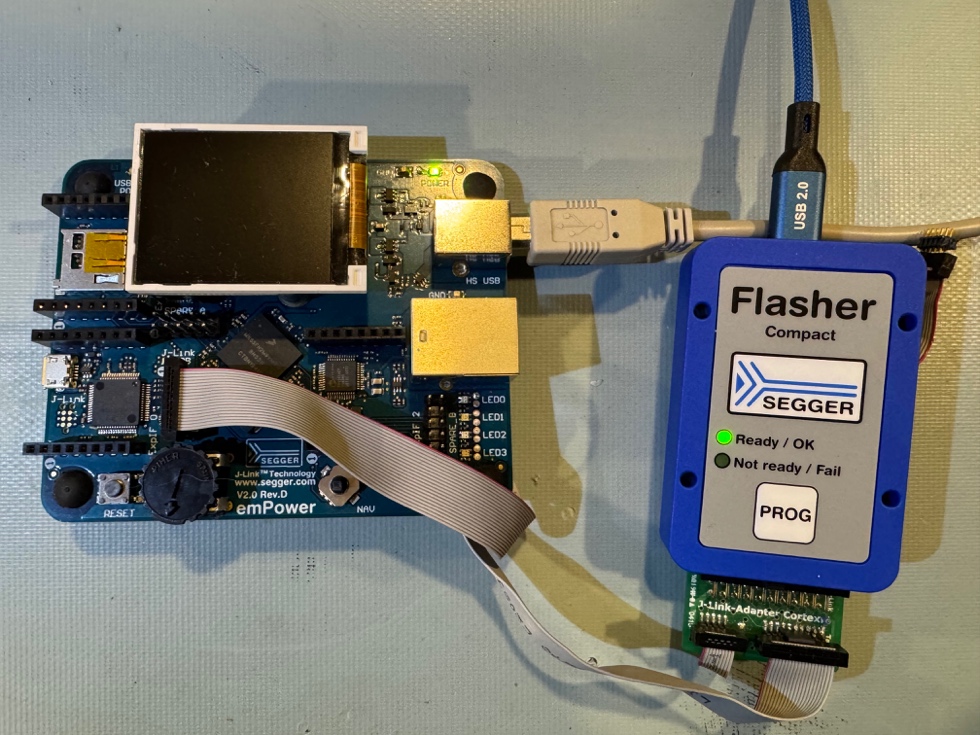
Additionally, the SDK supports the full SEGGER Flasher product line, including the Flasher Compact, Flasher PRO, Flasher Portable PLUS, and the Flasher Hub-4 and Hub-12 control units combined with a number of Flasher Compacts to form a gang programmer.
To help you understand better how the Flasher SDK can be used, let’s look at the workflow for developing a custom application and deploying it to a SEGGER Flasher Compact that I use at Beningo Embedded Group.
The Development Workflow
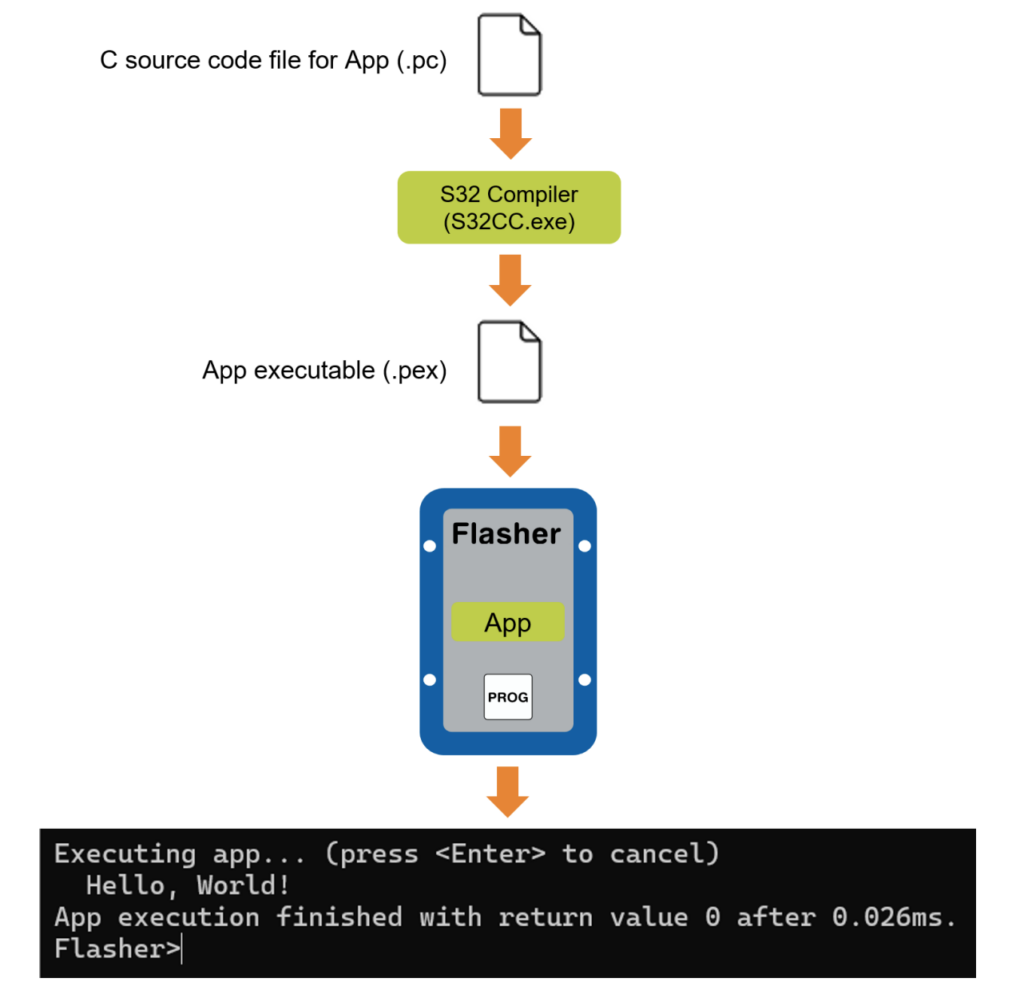
Overall, building a Flasher app follows a simple compile-load-run cycle. You write your app in C using a .pc source file, compile it with the S32 compiler, and the resulting .pex executable runs on the Flasher’s virtual CPU.
The Flasher App Builder (FlasherAppBuilderCL.exe) handles the entire cycle from a single command line. The process is straightforward:
- Connect your Flasher via USB
- Start
FlasherAppBuilderCL.exe(with Admin privileges on Windows) - Navigate to a sample project like HelloWorld
- Type
go
That’s it! That one command compiles the source, downloads the executable, and runs it! For example, when I followed this process to compile and run the sample HelloWorld application, this is what I did and saw:
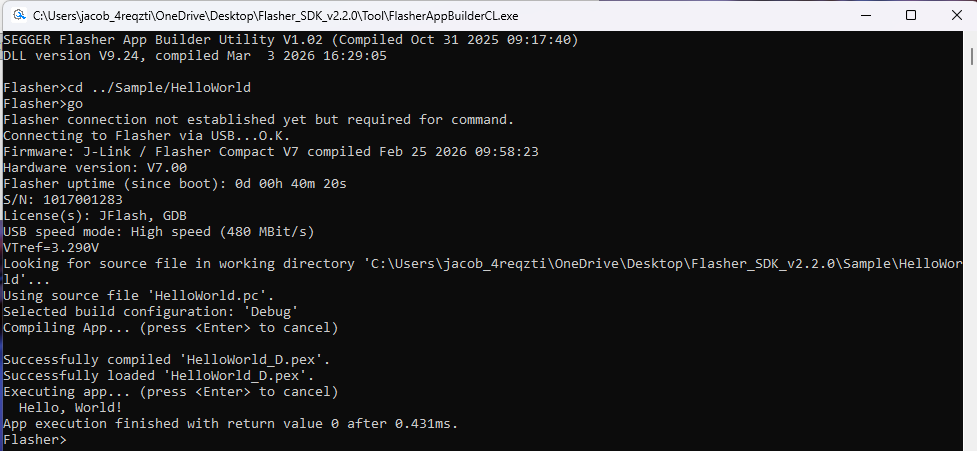
As you can see, running go starts a workflow that processes the desired application and loads it onto the Flasher. Notice the log messages for “Successfully compiled ‘HelloWorld_D.pex'”. That is the App executable we talked about earlier.
Then notice that after successfully loading, you see that the application runs and prints Hello, World!
The source code behind that output is exactly what you’d expect:
int main(void) {
  printf("Hello, World!\n");
  return 0;
}That’s it! No headers, no linker scripts, no startup files. Standard C.
Beyond go, the App Builder gives you finer control when you need it. make compiles without loading. run re-executes an app that’s already loaded. put uploads a compiled .pex to the Flasher.
Go versus Run Workflows
Let’s look at another workflow example that you might find helpful. Flasher supports two different mechanisms for running applications.
go— compiles and then deploys the application.run— just executes what is already there.
You can see this difference by examining the runtime differences between the commands by using the SDK sample GetUpTime. The sample reads the Flasher’s system clock using the built-in function SYS_GetTime():
int main(void) {
  int UpTime;

  UpTime = SYS_GetTime();
  printf("Flasher system uptime: %dms.\n", UpTime);
  return 0;
}You can see that this isn’t a complicated program, but a powerful one. Let’s look at what happens when we run it with go and run.
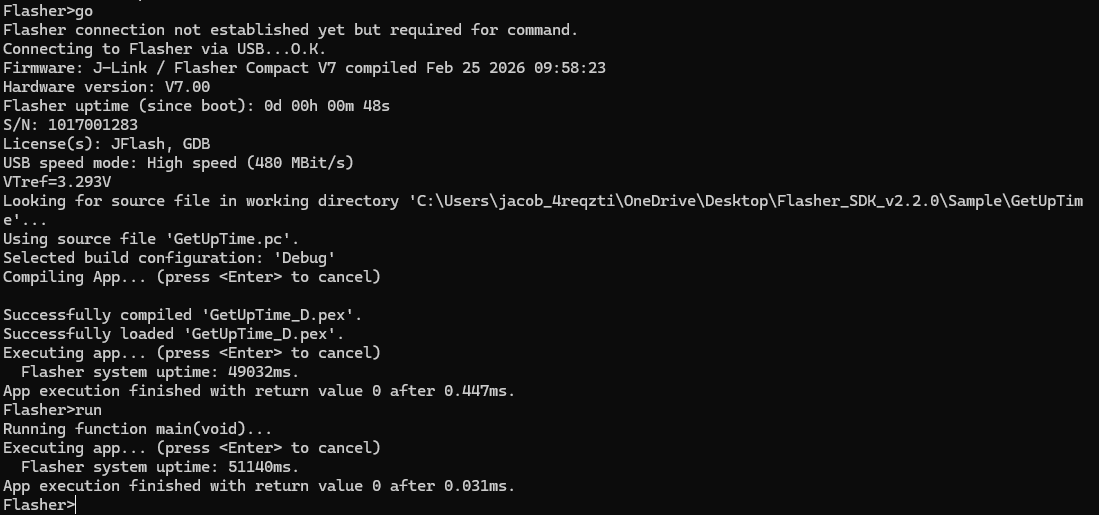
go rebuilt and reloaded. run just re-executed what was already there. The uptime increased by about 2 seconds between runs. Same binary, different Flasher state.
Hands-On: Controlling Hardware and Talking to a Target
Now that the workflow makes sense, let’s do something real. The SDK includes two samples that show what production apps actually look like: one controls the Flasher’s LEDs, the other sends and receives UART data through the target interface.
Blinking LEDs and Deploying Standalone
The ControlLED sample uses SYS_SetLED() and SYS_Sleep_ms() to blink the Flasher’s “Ready / OK” LED five times. The C application looks like the following:
int main(void) {
  U32 i;
  //
  // Alternating LED blink sequence
  //
  for (i = 0; i < 5; i++) {
    SYS_SetLED(0, 1);   // Turn on LED 0
    SYS_Sleep_ms(250);   // Wait for 250ms
    SYS_SetLED(0, 0);    // Turn off LED 0
    SYS_Sleep_ms(250);   // Wait for 250ms
  }
  return 0;
}
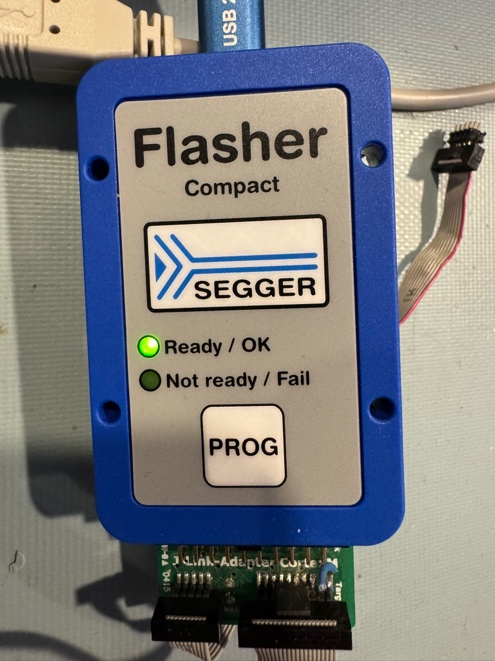
Once uploaded, watch your Flasher Compact. The green “Ready / OK” LED blinks five times over 2.5 seconds.
Simple, but here’s where it gets interesting for production. Use make to compile the app and look at the binary size:
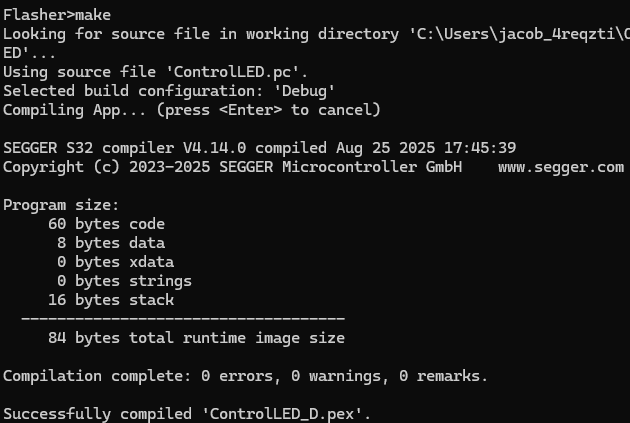
84 bytes. The entire app fits in 84 bytes. Now upload it to the Flasher’s internal filesystem with put:
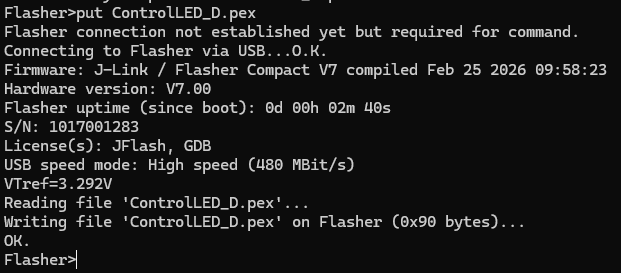
Now press the PROG button on the Flasher. The LED blinks five times — no PC control, no host software. Just the Flasher executing your 84-byte app from internal storage.
In production, you load an app once and press PROG for every board. That LED blink could just as easily be a pass/fail indicator for an operator or a vision system.
UART Communication Through the Target Interface
Blinking LEDs is cool, but it doesn’t truly demonstrate the power of the Flasher SDK. For that, let’s control a UART. The ControlTIF sample configures the UART on the Flasher’s target connector, sends two bytes, reads them back, and verifies the data. Here’s the application:
int main(void) {
static const U8 aOut[2] = {0xA5, 0x5A};
U8 aIn[2];
int r;
//
// Instruct the Flasher to assume a 3.3V target reference voltage
//
SYS_ExecCommand("VTrefTmp=3300");
//
// Initialize UART
//
TIF_PIN_SetFunc(TIF_PIN_PIN7, TIF_PIN_FUNC_UART_TX);
TIF_PIN_SetFunc(TIF_PIN_PIN9, TIF_PIN_FUNC_UART_RX);
TIF_UART_Init(115200); // 8 data bits, one stop bit, no parity
//
// Write data
//
TIF_UART_Write(&aOut[0], sizeof(aOut));
//
// Wait for data to arrive
//
SYS_Sleep_ms(10);
//
// Read data
//
r = TIF_UART_Read(&aIn[0], sizeof(aIn));
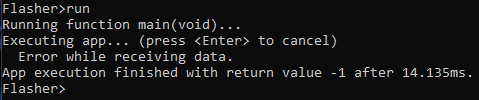
if (r < (int)sizeof(aIn)) {
printf("Error while receiving data.\n");
r = -1;
goto Done;
}
if (memcmp(aIn, aOut, sizeof(aIn))) {
printf("Data error - received 0x%X, 0x%X\n", aIn[0], aIn[1]);
r = -1;
goto Done;
}
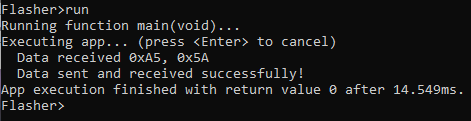
printf("Data received 0x%X, 0x%X\n", aIn[0], aIn[1]);
printf("Data sent and received successfully!\n");
r = 0;
Done:
TIF_UART_DeInit();
return r;
}A few things to note. SYS_ExecCommand("VTrefTmp=3300") tells the Flasher to assume a 3.3V reference voltage, so the output pins drive at the correct level without needing an external voltage on VTref. TIF_PIN_SetFunc() assigns UART TX and RX to specific pins on the 20-pin target connector. The Flasher supports UART, SPI, I2C, SWD, JTAG, and more through this same pin assignment API.
First, run it without any jumper connected and you’ll see the expected failure:
Now connect pin 7 (TX) to pin 9 (RX) on the Flasher’s target connector with a jumper wire to create a loopback:
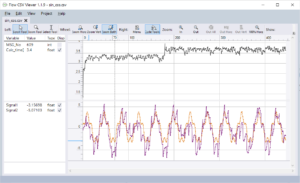
Still skeptical? Below is a scope trace I took showing that the UART transmitted the desired bytes!

This is a self-contained board-level communication test running entirely on the Flasher. In production, replace the loopback jumper with an actual target board. Program the firmware, send a command over UART, and verify the response. One station, one operation.
Why SEGGER Flasher SDK Code Is Safe on Production Hardware
Running custom apps on production equipment raises an obvious question: what happens when something goes wrong?
The SEGGER Flasher SDK includes a Sandbox sample that answers this directly. It deliberately dereferences an invalid pointer to show how the Flasher handles a misbehaving app:
int main(void) {
  U32 *p;
  U32 v;

  printf("Sandbox check\n");
  p = (void*) 0x5555;
  v = *p;
  return 0;
}Let’s see what happens when we test the Sandbox:
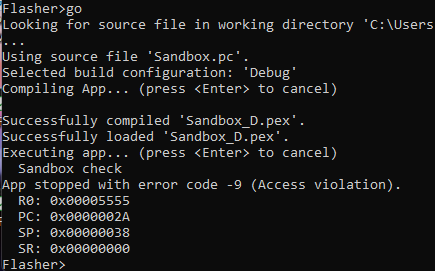
The S32 virtual CPU caught the invalid memory access, halted the app, dumped the register state, and returned control to the Flasher firmware. As a result, the Flasher itself is completely unaffected.
Importantly, this is pure software-enforced sandboxing. The S32 executor checks every memory access at runtime. Each app gets a dedicated address space of up to 64KB. Any attempt to read or write outside that space triggers an immediate fault. No hardware MPU required.
Notably, the total overhead for this entire virtualization layer (executor, loader, and API functions) is approximately 2.5KB of flash. Your apps run fast because the heavy lifting stays native. When your app calls TIF_UART_Init() or SYS_SetLED(), that call executes natively on the Flasher’s ARM Cortex-A9 at full speed. The virtual CPU only handles the orchestration logic. The 10–20x performance overhead of virtualization only applies to your app’s control flow, not to the actual I/O operations.
For production, the bottom line is straightforward: a buggy test app cannot brick your Flasher. The worst case is a halted app and an error code.
Beyond the SEGGER Flasher SDK: Introducing emApps
The virtual execution engine powering the SEGGER Flasher SDK isn’t locked inside SEGGER’s programmers. It’s available as a standalone product called emApps. SEGGER’s own J-Link and Flasher product lines have been running this same technology internally for years. The commercial release of emApps makes it available for any embedded device.
If you want to try it without owning a Flasher, SEGGER offers an emApps trial package with a desktop executor and pre-compiled sample apps:
app_run.exe samples/HelloWorld.pexSpecifically, it’s the same .pex binary, same output, running on your PC’s x86 instead of a Flasher’s Zynq 7000. You develop and debug on your desktop, then deploy the identical binary to production hardware.
Moreover, the value proposition extends well beyond production programming. If your device has 64KB of flash and you need post-deployment extensibility without modifying validated firmware, emApps gives you a framework to do it in roughly 2.5KB of overhead.
This positions emApps for devices that Docker and WebAssembly simply cannot reach: Cortex-M0 targets, resource-constrained IoT nodes, safety-critical systems where moving non-essential features into sandboxed apps can reduce certification scope (IEC 62304, DO-178C). It’s part of a broader shift in embedded systems trends toward extensible, software-defined hardware platforms.
| Approach | Minimum Footprint | Minimum RAM | OS Required |
|---|---|---|---|
| emApps | ~2.5KB | Dynamic per app | None |
| WASM Micro Runtime | 50–85KB | 128KB+ SRAM | None |
| Docker | ~256MB | ~256MB | Linux |
| MPU-based isolation | Varies | Varies | RTOS typical |
For more detail on the architecture, SEGGER’s blog post on embedded apps provides a good technical deep-dive.
What This Means for Your Workflow
Ultimately, the SEGGER Flasher SDK solves a specific, expensive problem: the gap between programming a board and knowing it works. By collapsing program, test, and calibration into a single station and a single app, you eliminate fixture changes, reduce cycle time and per-engineer overhead, and keep your test logic portable and updatable.
Furthermore, the underlying concept goes further. emApps represents a shift toward treating embedded devices as platforms rather than fixed-function endpoints. The same sandboxing, API-controlled access, and dynamic loading that make the Flasher SDK work can make any 64KB+ device extensible. Third-party ecosystems, field-updatable algorithms, customer-configurable behavior — all without touching validated firmware.
If you’re running a production line, take advantage of the Flasher SDK and run the samples on your own Flasher. The path from HelloWorld to a production test app is shorter than you think.
What station on your production line could you eliminate if your programmer could also test?
Want embedded engineering insights like this delivered to your inbox? Sign up for my Embedded Bytes newsletter to get the latest posts, insights, and hands-on tips delivered straight to your inbox.
Additional Resources
- SEGGER Flasher SDK product page
- SEGGER Flasher Compact product page
- SEGGER emApps product page
- SEGGER blog post: Embedded Apps technical deep-dive
Struggling to keep your development skills up to date or facing outdated processes that slow down your team, raise costs, and impact product quality?
Here are 4 ways I can help you:
- Embedded Software Academy: Enhance your skills, streamline your processes, and elevate your architecture. Join my academy for on-demand, hands-on workshops and cutting-edge development resources designed to transform your career and keep you ahead of the curve.
- Consulting Services: Get personalized, expert guidance to streamline your development processes, boost efficiency, and achieve your project goals faster. Partner with us to unlock your team's full potential and drive innovation, ensuring your projects success.
- Team Training and Development: Empower your team with the latest best practices in embedded software. Our expert-led training sessions will equip your team with the skills and knowledge to excel, innovate, and drive your projects to success.
- Customized Design Solutions: Get design and development assistance to enhance efficiency, ensure robust testing, and streamline your development pipeline, driving your projects success.
Take action today to upgrade your skills, optimize your team, and achieve success.