How to Configure Zephyr RTOS: A Practical Guide to West, Kconfig, proj.conf
Getting started with Zephyr RTOS can be frustrating, even if you’re experienced with RTOSes.
Yes, you can follow the Zephyr documentation to get started and blink an LED at super speed, but what happens when you want to go beyond a simple blinky?
Confusion. Chaos. Complexity!
Zephyr RTOS starts to look scary. Suddenly, you’re staring at a maze of new concepts:
- Device trees
- West
- Kconfig
- Drivers
- Subsystems
and the list goes on.
But here’s the good news: you don’t need to master everything at once.
If you start by understanding how west, Kconfig, and proj.conf work together, the rest of Zephyr begins to make sense.
In this post, we’ll break down these three tools, show how they fit into the build and configuration flow, and walk through practical examples using an NXP FRDM-MCXN947 board.
Along the way, we’ll also compare how Zephyr handles configuration versus FreeRTOS, so you can see why Zephyr’s approach is designed for scalability and long-term maintainability.
Understanding the Zephyr Build and Configuration Ecosystem
If you asked me for an example of a modern build system for embedded systems, I’d point you to Zephyr.
Zephyr’s build system gives you a lot of power. That power, though, can appear more complex than it really is.
There are three main pieces that you need to master:
- West – the project/workspace and build manager
- Kconfig – the configuration framework that enables and disables features
- proj.conf – your app-level overlay of the Kconfig settings
The easiest way to think about how the three work together is to a team working on a product.
West is the project manager. It sets up the workspace, brings all the right team members together (modules), and runs the main commands to build and deploy the product (build / flash / commands).
Kconfig is the team roster score. It defines who’s on the team and what each person is responsible for (which features, subsystems, and drivers are active)..
Finally, proj.conf is the specific project plan. It defines who from the team roster is needed on the project and the details for this exact product and board.
All three work together to help you build a Zephyr RTOS project.
Let’s take a look at each of these in detail.
West: The Modern Build System Manager
West is the tool that glues everything together at the heart of every Zephyr project.
If you’ve worked with FreeRTOS or other RTOSes before, you’re probably used to downloading a single codebase, dropping it into your IDE, and starting to hack away.
Zephyr takes a more modular, scalable approach and west is what makes that possible.
West is a meta-tool: it manages repositories, synchronizes modules, and handles builds.
Instead of you manually pulling drivers, libraries, and subsystems from different places, west fetches and organizes them for you. This is especially powerful when you’re working on platforms like the NXP FRDM-MCXN947 board, which pulls in board-specific code alongside the Zephyr kernel and modules.
You’ll typically use West for three main development tasks:
- Initializing a project using “west init” to set up your workspace (See Getting Started with Zephyr RTOS)
- Update and sync modules using “west update” to ensure your drivers, subsystems, and libraries are in the right place.
- Build and flash applications using “west build” which compiles your project, and “west flash” which pushes it to your hardware.
Many of these steps are available as GUI actions if you’re using NXP’s MCUXpresso for VS Code extension. For example, take a look at Projects section shown below in Figure 1:

Figure 1: NXP’s MCUXpresso for VS Code Project Window
As you can see, the extension simplifies working with west by providing buttons that perform the commonly used west actions! Under the hood, it’s still west doing the heavy lifting.
If you’re like me, you may find that you want to use both the extension and the command line. There are times where it’s good to either manually run the commands, so you don’t forget them, or if you want to run custom commands.
Within VS Code, you can still leverage the build environment and settings for the Zephyr workspace from a terminal. Any old terminal won’t do though because you won’t have the Zephyr workspace set up!
To get access to the Zephyr workspace in a terminal, right click on your project and select “Open in Integrated Terminal” as shown in Figure 2.

Figure 2: Opening a Zephyr Workspace in the VS Code Terminal
Once you’ve opened the terminal, you can run any west commands that you’d like. For example, I can build my blinky example using:
<a>west build -b frdm_mcxn947/mcxn947/cpu0</a>as shown below in Figure 3:

Figure 3: Building a Zephyr Blinky Example from an Integrated Terminal
If you’re wondering what else you can use west for, I’ve put together a west cheat sheet that can give you some ideas that you can find below:

Ultimately, think of West as Zephyr’s project manager: it keeps the source code organized, builds under control, and dependencies consistent. Without it, you’d spend more time wiring up your environment than actually writing firmware.
Kconfig: The System Wide Configurator
Kconfig is the configuration system that manages compile-time options for the kernel, subsystems, device drivers, and application settings.
It’s based on the same system originally used in the Linux kernel.
Kconfig plays a central role in Zephyr’s configuration system. It:
- Let’s developers select features, tune options, and manage dependencies at build time
- Enables configurable, modular, and scalable firmware projects
- Works hand-in-hand with tools like menuconfig, guiconfig, and prj.conf to simplify customization.
Let’s look at an example. In Figure 4, you’ll find a process overview of how Kconfig works:

Figure 4: How Kconfig works in Zephyr RTOS to configure a project
Kconfig works by layering configuration choices.
First, Zephyr’s Kconfig files define every possible option in the system.
Next, Your application’s prj.conf requests specific settings, like enabling a watchdog or turning on logging. The Kconfig system automatically resolves dependencies and generates a .config file that reflects all active choices.
Finally, those values get converted into autoconf.h as #define CONFIG_* macros that your code can directly use.
Kconfig translates high-level choices into concrete build-time settings your firmware can rely on.
Now, you might be wondering, “How do I go about figuring out what settings are available for the different modules, drivers, and sub-systems that I have in my system?”
This is where menuconfig and guiconfig come into play. They provide you with a direct interface to enable and disable settings through Kconfig and also just understand what options and settings are available to you.
Before you use either of these tools, you must first build your application. You can do this using NXP’s MCUXpresso for VS Code plug-in or by running the build command from the integrated terminal using west. For example, for a blinky application, you would use:
west build -b frdm_mcxn947/mcxn947/cpu0 zephyr/samples/basic/blinky
You can now use either menuconfig or guiconfig:
- Run menuconfig using the following command in the integrated terminal:
west build -t menuconfig- Run guiconfig by running the following command in the integrated terminal:
west build -t guiconfigBoth tools provide the same information as you can see below in Figure 5; it’s just a matter of preference for which one you use.

Figure 5: Zephr RTOS Kconfig tools menuconfig and guiconfig
If you don’t want to use the terminal commands, or, like me, you don’t want to remember them, you can use NXP’s MCUXpresso for VS Code extension. Right-click on your project and then go to Configure -> Open Kconfig GUI Configuration as shown in Figure 6.

Figure 6: Running Kconfig guiconfig from MCUXpresso
Now that you understand how west and Kconfig fit into the build system, let’s examine the last piece of the puzzle, proj.conf.
proj.conf: Application Specific Configuration
If Kconfig is the system-wide configurator, then proj.conf is where your application gets to say what it really needs.
Kconfig defines all the options and the defaults. proj.conf applies its settings on top of those defaults, giving proj.conf the final say.
You can find proj.conf in the root directory of your project as shown below in Figure 7.

Figure 7: prj.conf can be found in the root directory of your project
Let’s say that you want to enable the PWM module and logging through printk. You might enable those features by modifying prj.conf as shown in Figure 8.
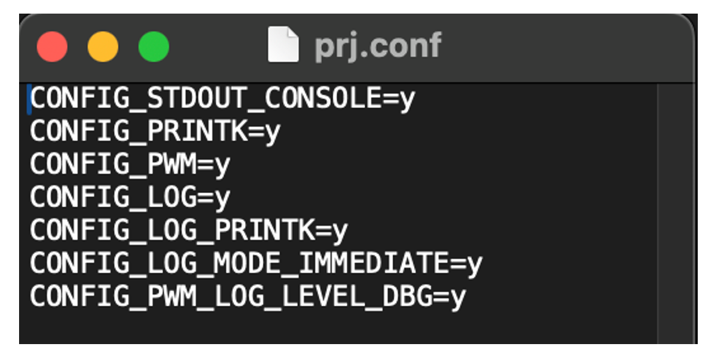
Figure 8: prj.conf enables and disables features at a project level
prj.conf is just a text file, so you can open it within VS Code and make necessary changes. You can use guiconfig or menuconfig to identify what options are available and their defaults.
Even if the default is enabled, you may decide to explicitly define it in prj.conf. That way it’s clear to teammates what the value is and in case the default values change with new releases.
You do need to be a little careful about what you enable and disable. If your setting conflicts with hard dependencies (for example, you try to disable something that another enabled feature requires), the Kconfig system will complain or re-enable the dependency to keep the build consistent.
Kconfig uses a dependency resolution mechanism. When you configure symbols (via prj.conf, menuconfig, etc.), Kconfig evaluates all depends on, select, and imply relationships to produce a consistent final configuration.
If you try to disable something that another option depends on, one of two things happens:
- If it’s a hard dependency (depends on), Kconfig simply makes your choice ineffective.
- If it’s a select or imply relationship, Kconfig automatically enables the required option to satisfy the dependency.
Zephyr vs FreeRTOS Configuration Approaches
If you’ve worked with FreeRTOS, you know that configuration usually comes down to editing a header file like FreeRTOSConfig.h.
Want to enable trace? You add a #define in the header. Need to tweak the scheduler tick rate? Another #define. Everything lives in a single config header, and you recompile.
This approach is simple, but it has limits. The more features you add, the messier that file becomes. And because it’s flat, it doesn’t capture relationships or dependencies between settings.
If you accidentally turn something off that another component needs, the compiler may not catch it until you’re deep into build errors. Have specific settings for an individual module? Now everything sees that configuration because it’s global.
Zephyr takes a very different approach. Instead of a monolithic config header, it uses the Kconfig system with overlays from proj.conf. For example, you’d modify proj.conf like this:
CONFIG_LOG=y

CONFIG_UART_CONSOLE=yIn FreeRTOS, you would modify FreeRTOSConfig.h, and manually add something like:
#define configUSE_UART_LOGGING 1That setting might tie into a driver you wrote, but there’s no central system ensuring the UART driver is present or that logging dependencies are satisfied.
The difference comes down to structure versus simplicity.
FreeRTOS uses a flat header file with no dependency resolution. Everything is manual, making it perfect for small, focused projects. It’s more difficult to scale though as projects become more complicated.
Zephyr uses a layered configuration. It captures relationships between features and enforces consistency, which pays off when your system grows beyond a blinky app and starts to include multiple subsystems.
Your Next Steps
At this point, you’ve seen how west, Kconfig, and proj.conf fit together to form the backbone of Zephyr’s configuration system.
You’ve also seen how this layered approach differs from FreeRTOS’s flat configuration model and why it scales better as projects grow more complex.
If you’re ready to put this into practice, here are three practical steps you can take today:
- Create a project with MCUXpresso for VS Code – Start a new Zephyr application on the FRDM-MCXN947 board using the MCUXpresso for VS Code extension. Use the GUI to explore west actions like build, flash, and update without memorizing commands.
- Experiment with Kconfig tools – Run west build -t menuconfig or west build -t guiconfig from the integrated terminal. Browse through the available options, then commit your key choices into proj.conf so they’re permanent and reproducible.
- Refine your proj.conf – Add or remove a few features in proj.conf (for example, enabling logging or UART). Then rebuild and flash the project to see how Zephyr’s configuration system enforces consistency.
By working through these steps, you’ll go from being overwhelmed by Zephyr’s many moving parts to feeling confident about controlling your project setup. Whether you stick with the command line or lean on the MCUXpresso extension, the important thing is that you now understand how the pieces fit together.
The next time you open a Zephyr project and see west.yml, Kconfig, and proj.conf, you won’t see chaos. You’ll see a system that gives you power, structure, and scalability.
In the next post, we’ll discuss Mastering Zephyr RTOS Device Tree and Overlays.
👉 Don’t miss the rest of this series. Sign up for my Embedded Bytes newsletter to get the latest posts, insights, and hands-on tips delivered straight to your inbox.
Additional Resources
- Blog – Introduction to the NXP MCX N FRDM Board
- Blog – Getting Started with Zephyr RTOS
- Free Training – Getting Started with MCUXpresso for Visual Studio Code
- Free Webinar – Getting Started with the MCUXpresso SDK for NXP MCUs
Struggling to keep your development skills up to date or facing outdated processes that slow down your team, raise costs, and impact product quality?
Here are 4 ways I can help you:
- Embedded Software Academy: Enhance your skills, streamline your processes, and elevate your architecture. Join my academy for on-demand, hands-on workshops and cutting-edge development resources designed to transform your career and keep you ahead of the curve.
- Consulting Services: Get personalized, expert guidance to streamline your development processes, boost efficiency, and achieve your project goals faster. Partner with us to unlock your team's full potential and drive innovation, ensuring your projects success.
- Team Training and Development: Empower your team with the latest best practices in embedded software. Our expert-led training sessions will equip your team with the skills and knowledge to excel, innovate, and drive your projects to success.
- Customized Design Solutions: Get design and development assistance to enhance efficiency, ensure robust testing, and streamline your development pipeline, driving your projects success.
Take action today to upgrade your skills, optimize your team, and achieve success.