Zephyr RTOS: Leveraging an Ecosystem of Drivers and Middleware
When most developers evaluate an RTOS, they start with the kernel.
Scheduling. Context switches. Mutexes. Semaphores.
Those things matter, but in real products, they’re rarely the bottleneck. The place where teams actually lose time is everything around the kernel: drivers, middleware, configuration, and integration.
This is where Zephyr RTOS quietly changes the game.
Zephyr is more than just a simple kernel. It’s an ecosystem that includes middleware, drivers, boards, configuration, and a toolbox of modern tools to help you easily scale your application.
Last time in Mastering Zephyr RTOSes Device Tree and Overlays, we looked at how to unlock the Devicetree to configure your hardware. With that understanding, you can leverage the real power of Zephyr RTOS, which is leveraging its ecosystem of middleware and drivers.
In this post, I’ll walk you through:
- Zephyr’s rich ecosystem of middleware
- Show how drivers are auto-initialized and configured using Devicetree and Kconfig
- Explain how middleware is enabled via prj.conf and used with minimal code
I’m going to show you how middleware and drivers work using NXP’s FRDM-MCXN947 development board. We’ll start with a simple example that enables the serial console so that you can command and query the system, including using your own custom commands.
By the end, you’ll realize how easy it is to unlock the Zephyr ecosystem and build firmware faster!
Let’s dig in!
The Zephyr RTOS Device Driver Model
At the heart of Zephyr RTOS lies a deceptively simple idea: applications should not care which driver is being used, only what capability it provides. The result is a device model that provides consistency for configuring and interacting with system drivers.
As many of you probably know, drivers are often responsible for configuring and providing features for subsystems like USARTs, SPI, I2C, timers, and every other peripheral known to man.
Figure 1 below shows the Zephyr driver model. Every device driver is wrapped in a device driver API that the application interacts with. The application doesn’t care about the underlying driver implementation. For example, the application doesn’t need to know if the serial driver it is interacting with is for an MCX N947 or an MCX W71.
Instead, the application uses generic subsystem API’s that interact with an instance of the device driver that knows which implementation to use based on the device tree, bindings, and KConfig settings.

Figure 1: The Zephyr RTOS Driver Model (Image Source: Zephyr Docs)
There are a lot of possible drivers that could be supported by Zephyr. In fact, you can even create your own, but that process is beyond the scope of our discussion today. What you’ll find is that all supported boards at least include drivers for:
- An Interrupt Controller
- Timer
- Serial Communication
- Entropy
These are the minimum number of drivers needed to get a Zephyr port up and running. An interrupt controller is tied into the kernel’s interrupt management subsystem. Timers are used by the kernel’s system clock and many hardware clock subsystems. Serial communication is needed for the kernel’s console subsystem. Entropy is needed to feed the random number generator subsystem.
If you look through the zephyr/driver folder, you’ll find all sorts of drivers. When you first explore a driver, you might be caught by surprise! For example, if you look at the serial drivers, you’ll find over 100 files! That seems super complex, but it’s far simpler than you might think.
Each driver consists of five key pieces:
- Driver API:Public interface exposed to applications and subsystems (e.g., gpio_pin_set_dt())
- Driver Implementation:SoC-specific logic tied to peripheral registers and HAL
- Devicetree Bindings:Describe hardware config and link it to the driver at build time
- Kconfig Entries:Enable or configure the driver in the build system
- Init Function (DEVICE_DT_DEFINE):Registers the driver during boot with priority, init level, and state
The first thing to recognize is that the public interface is not stored with the implementation. You can find the driver interfaces in zephyr/include/zephyr/drivers. For our example, you’ll see that there is a uart.h header file. This file contains all the public interfaces like:
- uart_callback_t
- uart_configure
- uart_tx
- uart_rx
- uart_drv_cmd
These are the interfaces that the application can use. They don’t define the driver implementation though. For that, you need to look in zephyr/drivers/serial. This folder has everything you need to provide the implementation. For example, for the MCUX, you’ll find files like:
- uart_mcux.c
- uart_mcux_lpuart.c
- uart_mcux_flexcomm.c
The MCUX parts have different types of serial interfaces, each of which has it’s own implementation file.
Next, you need configuration files. Hidden within the mass of files you’ll find that quite a few of them are KConfig files. Once again, we have configuration for the different serial peripherals like:
- Kconfig.mcux
- Kconfig.mcux_lpuart
- Kconfig.mcux_flexcomm
It’s beyond our scope today to really explore how these files work. However, the key concept is to realize that each driver presents itself to the application through a public API, with an implementation specific to the target, consisting of a C implementation and a Kconfig file.
You might be wondering at this point how the application knows that it should use a specific implementation. To do that, let’s discuss Devicetree bindings.
How Zephyr Devicetree Bindings Work
Devicetree bindings are the glue that connects hardware descriptions in our dts files to the driver code. They serve three purposes:
- Validation – They ensure Devicetree nodes have the required properties
- Documentation – They define what properties mean and their types
- Code generation – They enable macros to extract values at compile time
You can see the overview of how this process works below in Figure 2.

Figure 2 – Bindings are YAML files that tie the Devicetree definitions to the driver implementation.
The device tree defines what exists in hardware. The bindings define what’s allowed. Finally, the driver defines what to do with the hardware. Let’s look closer by continuing to examine the serial interface.
In our dts file for the MCX N947, dts/arm/nxp/nxp_mcxn94x_common.dtsi, you’ll find a definition for flexcomm0_lpuart0 like the following:
flexcomm0_lpuart0: lpuart@92000 {
      compatible = "nxp,lpuart";
      reg = <0x92000 0x1000>;
      clocks = <&syscon MCUX_FLEXCOMM0_CLK>;
      status = "disabled";
}; The compatible string is the key here. It links node flexcomm0_lpuart0 to the binding. The binding in this case is the nxp,lpuart.yaml file that can be found in dts/bindings/serial/
If you look inside nxp,lpuart.yaml, you’ll find the following:
compatible: "nxp,lpuart"

  include: [uart-controller.yaml, pinctrl-device.yaml]

  properties:
    reg:
      required: true

    nxp,loopback:
      type: boolean
description: Enable loopback mode on LPUART peripheral. The binding matches the node through the string “compatible: nxp,lpuart”. It also inherits common UART properties from uart-controller.yaml (such as current-speed, parity, hw-flow-control, etc.) via the include statements. There are also NXP-specific properties like nxp,loopback.
Finally, if you look at the driver code, located in drivers/serial/uart_mcux_lpuart.c, you notice statements like the following:
#define DT_DRV_COMPAT nxp_lpuart

  /* Extract properties from devicetree at compile time */
  .base = (LPUART_Type *) DT_INST_REG_ADDR(n),
  .baud_rate = DT_INST_PROP(n, current_speed),
  .loopback_en = DT_INST_PROP(n, nxp_loopback),
.parity = DT_INST_ENUM_IDX(n, parity), The DT_INST_* macros extract values from every devicetree node matching nxp,lpuart. At compile time, Zephyr generates a device instance for each enabled node.
While this whole process might seem overly complicated or confusing, it’s actually quite elegant and flexible. Instead of NXP having to completely define their entire driver model from scratch, they can inherit basic features from uart-controller.yaml and only define NXP-specific properties in their bindings.
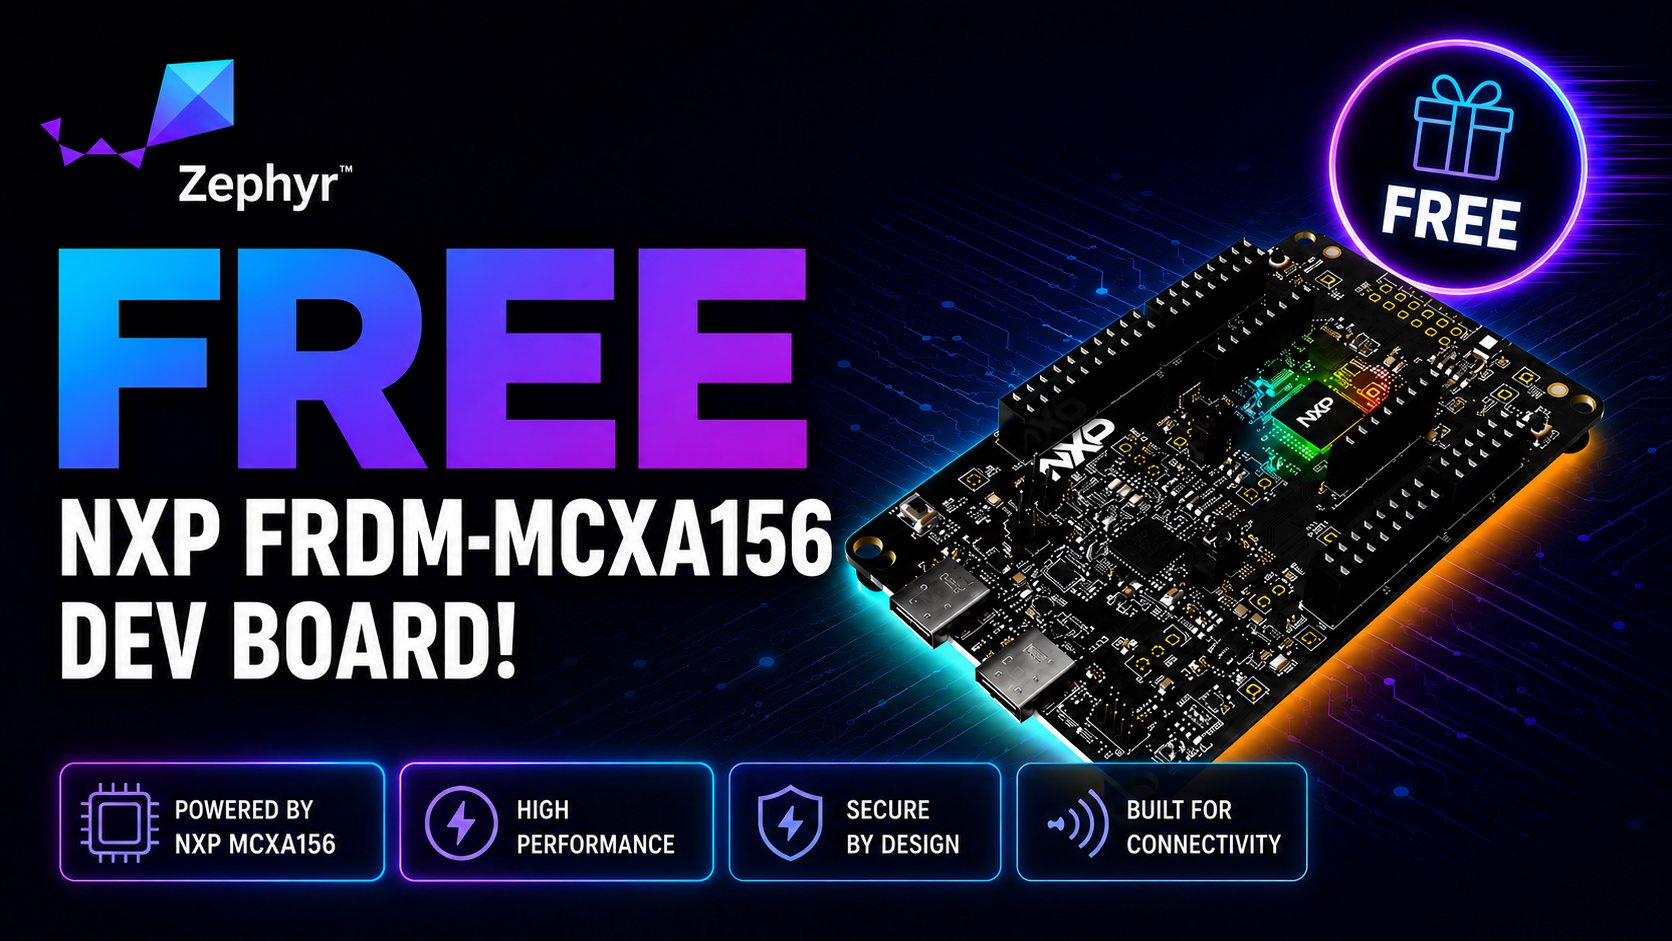
Free for Zephyr Developers
Get a Free NXP FRDM-MCXA156 Dev Board
NXP is offering 500 free FRDM-MCXA156 boards to embedded developers exploring Zephyr. Limited to 500 boards or available through December 31, 2026, whichever comes first.
Claim Your Free Board →Zephyr RTOS Built-In Middleware: What You Get Out of the Box
When you hear the word middleware, you probably think of something you need to find and integrate into your system.
A filesystem library pulled from somewhere.
A logging framework copied forward from the last project.
A networking stack that only works with one vendor’s HAL.
Middleware is rarely treated as a system capability. It’s treated as a building block that must be integrated, often through great pain and effort.
Zephyr takes a different stance.
So far, we’ve seen that drivers are intricately integrated into the fabric of Zephyr RTOS. That’s what really makes Zephyr more than just an RTOS and really makes it a platform.
Instead of treating middleware as optional add-ons, Zephyr ships with a broad set of subsystems that are already designed to coexist. All you need to do is configure them with Kconfig, prj.conf, and your overlay file, and you can use many of them right out of the box.
For example, if you take a peek in zephyr/subsys, you’ll find dozens of middleware subsystem there. These include middleware stacks such as shell, storage, tracing, zbus, sensing, logging, and device firmware updates, among others.
These modules are part of the operating system. Yes, some might be third-party libraries, but they’ve been fully integrated into Zephyr RTOS. There’s no need for you to do the work! For example, if you want to use the littleFS file system, it’s already integrated! All you need to do is enable it, and you’re off to the races.
Once enabled, it already understands:
- The driver model
- The device model
- The configuration system
- The initialization order
There’s no separate bring-up phase where middleware has to be carefully integrated and tested in a lengthy, time intensive process. There’s no need for you to get the library separately. Create abstractions for it. Integrate it into your application or build your automated unit tests. This has all been done for you!
Let’s look at some examples where we configure Zephyr’s serial console and enable the command shell while we’re at it!
Understanding Zephyr’s Serial Console Middleware
In a typical RTOS application, if you wanted to have a command shell and console, you’d have to search the internet for open-source solutions or write your own from scratch. Yet, every embedded system at some point in its development needs a serial shell! It lets you retrieve telemetry from your system and inject commands to configure and test it.
The serial console is just one example of how Zephyr can help you accelerate development. It’s very straightforward to enable, too! In fact, if you are using the FRDM board, you’ll discover that printk automatically maps to lpuart4! Take a look at Figure 3 below.

Figure 3 – The default serial mappings
I’ve highlighted in red some interesting Devicetree configurations. First, you can see that three middleware packages are mapped to flexcomm4_lpuart4:
- uart-mcumgr provides the UART transport so you can send MCUmgr commands from a host tool, like smpclient or mcumgr CLI, to the device over a serial connection.
- console is a lightweight terminal i/o tool.
- shell-uart is a fully interactive shell that includes the ability to create custom commands to interact with your device.
The overall process of using printk is pretty simple. You call the printk. The console subsystem is enabled in prj.conf by setting CONFIG_CONSOLE=y. The console subsystem connects to the UART console backend provided CONFIG_UART_CONSOLE=y. The backend console then communicates with the driver, which is selected by the Devicetree through the bindings we discussed earlier. The driver then connects to the UART Tx pin that sends data out through the hardware port.
Now you might be wondering how to configure and manage the shell’s features. As we discussed in previous posts, you can use Kconfig and your prj.conf file. For example, the prj.confg file below Is enabling these features and setting the behavior for the console:
# Required for printk on UART2 (console)
CONFIG_SERIAL=y
CONFIG_PRINTK=y
CONFIG_CONSOLE=y
CONFIG_UART_CONSOLE=y

# Required for Shell on UART4
CONFIG_SHELL=y
CONFIG_SHELL_BACKEND_SERIAL=y
CONFIG_DEVICE_SHELL=y
CONFIG_KERNEL_SHELL=y

# Optional: Adjust shell prompt text
CONFIG_SHELL_PROMPT_UART="shell>"

# Configure the shell:
CONFIG_SHELL_CMD_BUFF_SIZE=128
CONFIG_SHELL_HISTORY_BUFFER=512
CONFIG_SHELL_VT100_COLORS=n
CONFIG_SHELL_VT100_COMMANDS=n

# Configure the shell commands
CONFIG_SHELL_CMDS=y
CONFIG_THREAD_MONITOR=y
From the prj.conf file, you can see that I’ve actually split the printk messages and mapped them to UART2 while the shell is configured for UART4. This isn’t done through prj.conf. Instead, I’ve updated my app.overlay as follows:
/ {
    chosen {
	zephyr,console = &flexcomm2_lpuart2;
              zephyr,shell-uart = &flexcomm4_lpuart4;
	zephyr,uart-mcumgr = &flexcomm2_lpuart2;
    };

    leds {
        compatible = "gpio-leds";

        my_led: my_led {
            gpios = <&gpio1 22 GPIO_ACTIVE_LOW>;
            label = "My Custom LED";
        };
    };

    aliases {
        myled = &my_led;
    };
};
By separating them, I can see my printk message in one terminal and then have shell access through a separate one.
As you can see, the overall process for configuring middleware is straightforward.
- Update app.overlay to configure your Devicetree.
- Update prj.conf with the desired configuration settings. (Alternatively you can use Kconfig to configure these settings, I just like to be more explicit).
Your Next Steps
At this point, you should have a better feel for Zephyr’s ecosystem of drivers and middleware. Zephyr supports a wide range and I would encourage you to explore the driver system and middleware further.
There are a few steps I’d recommend you take using the MCX N947:
- Browse the Zephyr repo and trace a driver of your choice. Explore where the public API’s are located and what they are. Understand the bindings.
- Replicate what we’ve done in this post. Try to modify an example project like blinky so that you’ve remapped your serial outputs and shell.
- Pick a peripheral or middleware and explore how it is configured and get it up and running.
When you first get started with drivers and middleware in Zephyr, it can seem overwhelming. The truth is that it’s far less complex than you might think. Give it a try and see how easy it is to work with drivers and middleware.
Additional Resources
- Blog – Introduction to the NXP MCX N FRDM Board
- Blog – Getting Started with Zephyr RTOS
- Blog – How to Configure Zephyr RTOS: A Practical Guide to West, Kconfig, proj.conf
- Blog – FreeRTOS to Zephyr Migration: A Step-by-Step Guide for Embedded Developers
- Blog – Mastering the Zephyr RTOS Devicetree and Overlays
- Free Training – Getting Started with MCUXpresso for Visual Studio Code
- Free Webinar – Getting Started with the MCUXpresso SDK for NXP MCUs
- Free Webinar – Migrating from FreeRTOS to Zephyr RTOS
- Free Webinar – Mastering Zephyr Devicetree
👉 Don’t miss the rest of this series. Sign up for my Embedded Bytes newsletter to get the latest posts, insights, and hands-on tips delivered straight to your inbox.
Struggling to keep your development skills up to date or facing outdated processes that slow down your team, raise costs, and impact product quality?
Here are 4 ways I can help you:
- Embedded Software Academy: Enhance your skills, streamline your processes, and elevate your architecture. Join my academy for on-demand, hands-on workshops and cutting-edge development resources designed to transform your career and keep you ahead of the curve.
- Consulting Services: Get personalized, expert guidance to streamline your development processes, boost efficiency, and achieve your project goals faster. Partner with us to unlock your team's full potential and drive innovation, ensuring your projects success.
- Team Training and Development: Empower your team with the latest best practices in embedded software. Our expert-led training sessions will equip your team with the skills and knowledge to excel, innovate, and drive your projects to success.
- Customized Design Solutions: Get design and development assistance to enhance efficiency, ensure robust testing, and streamline your development pipeline, driving your projects success.
Take action today to upgrade your skills, optimize your team, and achieve success.